The Big Picture
OmniOutliner is an application designed to organize and display information in logical and attractive formats. This is accomplished by creating and editing OmniOutliner documents, called “outlines.”
Omni Automation scripts interact with documents through three interfaces:
- The Outline is the framework of the document and contains Columns as one of its elements. Columns are created and moved using the Outline object. In addition, the outline object is referenced when creating new named styles.
- Items are the individual rows of the outline organized in a hierarchy. All items are descendants of the invisible rootItem of the outline, which also is referenced when adding items to an outline.
- Editors are used to alter the way the outline is displayed and viewed. When text formatting is applied to outline items, you use an editor to do it. When you want a script to select items, focus items, or hide columns, an editor is manipulated to accomplish the task.
The Outline lies at the heart of everything you do in OmniOutliner. It’s where you compose and arrange content, it reflects the text formatting styles applied to the Outline’s data, and it is built on a hierarchy of rows that gives exactly the structure you want for your data.
From a scripting perspective, it is useful to organize the Omni Automation scripting support in OmniOutliner into two categories, Structural and Stylistic, with Structural concerning how outlines work, and Stylistic concerning how outlines look. Let’s focus on the structural nature of an outline first.
The Structure on an Outline
At the core of an outline is its data. This data is organized as a stack of individual rows of data. To assign significance and relevance to the data, the rows are indented to indicate their relationship to other rows of data. For example, a row may be indented to indicate that it is a “child” of the row above it, which can be thought of as its “parent.”
Nomenclature reflecting common human relationships are used in the scripting implementation to identify row data in relational terms, such as: parent, child, descendants, ancestors, and siblings, are commonly used when manipulation an outline’s data with scripts.
NOTE: the term “rows” is not used in OmniOutliner scripts. The generic term “item” is used instead. Every row of an outline is an item. More on this in the Items section of this website.
Just as rows describe how your content is oriented horizontally in the outline, Columns describe how it is grouped vertically.
By default, OmniOutliner documents have three columns:
- Status - a narrow column of checkboxes
- Topic - The outline column of the document containing the content
- Notes - A column of descriptions for each row (optionally the notes column (pane) can be hidden and the individual item notes be displayed inline beneath their corresponding item topics)
The default column created for a new document is the Topic column, which contains content in rich text format by default.
The Topic column is also the only column in the outline that can organize its rows (items) hierarchically; and when organization in the Topic column changes, content in additional columns changes accordingly to match the changes to the rows in the Topic column.
Scripting Structure
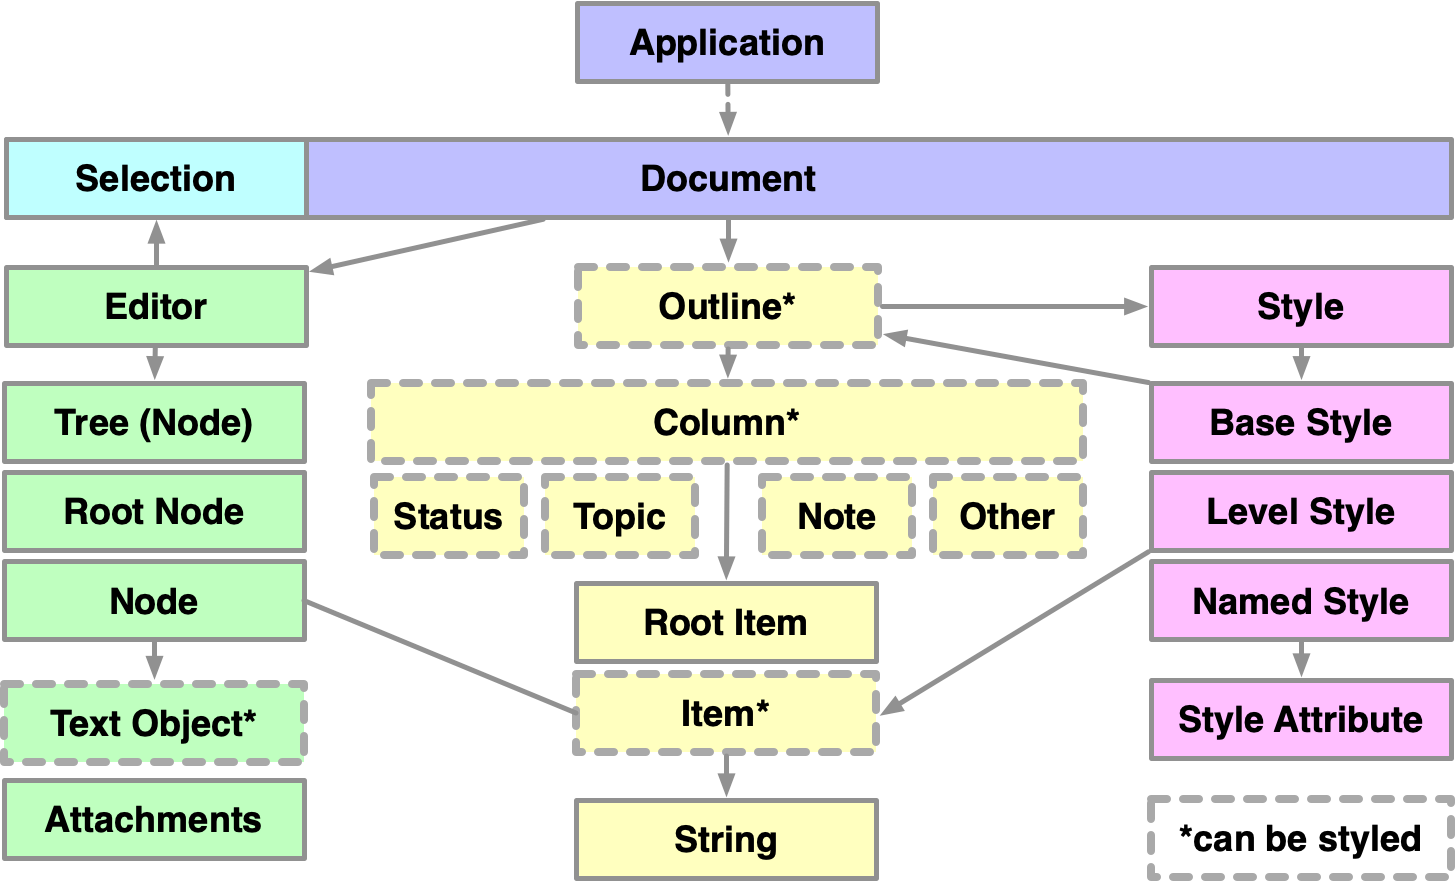
The following illustration indicates the basic scripting structure of an OmniOutliner document:

Document Structure
The following illustration represents the OmniOutliner document structure. NOTE: The notes column is not visible as a column, but its contents are instead displayed in a pane at the bottom of the window, or inline below each owner item (row).

The Visual Outline
Styles are essential components of an outline. How the information contained in the outline is displayed determines how well it is received and absorbed. The visual control of the outline and its contents is accomplished through the use of styles.
A Style is a collection of Style.Attributes each representing a visual quality of an element, such as text color and size, column background color, paragraph spacing, text alignment, and so on.
There are three types of styles:
- Base Style is the default style of the outline document. If no Base Style values are specified by the user, built-in default values for each of the style attributes is used instead. Base Style attributes are used unless an element has another style assigned to it.
- Level Styles exist for each “level” or row indentation of the outline, with Level 1 being the style for the top-level of outline rows. The Level 2 style would be automatically applied to the first row indentation, and so on. If you do not specify attributes and values for the level styles, the base style is used instead.
- Named Styles are user-created and contain whatever style attributes you wish to include. For example, you can create a Named Style for just setting the color of a text object to Red.
NOTE: Instances of the Column, Item (row), and Text (object) classes have a style property that can be used to control how they appear and how their content is displayed.
Omni Automation scripts can create and apply styles. You’ll find them very useful for quickly applying a specific design or “look” to your outline documents!
Coming Up
Each of the areas of the “Big Picture” are documented on this website in great detail, and include many code examples to jump-start your use of Omni Automation with OmniOutliner. Go explore!
(🔰2) For beginners, we suggest continuing with the step-by-step hands-on tutorials for macOS and on iOS/iPadOS