Plug-Ins
An outstanding feature of Omni Automation is its mechanism for integrating scripts with applications through the use of user-created and deployed plug-ins.
An Omni Automation plug-in is a single-file script or script bundle that exposes script functionality contextually through the host Omni application’s “Automation” and “Share” menus.
With a little bit of effort, you can create, deploy, and share your own plug-ins to add-to and automate the abilities of OmniOutliner and the other Omni applications.
As an example, in this section you’ll learn how to create and install a plug-in that checks or unchecks the selected rows in an OmniOutliner document.
Editor Application
While the built-in automation console in OmniOutliner is useful for writing and testing short script snippets, it is not designed to replace a full-featured editor application. To write Omni Automation plug-ins, you’ll need to use a text editing application, or one of the 3rd-party JavaScript editor applications found on the Mac App Store.
For the purposes of documentation, this section will contain illustrations that feature the use of the BBEdit application for macOS from Bare Bones Software. The basic application may be used without purchase, or you may choose to upgrade to a more featured version at any time.
Mention of third-party websites and products is for informational purposes only and constitutes neither an endorsement nor a recommendation. OMNI-AUTOMATION.COM assumes no responsibility with regard to the selection, performance or use of information or products found at third-party websites. OMNI-AUTOMATION.COM provides this only as a convenience to our users. OMNI-AUTOMATION.COM has not tested the information found on these sites and makes no representations regarding its accuracy or reliability. There are risks inherent in the use of any information or products found on the Internet, and OMNI-AUTOMATION.COM assumes no responsibility in this regard. Please understand that a third-party site is independent from OMNI-AUTOMATION.COM and that OMNI-AUTOMATION.COM has no control over the content on that website. Please contact the vendor for additional information.
The Plug-In Template
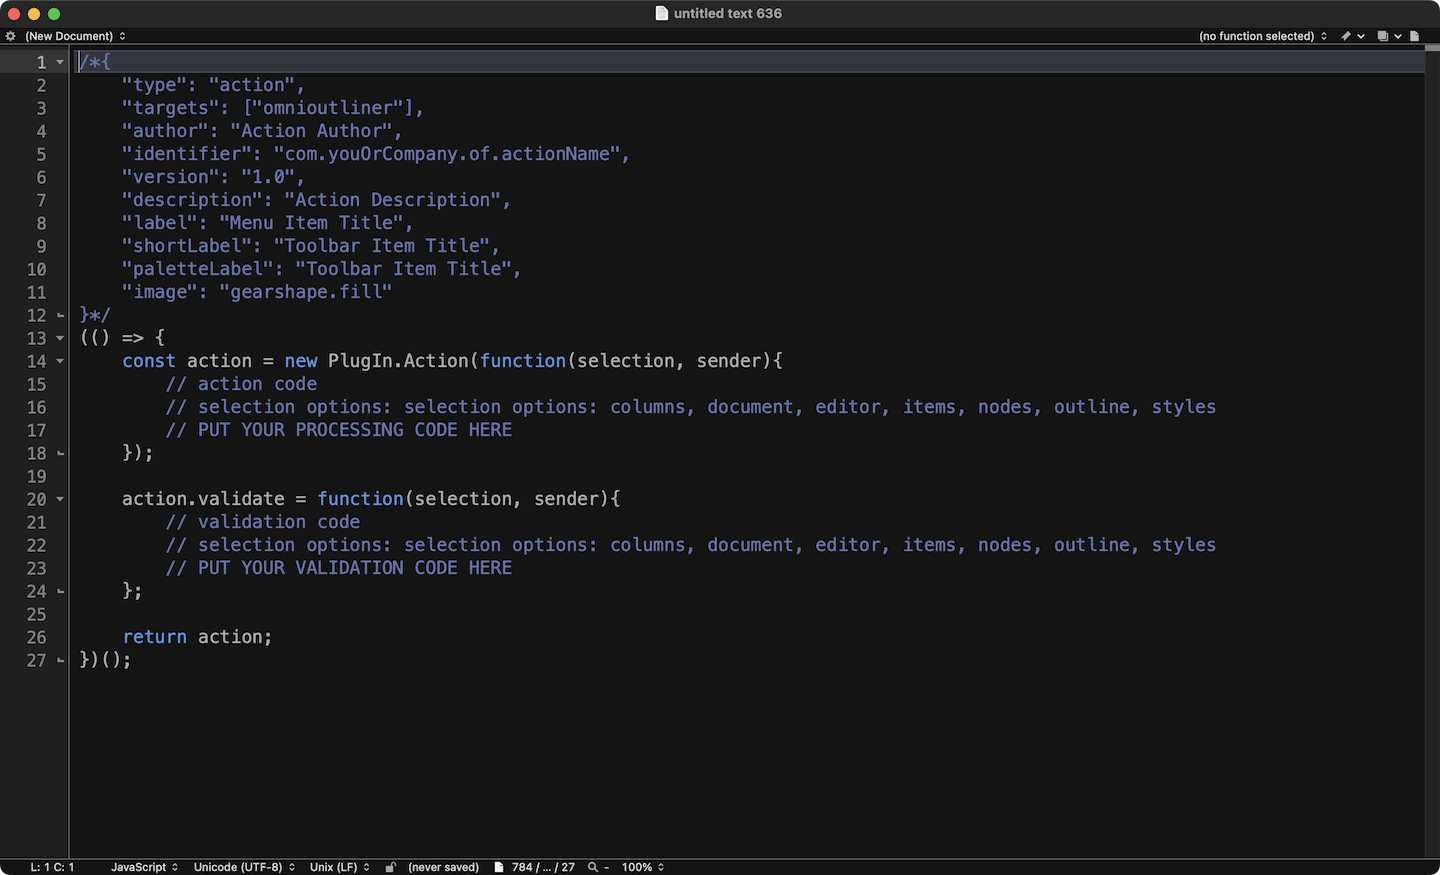
The source text of Omni Automation plug-ins is divided into two sections:
- Plug-In Metadata Properties (lines 1-12 below)
- Plug-In Function Code (lines 13-27 below)
Basic OmniOutliner Plug-In Template
/*{"type": "action","targets": ["omnioutliner"],"author": "Action Author","identifier": "com.youOrCompany.oo.actionName","version": "1.0","description": "Action Description","label": "Menu Item Title","shortLabel": "Toolbar Item Title","paletteLabel": "Toolbar Item Title","image": "gearshape.fill"}*/(() => {const action = new PlugIn.Action(function(selection, sender){// action code// selection options: columns, document, editor, items, nodes, outline, styles// PUT YOUR PROCESSING CODE HERE});action.validate = function(selection, sender){// validation code// selection options: columns, document, editor, items, nodes, outline, styles// PUT YOUR VALIDATION CODE HERE};return action;})();
| DO THIS ► | Open the template in a new document in an editor application. You may either |
(see below) The plug-in template opened in the BBEdit application:

Next, we’ll edit the plug-in’s metadata record.
The Plug-In Metadata Properties
A plug-in’s metadata properties define how a plug-in is integrated by the host Omni application. Here is an explanation of each metadata property:
Plug-In Metadata
/*{"type": "action","targets": ["omnioutliner"],"author": "Otto Automator","identifier": "com.omni-automation.oo.check-uncheck-selected-rows","version": "1.0","description": "This plug-in will check or uncheck the status boxes of the selected outline items.","label": "Check/Uncheck Selected Rows","shortLabel": "Check|Uncheck Rows","paletteLabel": "Check|Uncheck Rows","image": "checkmark.square"}*/
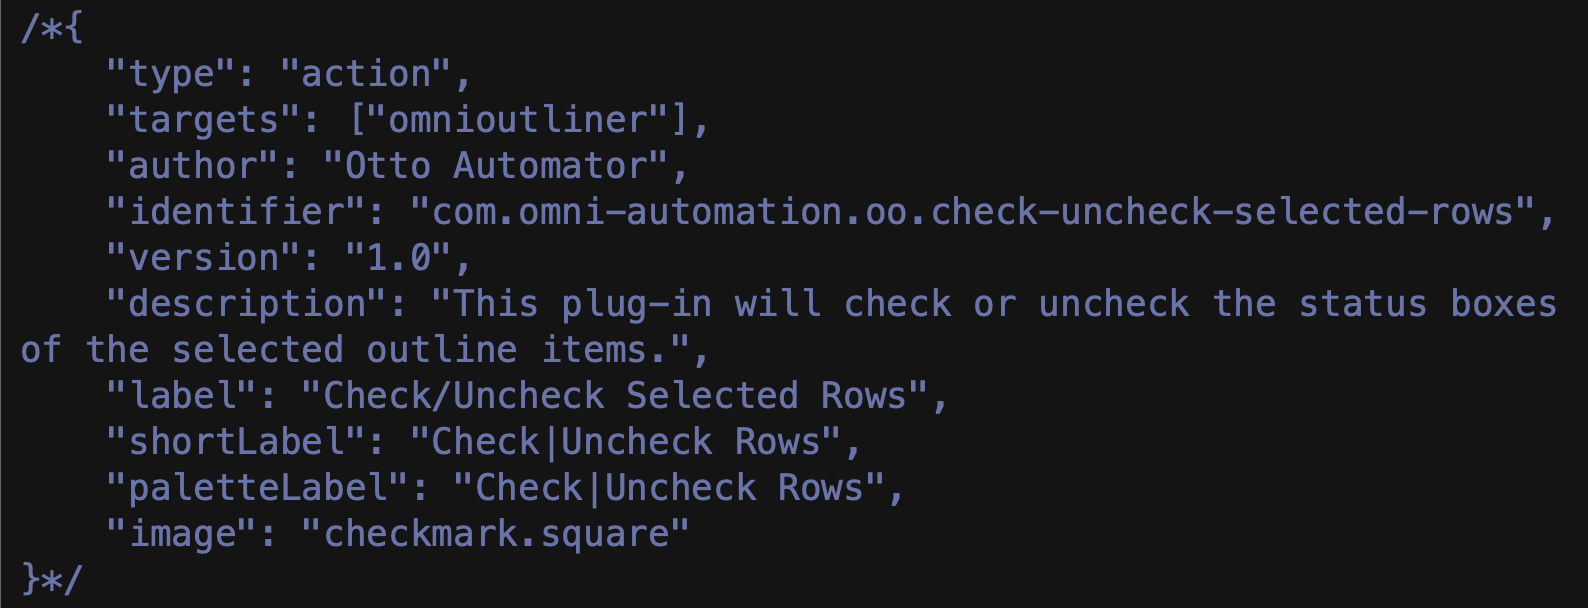
1-10 The plug-in metadata record (key/values) determine which Omni application(s) host the plug-in; what should be displayed as the plug-in menu item in the OmniOutliner Automation menu or Sharing menu; and the author and identifier of the plug-in.
2 The plug-in type, which in this example is an "action". If the plug-in was to be used as a library, this value would be: "library"
3 The plug-in targets property is an array of the lowercase names of the Omni applications in which this plug-in should be made available.
4 The author property is the name of the user, developer, or company who created the plug-in.
5 The value of the identifier property is a unique text string that is used by OmniOutliner to identify and integrate the plug-in. A general format to follow is: com.YourNameOrYourCompanyName.oo.nameOfAction (“oo” is for OmniOutliner) TIP: Avoid using spaces and special characters in the identifier.
6 The version property is expressed as a numeric string and is important to update as you deploy your plug-in. OmniOutliner compares versions when you install and updated version, and will automatically prompt for replacement.
7 The value of the description property is a short text string displayed to users in the OmniOutliner Plug-In Management window.
8 The value of the label property is the text for the plug-in’s menu item displayed in the Automation and Share menus.
9 The value of the shortLabel property is used to display on toolbar buttons.
10 The value of the paletteLabel property is used to display on toolbar assignment dialog.
11 The value of the image property is the name of the SF Symbol character to be used as the icon for the plug-in.
| DO THIS ► | Keeping in mind that our plug-in example will select/deselect the checkboxes of the selected outline items, in the editor application, edit the metadata header to include your information: |

The Plug-In Validation Function
Optionally, plug-ins can be designed to be only be available when specific conditions exist within the application or the app’s selected objects.
For example, our example plug-in for checking/unchecking selected rows should only be enabled in the Automation or Sharing menus when one or more rows are selected in the application interface.
Your code for performing the conditional checks is placed within the validation function in the template (lines 18-22 in the template)
Validation Function
action.validate = function(selection, sender){// validation code// selection options: columns, document, editor, items, nodes, outline, styles// PUT YOUR VALIDATION CODE HERE};
To assist you in validating the plug-in, two items are automatically passed into the function:
The selection object that has a value that is an array of objects currently selected in the application interface: columns, document, editor, items, nodes, outline, or styles
The sender object that has a value indicating the mechanism used to trigger the execution of the plug-in. (Menu Item, Toolbar Button, or null if a remote script)
NOTE: In OmniOutliner the document, editor, and outline selection objects reference the document, editor, and outline of the currently selected columns, items, or nodes.
Since a validation function must return a boolean value (true or false) we can use the passed-in selection object to determine if one or more rows are selected in OmniOutliner, and return the appropriate corresponding boolean value.
If the validation function returns a value of false, the plug-in’s menu item will be disabled in the Automation Menu and will not appear on the Sharing Menu.
To determine whether one or more rows are currently selected, we return the value of a script statement that counts the number of rows returned by the nodes property of the selection object and compares it to zero (none):
The Validation Statement (true|false)
return (selection.nodes.length > 0)
If one or more rows are selected in the application interface, this statement will return a value of true, otherwise it will return a value of false.
| DO THIS ► | Edit the plug-in template’s validation function (removing the existing comments) to contain the script statement: |

The Plug-In Action Function
The plug-in action function performs the work of the plug-in, which in the case of this example plug-in is checking or unchecking the selected rows in the application interface.
The Action Function
const action = new PlugIn.Action(function(selection, sender){// action code// selection options: columns, document, editor, items, nodes, outline, styles// PUT YOUR PROCESSING CODE HERE});
As with the validation function, the action function also receives the selection and sender objects as input to the function. (line 01 above)
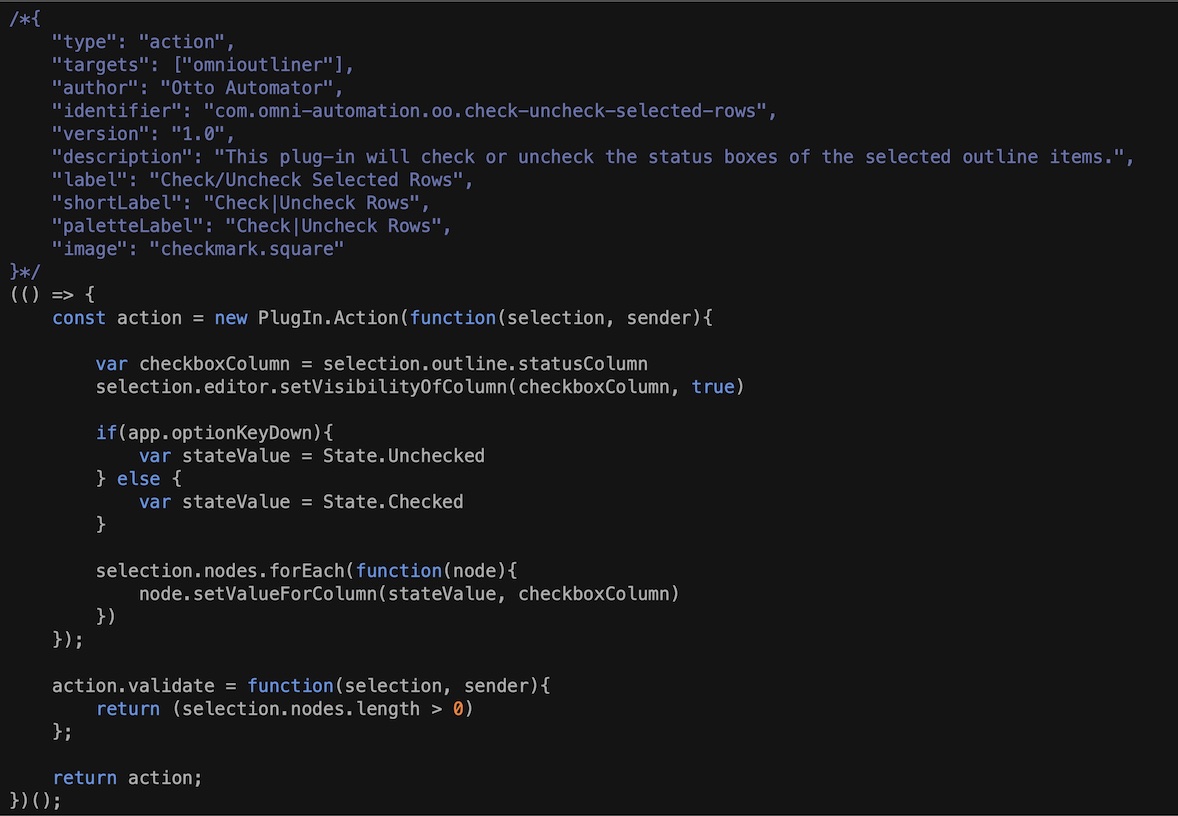
The plug-in’s function code (below) incorporates the selection object and some of its components (outline, editor, nodes) to iterate the selected rows (nodes) and check or uncheck their corresponding status checkboxes:
Check/Uncheck Selected Rows
var checkboxColumn = selection.outline.statusColumnselection.editor.setVisibilityOfColumn(checkboxColumn, true)if(app.optionKeyDown){var stateValue = State.Unchecked} else {var stateValue = State.Checked}selection.nodes.forEach(function(node){node.setValueForColumn(stateValue, checkboxColumn)})
01—02 These script statements ensure that the status column is visible in the document. Note the use of the selection object and its outline and editor components to reference the statusColumn property of the outline document, and making it visible using the setVisibilityOfColumn() function we used earlier in the tutorial.
04-08 Plug-ins have the ability to sense when the Option, Shift, or Control keys remain pressed during their selection from the Automation Menu or Toolbar buttons. The optionKeyDown property of the application object (app) returns a boolean value of true or false that is used to determine which State property is to be applied to the selected rows: State.Checked or State.Unchecked In this example, holding down the Option key during plug-in selection will uncheck the checkboxes of the selected rows.
10-12 The forEach() function is used in conjunction with the nodes component of the selection object to iterate the selected rows and set the value of their status checkboxes to the value previously stored in the variable: stateValue
| DO THIS ► | Edit the plug-in template’s action function (removing the existing comments) to contain the script statements: |

Completed Plug-In
/*{"type": "action","targets": ["omnioutliner"],"author": "Otto Automator","identifier": "com.omni-automation.oo.check-uncheck-selected-rows","version": "1.0","description": "This plug-in will check or uncheck the status boxes of the selected outline items.","label": "Check/Uncheck Selected Rows","shortLabel": "Check|Uncheck Rows","paletteLabel": "Check|Uncheck Rows","image": "checkmark.square"}*/(() => {const action = new PlugIn.Action(function(selection, sender){var checkboxColumn = selection.outline.statusColumnselection.editor.setVisibilityOfColumn(checkboxColumn, true)if(app.optionKeyDown){var stateValue = State.Unchecked} else {var stateValue = State.Checked}selection.nodes.forEach(function(node){node.setValueForColumn(stateValue, checkboxColumn)})});action.validate = function(selection, sender){return (selection.nodes.length > 0)};return action;})();
Save the Plug-In File
Save the plug-in file to disk using a file extension of: omnioutlinerjs
A standard naming convention for plug-ins follows this format:
(initials of Omni application)-(hyphenated-plug-in-name).omnioutlinerjs
oo-check-uncheck-selected-rows.omnioutlinerjs
Installing the Plug-In
Now that the plug-in has been created, edited, and saved to file, you’re ready to install the plug-in in OmniFocus.
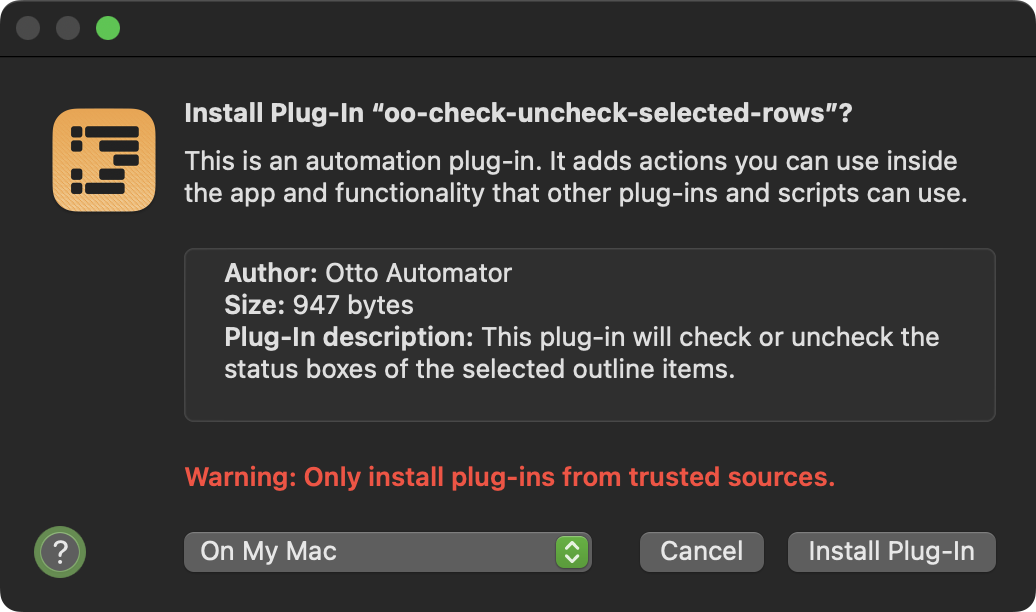
| DO THIS ► | Locate and select the plug-in file in the Finder, and then open it by typing Command-O (⌘O) or double-clicking it. The following installation dialog will appear: |

| DO THIS ► | The popup menu at the lower left provides the option to install the plug-in locally on the computer, in the OmniOutliner iCloud folder, or in another location designated by you. Leave the setting as “On My Mac” and click the “Install Plug-In” button. |
Once installed, the plug-in will be available from OmniOutliner’s Automation Menu. Select some rows in the outline document and give it a try!
Related Links
- The OmniOutliner plug-in collection contains example plug-ins. In addition, detailed documentation regarding the creation of plug-ins is located in the Plug-In & Libraries Section of this website.
- Detailed documentation regarding the use of the Console, is found in the Console Section of this website.
- The Omni Automation Plug-In Template Generator for OmniOutliner can be used to quickly generate new plug-in files.
- OmniOutliner voice commands video carousel and commands collection.
What’s Next?
In the next section we’ll review what you’ve learned in this tutorial.