
OmniGraffle & Workflow: Select-Edit-Add Photo
Here’s a simple but effective example of how well Omni Automation and the Workflow app on iOS work together. An OmniGraffle action triggers the execution of an existing workflow that allows the user to choose, edit, and size an image that is then added to the current OmniGraffle canvas.
IMPORTANT: The OmniGraffle app and the Workflow app must both be active and showing, by using either the split-view or slide-over iOS multitasking mode.
The Workflow
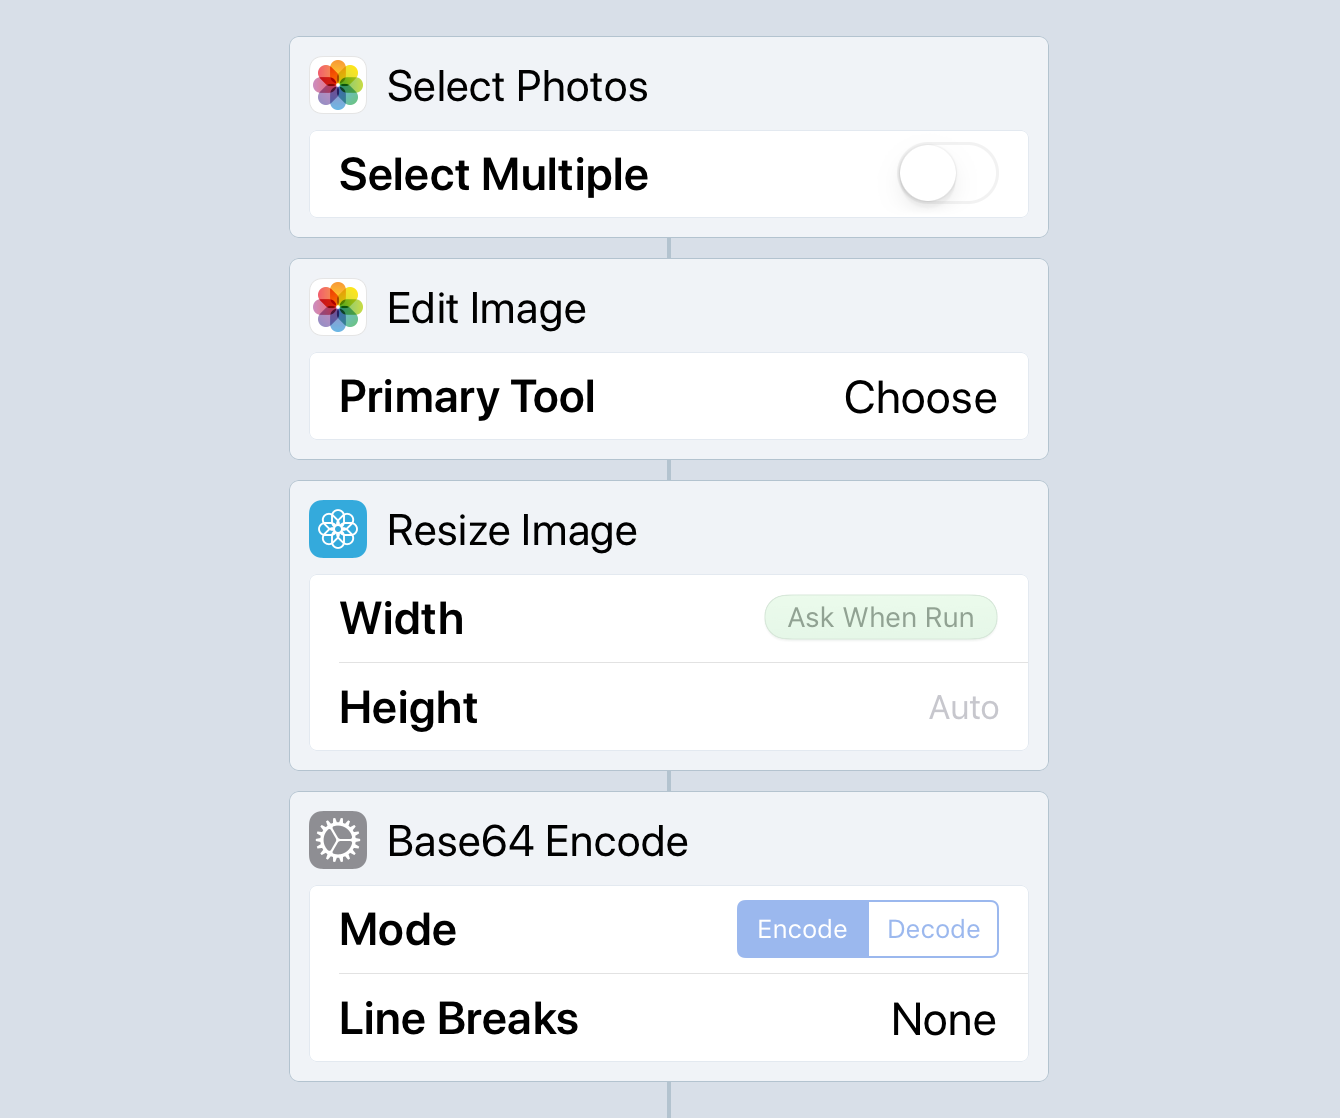
The workflow contains a series Workflow actions that prompt the user to choose and image and presents it for editing. Once the user-edits of the image are completed, the workflow will prompt for the width dimension to use for the image. Once the width is supplied, the workflow converts the created image into a base64 data string that is returned to the OmniGraffle action that triggered the running of the workflow.
This workflow is available for download.
The OmniGraffle Action
This is the Omni Automation action for OmniGraffle that will performing the following tasks:
- Create a Workflow URL for triggering the execution of the related installed workflow file. (Information about the Workflow URL schema is available here)
- Execute the Workflow URL.
- Wait for the workflow completion and then use the returned base64 image data to add the chosen image to the current OmniGraffle canvas.
And here’s the action code:
| Select-Edit-Add Photo Action | ||
| 01 | /*{ | |
| 02 | "type": "action", | |
| 03 | "targets": ["omnigraffle"], | |
| 04 | "author": "Otto Automator", | |
| 05 | "description": "Runs an iOS workflow for choosing and editing an image that is added t0 the current canvas.", | |
| 06 | "label": "Select-Edit-Add Photo", | |
| 07 | "paletteLabel": "Add Edited Photo" | |
| 08 | }*/ | |
| 09 | var _ = function(){ | |
| 10 | var action = new PlugIn.Action(function(selection, sender){ | |
| 11 | // action code | |
| 12 | // selection options: canvas, document, graphics, lines, solids, view | |
| 13 | workflowName = encodeURIComponent("Select-Edit-Add Photo into OmniGraffle") | |
| 14 | urlStr = "workflow://run-workflow?name=" + workflowName | |
| 15 | URL.fromString(urlStr).call(function(reply){ | |
| 16 | imageData = Data.fromBase64(reply) | |
| 17 | cnvs = document.windows[0].selection.canvas | |
| 18 | solid = cnvs.newShape() | |
| 19 | solid.strokeThickness = 0 | |
| 20 | solid.shadowColor = null | |
| 21 | solid.fillColor = null | |
| 22 | solid.image = addImage(imageData) | |
| 23 | newGeometry = solid.geometry | |
| 24 | newGeometry.size = solid.image.originalSize | |
| 25 | solid.imageSizing = ImageSizing.Stretched | |
| 26 | solid.geometry = newGeometry | |
| 27 | }) | |
| 28 | }); | |
| 29 | ||
| 30 | action.validate = function(selection, sender){ | |
| 31 | // validation code | |
| 32 | // selection options: canvas, document, graphics, lines, solids, view | |
| 33 | return true | |
| 34 | }; | |
| 35 | ||
| 36 | return action; | |
| 37 | }(); | |
01-08 The metadata for the action file.
30-34 The validation function determines whether or not to enable the action in the Automation menu. The action is set to always return true, and so will aways be selectable from the Automation menu.
09-28 The main function for the action is performed if the validation routined has a positive result.
13 Percent-encode the name of the installed Workflow file to run. In this example, the workflow file is named: “Select-Edit-Add Photo into OmniGraffle”
14 Create the url string for the Workflow app by concatenating the encoded data to the workflow url schema. More information about Workflow URLs is available here.
15-27 Use the fromString() method of the URL class to convert the url string into a URL object, and then use the call() method to execute the url, triggering Workflow and waiting for the response.
16 Use the fromBase64() method of the Data class to convert the returned base64 string into a Data object.
17-21 Create a new empty shape on the current canvas.
22 Use the addImage() method of the Portfolio class to insert the image data into the created shape.
23-26 Resize the created shape to fit the actual dimensions of the added image.
This webpage is in the process of being developed. Any content may change and may not be accurate or complete at this time.
DISCLAIMER