
Exporting JSON Data
The next step in creating a dynamically generated organization chart is to transfer the generated JSON from the FileMaker database to the OmniGraffle document. This is accomplished by creating and running another FileMaker script that encodes and inserts the JSON into an Omni Automation script that writes the data into the OmniGraffle document.
Here is the script:
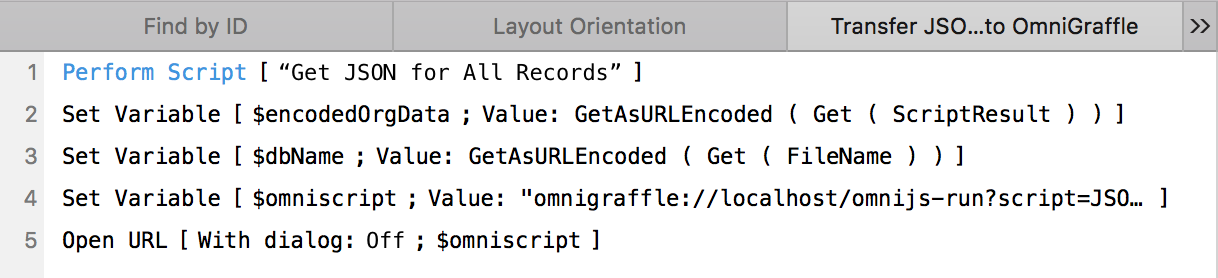
1 Perform the FileMaker script for generating JSON for the iterated set of database records. If you remember from the previous page, the resulting JSON is returned by the script when it has completed.
2 Instantiate a new variable named $encodedOrgData that uses the FileMaker GetAsURLEncoded function to percent encode the JSON and store the result in the created variable.
3 Instantiate a new variable named $dbName that uses the FileMaker GetAsURLEncoded function to percent encode the database file name and store the result in the created variable.
4 Instantiate a new variable named $omniscript that contains a percent encoded version of the Omni Automation script shown later on this page.
4 Execute the Omni Automation script by opening the script URL.
As shown by the illustration below, in the FileMaker script statement that creates the $omniscript variable that contains the encoded Omni Automation script (FileMaker script line 4 above), the placeholders DBTRANSFERDATA (below: script line 1) and DBFILENAME (below: script line 2) are replaced with the created FileMaker variables $encodedOrgData and $dbName respectively.
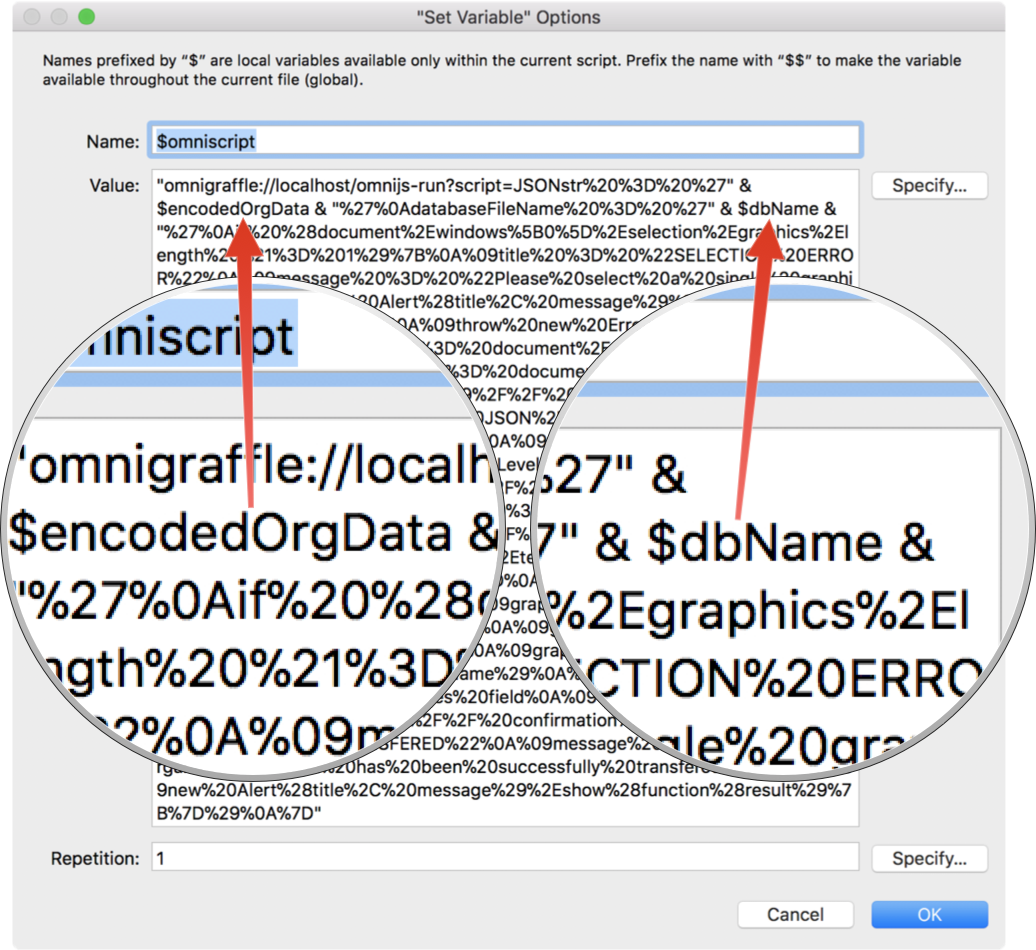
When the encoded Omni Automation script URL is executed, it will include the JSON data extracted from the database.
The Tagging Script
The executed Omni Automation script performs two tasks with the current OmniGraffle document:
- Writes the decoded JSON data into the notes field for the currently selected canvas.
- Assigns metadata keys and values for the top-level person (database record 1) to the currently selected solid graphic.
The following is a line-by-line explanation of the Omni Automation script:
1 In the encoded version of this script, the placeholder DBTRANSFERDATA is replaced with the percent encoded JSON database data. When the script URL is processed by OmniGraffle, it is decoded and the script variable JSONstr will be assigned the transfered JSON.
2 The script variable databaseFileName wil be assigned the name of the source FileMaker database.
3 A conditional statement that checks for a single selected solid to be assigned the values of the first database record. A solid is a graphic that can contain text or an image. If a single solid is not selected, then alert the script user.
9-28 The script statements for tagging document objects with the transferred data.
| Tag Objects with Transfered Data | ||
| 01 | JSONstr = 'DBTRANSFERDATA' | |
| 02 | databaseFileName = 'DBFILENAME' | |
| 03 | if (document.windows[0].selection.solids.length != 1){ | |
| 04 | title = "SELECTION ERROR" | |
| 05 | message = "Please select a single graphic." | |
| 06 | new Alert(title, message).show(function(result){}) | |
| 07 | throw new Error(title) | |
| 08 | } else { | |
| 09 | cnvs = document.windows[0].selection.canvas | |
| 10 | graphic = document.windows[0].selection.solids[0] | |
| 11 | // retrieve data for top-level item (1st record) | |
| 12 | data = JSON.parse(JSONstr) | |
| 13 | topLevelName = data[0]['Name'] | |
| 14 | topLevelID = data[0]['Employee ID'] | |
| 15 | // write name and ID to graphic | |
| 16 | graphic.name = topLevelName + ' ' + topLevelID | |
| 17 | // write name and ID to graphic text | |
| 18 | graphic.text = topLevelName + '\n' + topLevelID | |
| 19 | // write metadata to graphic user data | |
| 20 | graphic.setUserData('Employee Name',topLevelName) | |
| 21 | graphic.setUserData('Employee ID',topLevelID) | |
| 22 | graphic.setUserData('Database Name',databaseFileName) | |
| 23 | // write JSON string to canvas notes field | |
| 24 | cnvs.background.notes = JSONstr | |
| 25 | // confirmation alert | |
| 26 | title = "DATA TRANSFERED" | |
| 27 | message = "The organization data has been successfully transfered." | |
| 28 | new Alert(title, message).show(function(result){}) | |
| 29 | } | |
9,10 Instantiate variables for the current canvas and the selected graphic (solid).
12 Use the parse() method to convert the JSON string into a JSON object.
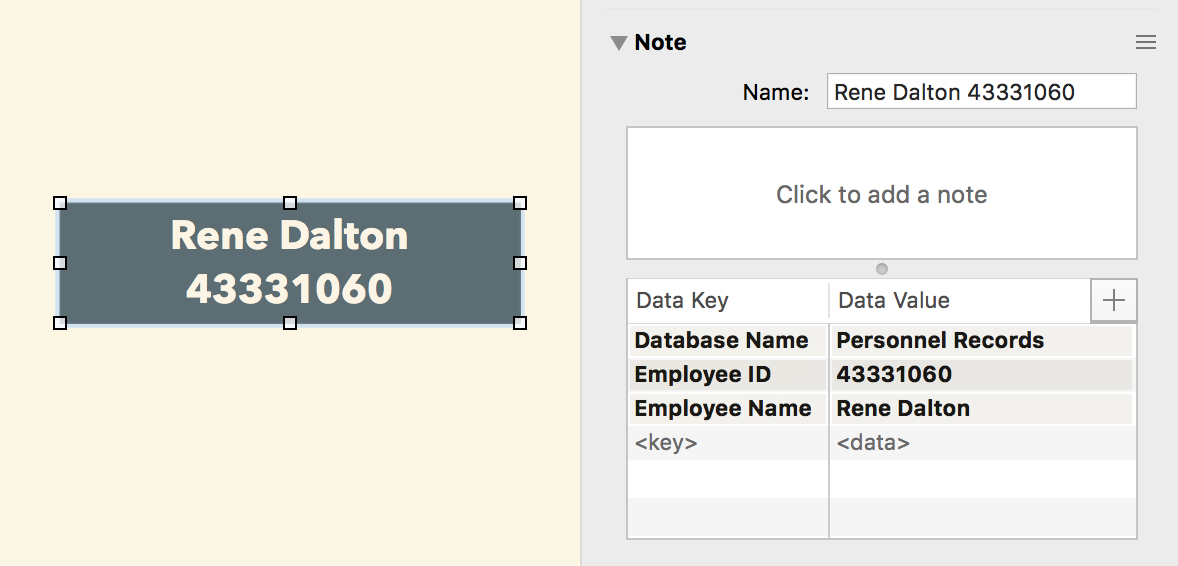
13-14 Extract the Employee Name and Employee ID for the top-level database record (record 1).
16 Name the graphic using the top-level Employee Name and Employee ID data.
18 Set the text in the graphic to the top-level Employee Name, a carriage return, and the Employee ID data.
20-22 Assign metadata keys and values to the selected graphic.
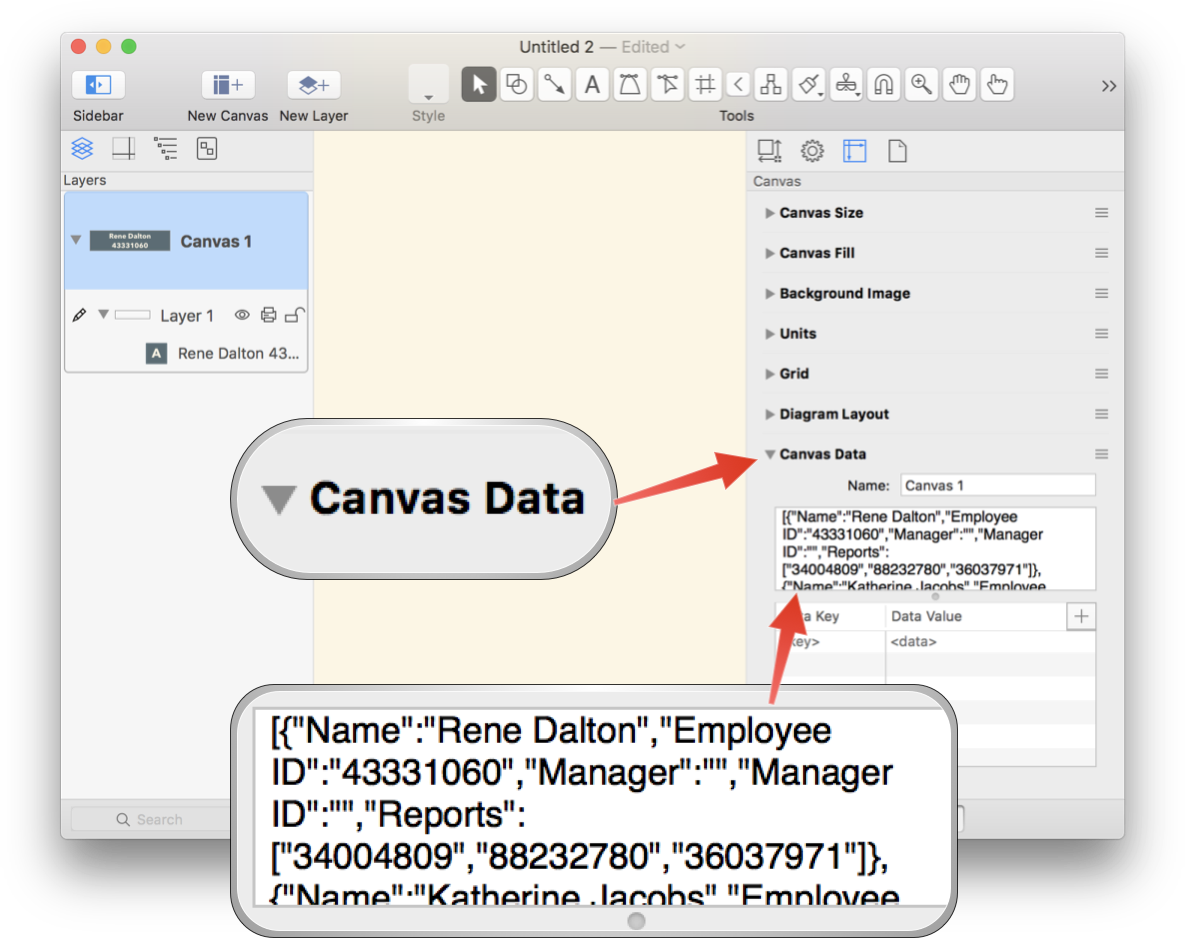
24 Set the value of the Notes field of the current canvas to the full JSON transferred from the database.
(below) The top-level record object name and metadata assigned to the selected graphic:
(below) The JSON generated from the FileMaker database is placed into the Notes field for the current canvas.
Next
In the next section, we’ll examine how to dynamically generate an organization chart using the actions in an Omni Automation PlugIn.
This webpage is in the process of being developed. Any content may change and may not be accurate or complete at this time.
DISCLAIMER