
HTML List to Outline
In the following scenario, “Omni-Interactive” code in a webpage extracts the contents of an HTML list and inserts the retrieved list items into an OmniOutliner outline document as individual rows.
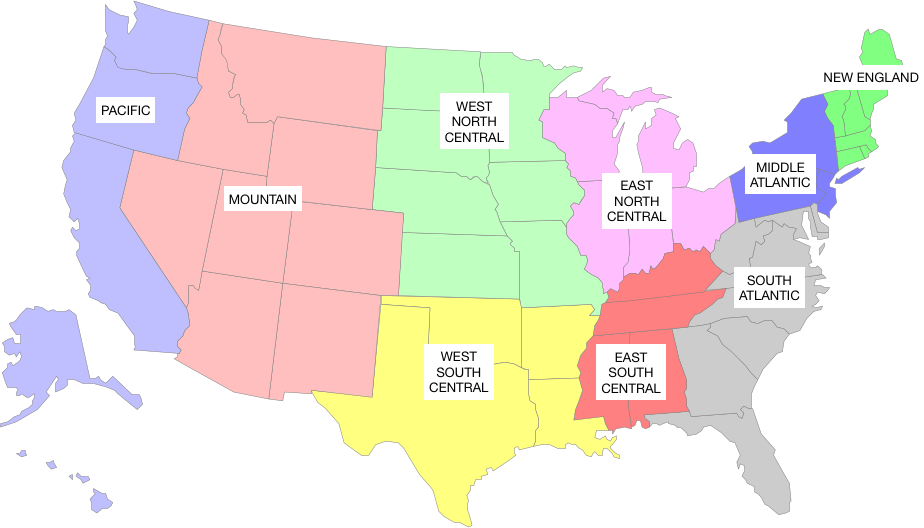
U.S. Census Regions and Divisions (shown in video)
“Tap-able”|“Click-able” Lists
You can make an HTML list “tap-able” or “click-able” by adding an onclick() handler to the element’s opening tag. In the example HTML code below, the onclick() handler calls a function named addToOutline(elementID) and passes the element’s ID into the function:
Once the onclick() event handler has been assigned to an HTML list element, clicking or tapping any list item will cause the targeted JavaScript function to run.
| Making a List Clickable | ||
| 01 | <ul id="pacific-region" onclick="addToOutline('pacific-region')"> | |
| 02 | <li>Alaska</li> | |
| 03 | <li>California</li> | |
| 04 | <li>Hawaii</li> | |
| 05 | <li>Oregon</li> | |
| 06 | <li>Washington</li> | |
| 07 | </ul> | |
Getting List Items
The first step in transferring the contents of an HTML list to an OmniOutliner document is to create a JavaScript array containing the text of the list items. This is accomplished using this JavaScript function placed in the host webpage.
| Getting List Items | ||
| 01 | function getListItemStrings(listID){ | |
| 02 | var ul = document.getElementById(listID); | |
| 03 | var items = ul.getElementsByTagName("li"); | |
| 04 | var listStrings = new Array(); | |
| 05 | for (var i = 0; i < items.length; ++i) { | |
| 06 | listStrings.push(items[i].textContent); | |
| 07 | }; | |
| 08 | return listStrings; | |
| 09 | } | |
When this function is called by the main function, it is passed the ID of the list whose contents are to be retrieved, and returns an JavaScript array of strings.
The Main Function
This is the main JavaScript function, embedded in the webpage, or linked from a file (see bottom of this page), that performs the following:
- Retrieves the contents of the targeted HTML list
- Converts the resulting array into a JSON object string
- Encodes the JSON object string
- Replaces a placeholder in an encoded Omni Automation script (line 5) with the encoded JSON data
- Executes the encoded Omni Automation script
| Main Function | ||
| 01 | function addToOutline(listID){ | |
| 02 | var listItems = getListItemStrings(listID); | |
| 03 | var listItemsString = JSON.stringify(listItems); | |
| 04 | var encodedListItemsString = encodeURIComponent(listItemsString); | |
| 05 | var OmniOutlinerScript = 'omnioutliner:///omnijs-run?script=var | |
| 06 | OmniOutlinerScript = OmniOutlinerScript.replace('DATAPLACEHOLDER', | |
| 07 | window.location = OmniOutlinerScript; | |
| 08 | } | |
01-08 The addToOutline(listID) function performs the task of extracting list data, inserting it into an Omni Automation script, and executed the script.
02 Retrieve the list item strings using the getListItemStrings(listID) function, passing in the ID of the list to process.
03 Convert the retrieved array of string into a string using the JSON.stringify() method.
04 Encode the string using the standard JavaScript encodeURIComponent() method.
05 An encoded version of the Omni Automation script URL for adding items to the outline document, is place within this function. The encoded script contains the placeholder DATAPLACEHOLDER that will be replaced with the encoded list data.
06 Replace the placeholder with the encoded list content.
07 Execute the Omni Automation script URL by assigning it to be the value of the window’s location property.
The Omni Automation Script
Here is the Omni Automation script that does the work of adding the retrieved list items into the currently open OmniOutliner document. In use, the script is encoded and the encoded script is placed within the main JavaScript function embedded in the webpage. Note the placeholder DATAPLACEHOLDER (line 1) that is replaced with an array of the list item strings before the script is executed by the main JavaScript function.
| Add List Items to Outline | ||
| 01 | var itemArray = DATAPLACEHOLDER | |
| 02 | var nodes = document.editors[0].selectedNodes | |
| 03 | if(nodes.length == 1){ | |
| 04 | var alert = new Alert("Item Placement", "Should the list items be added as children or siblings of the selected outline item?") | |
| 05 | alert.addOption("Children") | |
| 06 | alert.addOption("Siblings") | |
| 07 | alert.addOption("Cancel") | |
| 08 | alert.show(function(result){ | |
| 09 | var selectedItem = nodes[0].object | |
| 10 | if (result == 0){ | |
| 11 | for(i = 0; i < itemArray.length; i++){ | |
| 12 | selectedItem.addChild(selectedItem.end,function(item){item.topic = itemArray[i]}) | |
| 13 | } | |
| 14 | } else if (result == 1){ | |
| 15 | parentItem = selectedItem.parent | |
| 16 | for(i = 0; i < itemArray.length; i++){ | |
| 17 | parentItem.addChild(parentItem.end,function(item){item.topic = itemArray[i]}) | |
| 18 | } | |
| 19 | } else { | |
| 20 | throw new Error('script cancelled') | |
| 21 | } | |
| 22 | }) | |
| 23 | } else { | |
| 24 | var alert = new Alert('SELECTION ERROR','Please select a single outline item at which you wish to add items.') | |
| 25 | alert.show(function(result){}) | |
| 26 | } | |
Working with Titled Lists
In the Grocery Shopping List example (plugin), each the source lists are titled, and the added row is to be a parent (List Title) with children (List Items). Therefore, a title attribute is added to the list element so that it can be retrieved and used as the topic for the added parent row.
Here is the HTML for one of the lists from the example shown in the video above. Note that the “title” and “id” attributes are added to the standard ul (unordered list) element, with the of the title attribute being the name of the list as it is to appear in the outline document. The value of the id attribute can be whatever unique value you want to use. In this case, we use a lowercase version of the title.
Also added to the ul opening statement is the onclick handler that calls the embedded JavaScript function described on this page: addToOutline('dairy')
| Titled List Item | ||
| 01 | <ul id="dairy" title="Dairy" onclick="addToOutline('dairy')"> | |
| 02 | <p class="list-head">Dairy</p> | |
| 03 | <li>Butter / Margarine</li> | |
| 04 | <li>Cottage cheese</li> | |
| 05 | <li>Half & half</li> | |
| 06 | <li>Milk</li> | |
| 07 | <li>Sour cream </li> | |
| 08 | <li>Whipped cream</li> | |
| 09 | <li>Yogurt</li> | |
| 10 | <li style="border-bottom:1px solid #000;"></li> | |
| 11 | <li style="border-bottom:1px solid #000;"></li> | |
| 12 | </ul> | |
Because the list element includes the title attribute, the processing function includes statements for extracting and passing the value of list’s title attribute:
| Main Function: Working with Titled Lists | ||
| 01 | function addToOutline(listID){ | |
| 02 | var ul = document.getElementById(listID); | |
| 03 | var listTitle = ul.getAttribute('title'); | |
| 04 | var encodedListTitle = encodeURIComponent(listTitle); | |
| 05 | var listItems = getListItemStrings(listID); | |
| 06 | var listItemsString = JSON.stringify(listItems); | |
| 07 | var encodedListItems = encodeURIComponent(listItemsString); | |
| 08 | var OmniOutlinerScript = 'omnioutliner://localhost/omnijs-run?script=var | |
| 09 | OmniOutlinerScript = OmniOutlinerScript.replace('LISTITEMSPLACEHOLDER', | |
| 10 | OmniOutlinerScript = OmniOutlinerScript.replace('LISTTITLEPLACEHOLDER', | |
| 11 | window.location = OmniOutlinerScript; | |
| 12 | } | |
Since the grocery list example adds a row (List Title) with children (List Items), the Omni Automation script does not query the user as to where to insert the new item, and instead places it at the beginning of the top-level items. Here is the unencoded Omni Automation script:
| Insert Item and its Children | ||
| 01 | var itemTitle = 'LISTTITLEPLACEHOLDER' | |
| 02 | var itemArray = LISTITEMSPLACEHOLDER | |
| 03 | var newItem = rootItem.addChild( | |
| 04 | rootItem.beginning, | |
| 05 | function(item){item.topic = itemTitle} | |
| 06 | ) | |
| 07 | for(i = 0; i < itemArray.length; i++){ | |
| 08 | newItem.addChild(newItem.end,function(item){item.topic = itemArray[i]}) | |
| 09 | } | |
| 10 | statusCol = document.outline.statusColumn | |
| 10 | document.editors[0].setVisibilityOfColumn(statusCol, true) | |
Working with Checked Lists
In the Grocery List example, items were added from webpage to an OmniOutliner document with status checkboxes displayed. Here are two OmniOutliner actions for working with status-type lists:
- Focus Checked Items
- Add Focused Items to New Task (OmniFocus)
Adding Functions from File
You can incude the functionality shown on this webpage in your webpages by downloading the addListToOutline.js file and including this link in the HEAD section of your webpages. Add the TAP|CLICK triggers to your lists as shown above.
| JavaScript Script File | ||
| 01 | <script type="text/javascript" src="addListToOutline.js"></script> | |
Image Maps and Omni Automation
OmniGraffle Pro for macOS has the awesome ability to export the graphics on a canvas as an HTML image map. The image map shown in the example video was created in OmniGraffle Pro and was exported as an HTML image map, with the ability to trigger embedded JavaScript functions that run “Omni-Interactive” scripts.
When the OmniGraffle document used to generate the image is exported as an image map, URLs assigned as actions to graphics are automatically exported as URLs integrated into the generated HTML for the image map.
To make the URLs able to trigger the JavaScript functions embedded in the webpage, simply make the value of the action URL assigned to the graphic (see illustration below) a call to the target JavaScript function, instead a standard URL.
javascript:addToOutline('new-england-region')

Once you’ve assigned all of the graphics an action URL, export the canvas as an image map, by choosing “Export…” from the “File” menu, and then select the “HTML Image Map” export option in the forthcoming drop-down sheet. An archive of the example document shown in the video is available for download.
This webpage is in the process of being developed. Any content may change and may not be accurate or complete at this time.
DISCLAIMER