Plug-Ins: Promises
The JavaScript Promise object represents the eventual completion (or failure) of an asynchronous operation, and its resulting value. The use of JavaScript Promises with Omni Automation, and forms in particular, enables a simpler design for your scripts and actions that are meant to respond to events, such as the presentation and completion of a form dialog.
NOTE: This section contains interactive script examples that are executed only with your approval. See the section on Script Security for details about allowing the execution of external scripts, like those embedded in the content of this website.Let’s Experiment!
To demonstrate the concept of JavaScript Promises, run the following script that logs the time as the script begins (line 1), and the time as the script completes (line 3). Be sure to count to five (5) before closing the alert dialog!
Time Example
console.log("BEFORE:", new Date().toLocaleTimeString())new Alert("Time Example", "Count to 5, then check the console.").show()console.log("AFTER:", new Date().toLocaleTimeString())

(⬇ see below ) The console after the script has been run.
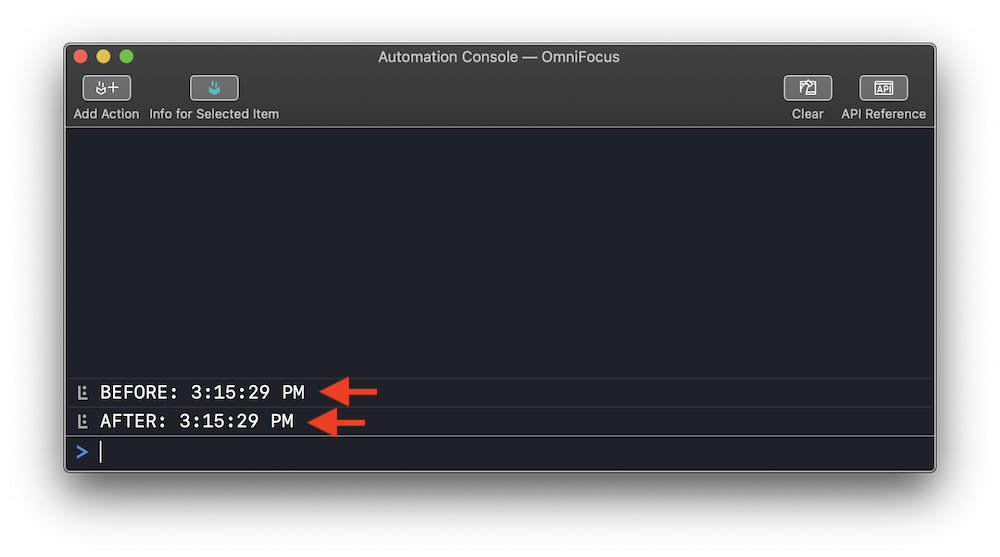
𝒬: Wait a minute — the start and stop times are the same! I counted from 1 to 5 while the alert was displayed, why isn’t that time reflected in the log?
𝒜: The answer is that, by default, JavaScript does not pause for user interactions to complete, or for application processes to finish. JavaScript statements run as fast and efficiently as their host device enables.
𝒬: If that is the case, how do you write scripts that can “wait” for actions to complete before executing other statements?
𝒜: JavaScript Promises.
𝒬: What are JavaScript Promises?
𝒜: A JavaScript Promise is a mechanism for easily enabling scripts to include statements that are meant to be performed after some other process has completed. They are “promises” to continue a previously started action. A “promise” is an instance of the JavaScript Promise class.
Omni Automation and Promises
Many Omni Automation commands return an instance of the Promise class as the result of the command execution. For example, the show() function of the Alert class returns a Promise instance as the result of its execution.
show(callback: Function or null) → (Promise of Number) • Displays the alert. If no options have yet been added, a default “OK” option is added. Once the user selects an option, the alert is dismissed. If a callback function was supplied, it is invoked with the zero-based index of the selected option as its argument. A Promise is returned as well, which may also be used to collect the result of the Alert.
The returned Promise instance can be stored in a variable, and “redeemed” elsewhere in the script.
A JavaScript Promise instance can be redeemed using the then() function, which will return the result of the promised action, allowing any further processing statements to execute.
As an example of the use of a promise, here’s our previous alert-and-count script re-designed to store and redeem the JavaScript Promise returned by the show() command:
Redeeming a Stored Promise
console.log("BEFORE:", new Date().toLocaleTimeString())var alertPromise = new Alert("Time Example", "Count to 5, then check the console.").show()alertPromise.then(function(promiseResult){console.log("AFTER:", new Date().toLocaleTimeString())})
(⬇ see below ) The console after the script has been run.
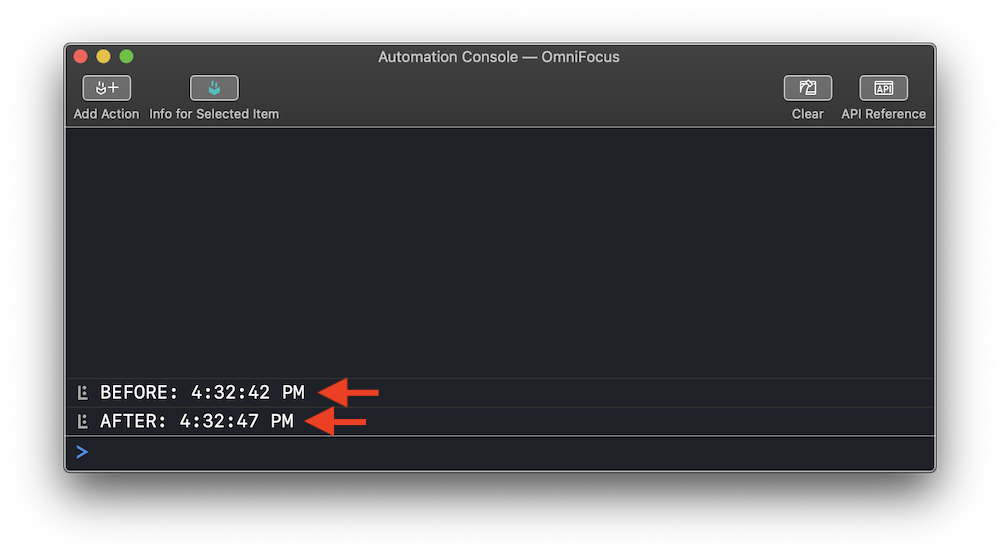
Aha! As you can see in console, the time it took for you to count from 1 to 5 is reflected in the time entries logged to the console. The promise redemption wasn’t called until you closed the alert dialog.
JavaScript Promises provide an excellent mechanism for adapting scripts to work smoothly in situations where interfaces are presented to the user, like those scripts that display plug-in forms.
Forms and Promises
Like the Alert class, the Form class is used to present information and options to the user, however forms also enable the user to provide input for scripts to use as well. Once a Form instance is created, it is presented using the show() function of the Form class:
show(title: String, confirmTitle: String) → (Promise of Form) • Present the Form to the user, and return a Promise to be fullfilled or rejected when the user commits or cancels the form.
The display of the form returns a Promise instance that when redeemed will deliver the completed form object to be processed by the script.
Try the example form below that demonstrates the three steps for working with a Promise instance:
- Store the Promise instance
- Redeem the Promise instance
- Respond to cancellation or errors from the Promise instance
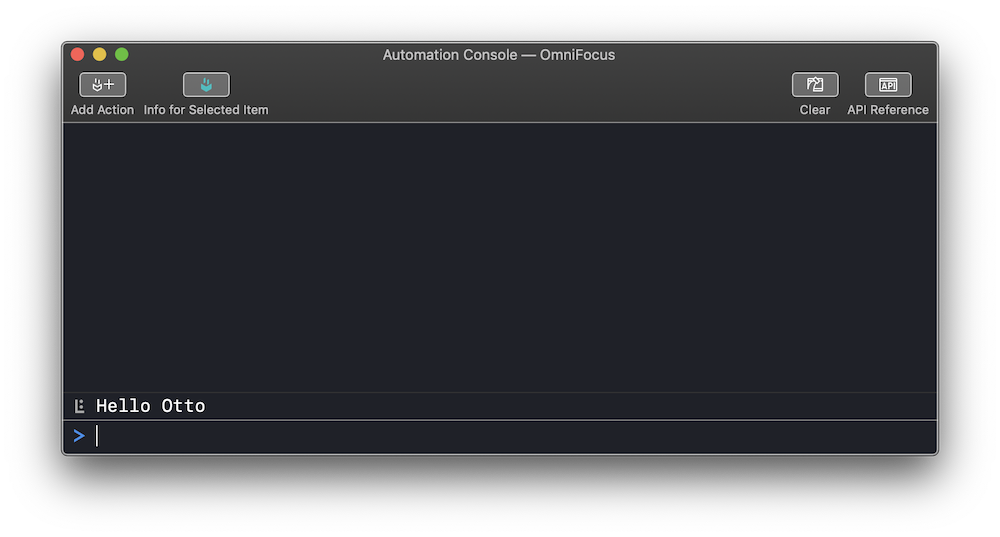
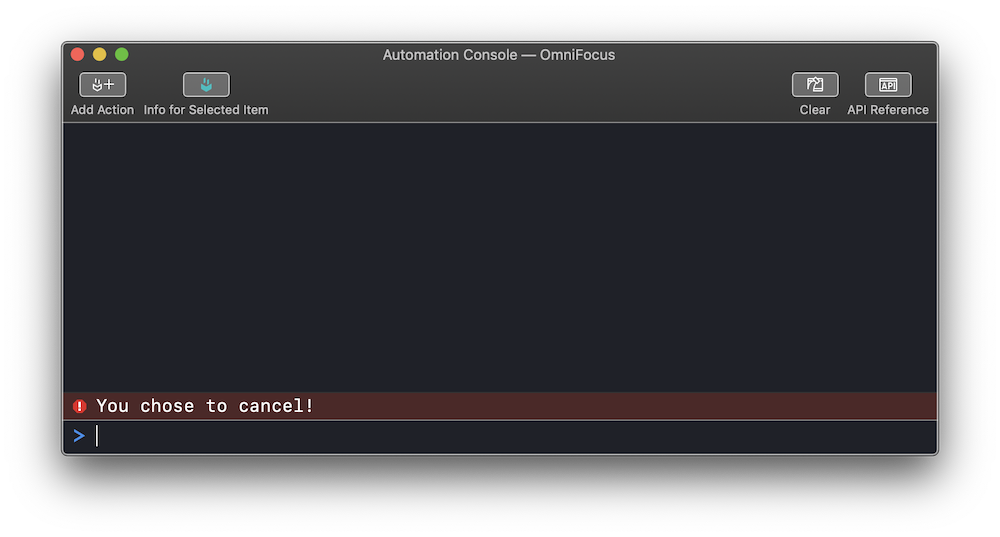
“A Promising Form”
var inputForm = new Form()var textInputField = new Form.Field.String("textInput",null,null)inputForm.addField(textInputField)var formPrompt = "Enter your first name:"var buttonTitle = "Continue"var formPromise = inputForm.show(formPrompt,buttonTitle)inputForm.validate = function(formObject){inputText = formObject.values['textInput']if(!inputText){return false}return true}formPromise.then(function(formObject){var textValue = formObject.values['textInput']console.log('Hello',textValue)})formPromise.catch(function(err){console.error("You chose to cancel!")})
11 A Promise instance is returned by the Form show() function and is stored in a variable (formPromise).
18-21 The stored promise is redeemed calling the then() function of the Promise class. The parameter of this method is a processing function whose passed-in input is the completed form object whose values can be extracted within the processing function.
23-25 The catch() function is used with the stored promise to handle situations where the user rejects (cancels) the form, or an error occurs during the form execution.
(⬇ see below ) The result of a completed form:
(⬇ see below ) The result of a canceled form:
About the catch() function
In some more interactive forms, using a catch() is beneficial as it allows for a script to return the application environment to the state in was in before the script was run. However, for many simpler forms, the catch() responce handler is omitted as it may not be needed.
Basic Form Design with Promises
For many of the forms you create and execute in your scripts, the workflow design used in the previous example is adequate, as it follows these steps:
- If required, gather the data to be presented by the Form instance.
- Create the Form instance and add the various form elements, menus, checkboxes, input fields, etc.
- Validate the Form instance as the user interacts with it.
- Redeem the completed Form instance and process the resulting form object, using the values property of the Form class to extract the user-chosen and input data.
- Optionally, deal with any form cancellation or errors.
Because of clarity provided by explicitly defining the steps involving the use of Promises, most of the form examples provided on this website incorporate this workflow design, especially when plug-ins incorporate forms and multiple nested Promise instances.
And here is the form placed within an Omni Automation plug-in:
Form in a Plug-In
/*{"type": "action","targets": ["omnigraffle", "omnifocus", "omniplan", "omnioutliner"],"author": "Otto Automator","identifier": "com.omni-automation.all.enter-name","version": "1.0","description": "A simple text input form.","label": "Enter Your Name","paletteLabel": "Enter Name","image": "gearshape.fill"}*/(() => {const action = new PlugIn.Action(function(selection, sender){// action codelet inputForm = new Form()let textInputField = new Form.Field.String("textInput",null,null)inputForm.addField(textInputField)let formPrompt = "Enter your first name:"let buttonTitle = "Continue"let formPromise = inputForm.show(formPrompt,buttonTitle)inputForm.validate = function(formObject){inputText = formObject.values['textInput']if(!inputText){return false}return true}formPromise.then(function(formObject){var textValue = formObject.values['textInput']console.log('Hello',textValue)})formPromise.catch(function(err){console.error("You chose to cancel!")})});action.validate = function(selection, sender){// validation codereturn true};return action;})();
Inline Promise Processing
As shown in the example above, the result of using the show(…) method to display a form interface is a JavaScript promise object, which can then be processed using the then(…) or catch(…) functions depending on whether the dialog was approved or canceled.
The FilePicker and FileSaver classes also return Promise instances when they are called.
If processing a canceled picker is not necessary for your script, you can streamline the script coding by appending the then(…) function to the show(…) function as shown in the example below. Functionally, this technique is the same as processing a promise object stored in a variable. The callback function within the then(…) function still receives the array of URLs chosen by the user in the file picker dialog.
Pick and Process
var picker = new FilePicker()picker.folders = falsepicker.multiple = falsepicker.types = [FileType.plainText]picker.show().then(function(urlsArray){var aURL = urlsArray[0]aURL.fetch(function(data){console.log(data.toString())})})
01 Create a new empty file picker object and store it in a variable.
02-04 Set the properties of the new file picker.
05 Use the show(…) method of the FilePicker class to display the file picker dialog to the user. The result of this method is a new JavaScript Promise object that is then processed by the appended then(…) function.
06 A URL object is extracted from the URLs array passed by the promise as input to the call-back function.
07-09 The fetch(…) method of the URL class is used to read the file represented by the extracted URL.
Asynchronous Promise Calls
JavaScript is a very flexible language, changing and adapting many times during its over 25 years of extended development, and you’ll find there are often many ways to do the same thing, each with its own set of advantages.
Let’s examine another approach for dealing with JavaScript Promises.
“I await your decision.”
The term “await” is an old word, Middle English in derivation, from the Anglo-Norman French awaitier, from a- (from Latin ad ‘to, at’) + waitier ‘to wait’. “Await” succinctly describes the concept of using JavaScript Promises: waiting for something to complete, and then by implication, continuing with another related process.
A second companion term used when describing the process of waiting for a process to complete before beginning another, is the word: asynchronous
Asynchronous: “A computer control timing protocol in which a specific operation begins upon receipt of an indication (signal) that the preceding operation has been completed.”
These two terms can be used together in scripts and plug-ins to execute JavaScript Promises without the need to explicitly declare, store, and redeem Promise instances.
This is accomplished by first encasing the form (and any code using Promises) within a self-invoking anonymous function wrapper…
Self-Invoking Anonymous Function
(() => {// STATEMENTS GO HERE})();
…and then declaring that the code contained within the function should be executed asynchronously. This is done by inserting the term “async” at the beginning of the function:
Asynchronous Function
(async () => {// STATEMENTS GO HERE})();
To take advantage of the asynchronous nature of the function, the term “await” is placed before the command that returns a Promise instance, indicating that the script should wait for the function to complete before proceding:
“Awaiting” the Promise
(async () => {promiseResult = await inputForm.show(formPrompt,buttonTitle)})();
The variable (promiseResult) placed before the “await” invocation will contain the result of the Promise instance’s execution, if successful. In the case of plug-in forms, the result will be a Form object whose values can be retrieved using the object’s keys.
Here is the previously used Form instance, made to execute asynchronously. Give it a try. You’ll notice is works just the same as previous version that uses explicit Promise handlers.
Note that the catch() function is appended to the function wrapper to deal with a negative result from the Promise instance.
Asynchronous Form (async -> await)
(async () => {inputForm = new Form()textInputField = new Form.Field.String("textInput",null,null)inputForm.addField(textInputField)inputForm.validate = function(formObject){inputText = formObject.values['textInput']if(!inputText){return false}return true}formPrompt = "Enter your first name:"buttonTitle = "Continue"formObject = await inputForm.show(formPrompt,buttonTitle)textValue = formObject.values['textInput']console.log('Hello',textValue)})().catch(err => console.error(err.message));
To use the “async/await” technique with Omni Automation plug-ins, the self-invoking anonymous asynchronous wrapper is placed within the action declaration in the plug-in code.
Here’s an asynchronous version of the single-file plug-in that incorporates await statements within an asynchronous wrapper rather than relying on explicit Promise handlers. NOTE: the main action code is placed within an explicit error handler: try{…}catch(err){…}
Asynchronous Form in a Plug-In
/*{"type": "action","targets": ["omnigraffle", "omnifocus", "omniplan", "omnioutliner"],"author": "Otto Automator","identifier": "com.omni-automation.all.async-enter-name","version": "1.0","description": "A simple asynchronous text input form.","label": "Enter Your Name","shortLabel": "Enter Name","paletteLabel": "Enter Name","image": "gearshape.fill"}*/(() => {const action = new PlugIn.Action(async function(selection, sender){try {inputForm = new Form()textInputField = new Form.Field.String("textInput",null,null)inputForm.addField(textInputField)inputForm.validate = function(formObject){inputText = formObject.values['textInput']if(!inputText){return false}return true}formPrompt = "Enter your first name:"buttonTitle = "Continue"formObject = await inputForm.show(formPrompt,buttonTitle)textValue = formObject.values['textInput']console.log('Hello',textValue)}catch(err){if(!causedByUserCancelling){new Alert(err.name, err.message).show()}}});action.validate = function(selection, sender){return true};return action;})();