Shortcuts Examples for OmniGraffle
This page contains example Shortcuts workflows and templates demonstrating the use of Omni Automation with OmniGraffle and the Shortcuts application.
- Export Layers to Keynote Slides (shortcut)
- Place Named Image (shortcut)
OmniGraffle • Export Layers to Keynote
This macOS-only example details the use of an Omni Automation plug-in to export images to file and then call a shortcut to add those exported images to new slides in the frontmost Keynote presentation.
| Export Layers to Keynote Slides |
| A macOS-only shortcut that adds a row for each of the chosen images to the current outline. |
|
|
This plug-in exports the layers of the current OmniGraffle canvas as a series of PNG files, either one for each layer, or as a set of images composited from the bottom to the topmost layer. During execution of the plug-in, the user will be prompted to choose a name and location for the folder containing the exported images.
Here is the initial interface presented by the plug-in:
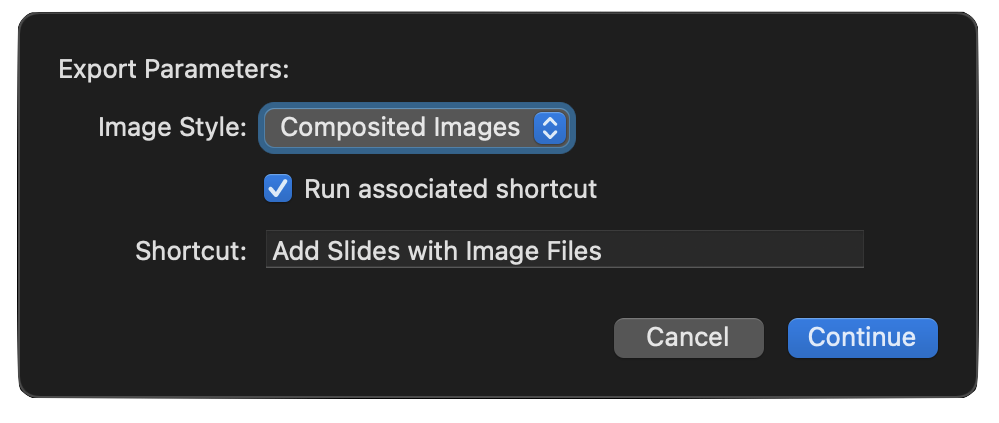
If the option to execute an installed shortcut is chosen, a file URL to the created folder will be passed to the installed shortcut whose name has been entered in the plug-in interface. The passed file URL is in a form similar to this:
file:///Users/Otto/Pictures/Export Folder/
which will be percent encoded and appended to the URL that calls the Shortcuts application: (see line 118 shown below)
file%3A%2F%2F%2FUsers%2FOtto%2FPictures%2FExport%20Folder%2F
The provided shortcut is designed to receive text input and contains actions for decoding and processing the URL of the created folder.
NOTE: the plug-in uses the Preferences class to store and retrieve used settings.
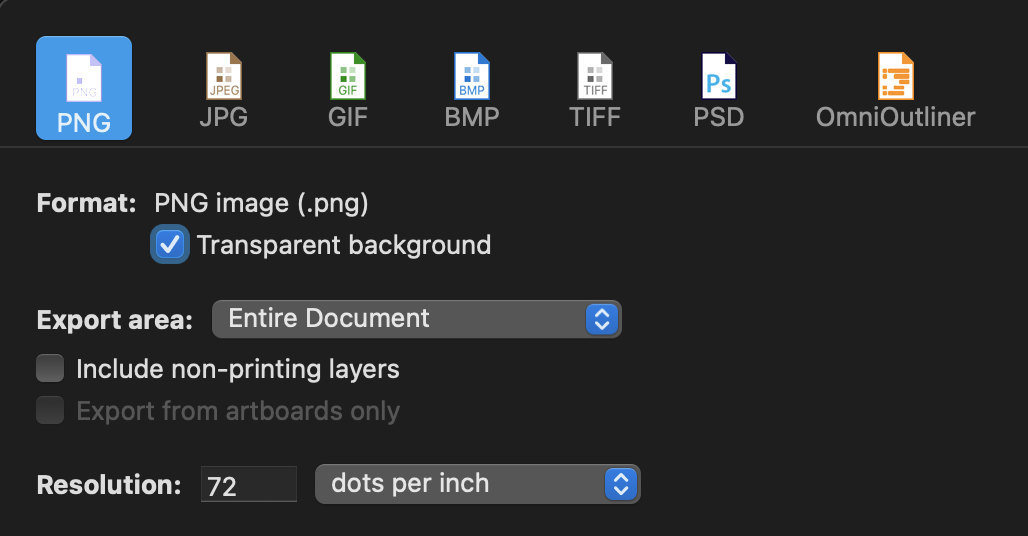
IMPORTANT: for best results, set the dimensions of the current canvas to match those of the Keynote slides. For example, if the Keynote presentation dimensions is set to “wide” (1920x1080), then set the dimensions of the canvas to match (1920x1080). Also note that the alpha transparency of the PNG images uses the current OmniGraffle export settings (see below).
Plug-In: Export Current Canvas Layers
/*{"type": "action","targets": ["omnigraffle"],"author": "Otto Automator","identifier": "com.omni-automation.og.export-layers-current-vanvas","version": "1.0","description": "Exports the layers of the current canvas as either individual PNG files, or as images composited from the bottom to the topmost layer.","label": "Export Current Canvas Layers","shortLabel": "Export Layers","paletteLabel": "Export Layers","image": "gearshape"}*/(() => {let preferences = new Preferences()var action = new PlugIn.Action(async function(selection, sender){// defaultsvar defaultShouldRunShortcut = falsevar defaultExportOptionIndex = 0var defaultShortcutTilte = "Title of Shortcut"var shouldRunShortcut = preferences.readBoolean("shouldRunShortcut")console.log("shouldRunShortcut-stored", shouldRunShortcut)if(!shouldRunShortcut){shouldRunShortcut = defaultShouldRunShortcut}var exportOptionIndex = preferences.readNumber("exportOptionIndex")console.log("exportOptionIndex-stored", exportOptionIndex)if(!exportOptionIndex){exportOptionIndex = defaultExportOptionIndex}var shortcutTitle = preferences.readString("shortcutTitle")console.log("shortcutTitle-stored", shortcutTitle)if(!shortcutTitle){shortcutTitle = defaultShortcutTilte}var exportOptions = ["Individual Images","Composited Images"]var exportOptionsMenu = new Form.Field.Option("exportOption","Image Style",[0,1],exportOptions,exportOptionIndex)var checkSwitchField = new Form.Field.Checkbox("shouldRunShortcut","Run associated shortcut",shouldRunShortcut)var textInputField = new Form.Field.String("shortcutTitle","Shortcut",shortcutTitle,null)var inputForm = new Form()inputForm.addField(exportOptionsMenu)inputForm.addField(checkSwitchField)inputForm.addField(textInputField)inputForm.validate = function(formObject){var shouldRunShortcut = formObject.values["shouldRunShortcut"]if (shouldRunShortcut){var textValue = formObject.values['shortcutTitle']if(!textValue){return false}}return true}var formPrompt = "Export Parameters:"var buttonTitle = "Continue"var formObject = await inputForm.show(formPrompt,buttonTitle)var exportOptionIndex = formObject.values["exportOption"]preferences.write("exportOptionIndex", exportOptionIndex)var shouldRunShortcut = formObject.values["shouldRunShortcut"]preferences.write("shouldRunShortcut", shouldRunShortcut)var shortcutTitle = formObject.values["shortcutTitle"]preferences.write("shortcutTitle", shortcutTitle)var cnvs = document.windows[0].selection.canvascnvs.layers.forEach(layer => layer.visible = false)var wrapperPromises = new Array()cnvs.layers.slice().reverse().forEach((layer, index) => {layer.visible = truevar exportName = encodeURIComponent(index + "-" + layer.name)var fileTypeID = "public.png"var wrapperPromise = document.makeFileWrapper(exportName, fileTypeID)wrapperPromises.push(wrapperPromise)if (exportOptionIndex === 0){layer.visible = false}})cnvs.layers.forEach(layer => layer.visible = true)Promise.all(wrapperPromises).then(wrappers => {// Create and Show File Savervar filesaver = new FileSaver()filesaver.message = "Name and Location for export folder:"var folderType = new FileType("public.folder")filesaver.types = [folderType, FileType.png, FileType.pdf]//var docName = document.namevar fldrwrapper = FileWrapper.withChildren("Export Folder", wrappers)var fileSaverPromise = filesaver.show(fldrwrapper)// Process File Saver ResultfileSaverPromise.then(urlObj => {if(shouldRunShortcut === true){// remove any percent encodingvar decodedURL = decodeURIComponent(urlObj.string)// encode entire URLvar encodedURL = encodeURIComponent(decodedURL)// construct and execute Shortcuts URLshortcutTitle = encodeURIComponent(shortcutTitle)var urlStr = "shortcuts://run-shortcut?name=" + shortcutTitle + "&input=text&text=" + encodedURLURL.fromString(urlStr).open()}})})});action.validate = function(selection, sender){return true};return action;})();
Shortcut for processing exported images
Here is the shortcut (DOWNLOAD) designed to accept the passed file URL to the export folder, and to create new slides in the frontmost Keynote presentation, for each of the exported images.
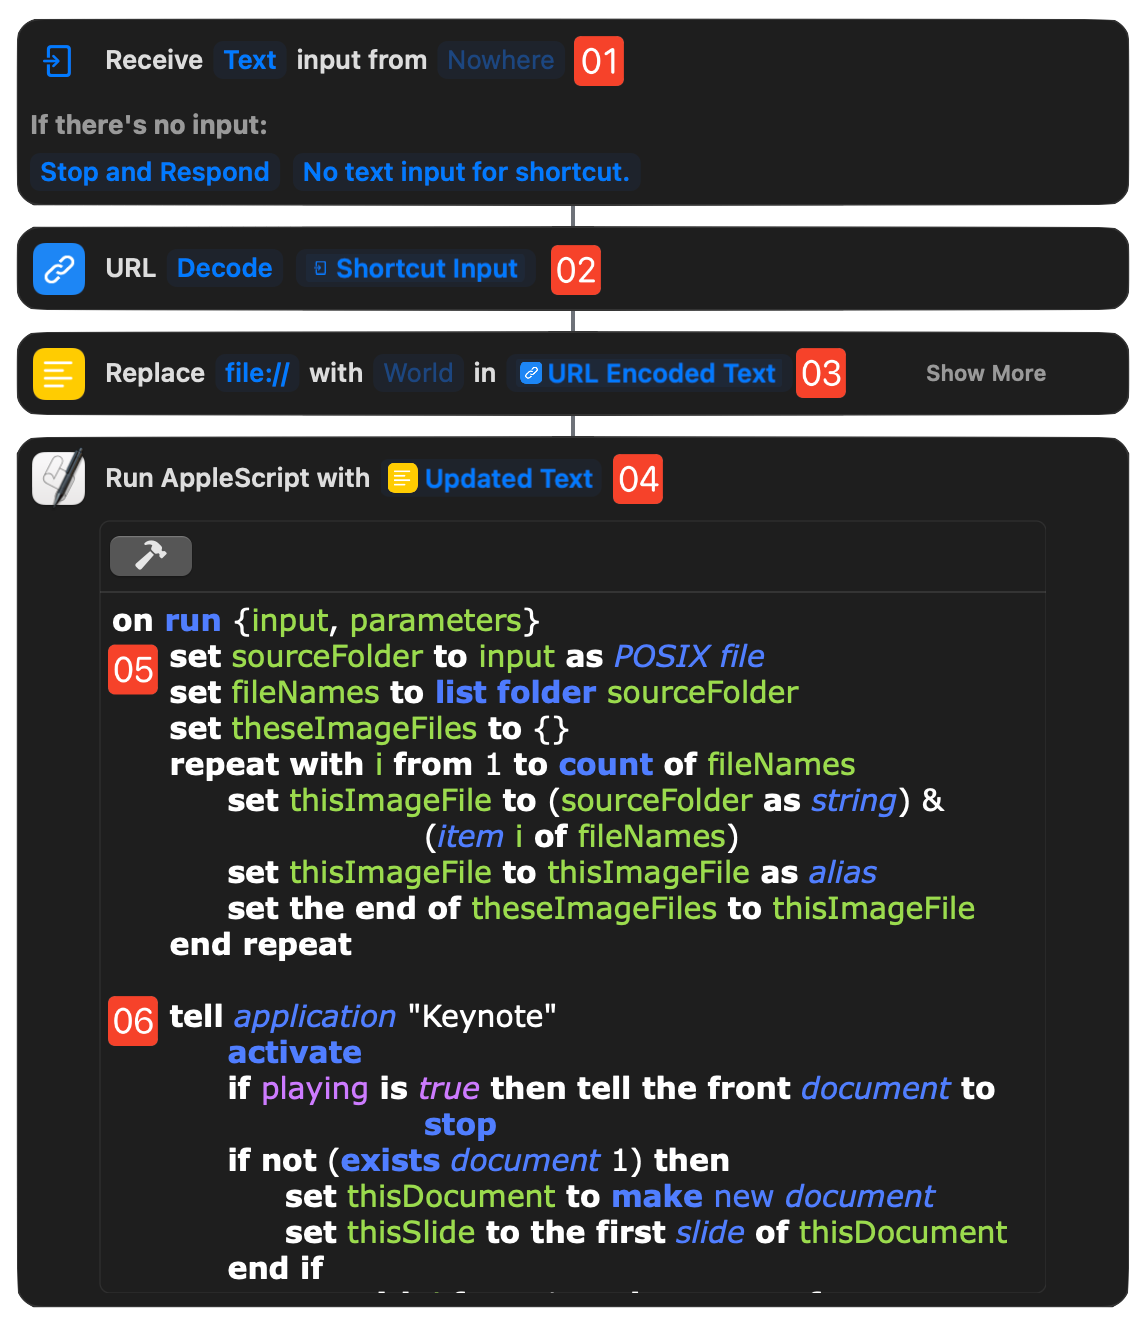
1 Shortcut Input Settings • This shortcut is designed to receive text as its input. As stated previously, the passed text with be a percent-encoded file URL to the created folder containing the exported layer images.
2 Decode Passed Text • This action will decode the passed text, converting it back into a file URL format.
3 Trim Schema • Remove the file:// schema from the beginning of the file URL. The resulting segment will be a path reference in POSIX form to the export folder: /Users/Otto/Pictures/Export Folder/
4 “Run AppleScript” action • The UNIX path string is passed as input to the “Run AppleScript” action.
5 Generate File References • The script converts the passed path to a file reference and then derives file references to each of the exported image files.
6 Generate Slides • The list of generated image file references is iterated to create a new slide for each of the images.
Here is the code of the AppleScript script for processing the images.
AppleScript: Keynote Slides from Image Files
on run {input, parameters}set sourceFolder to input as POSIX fileset fileNames to list folder sourceFolderset theseImageFiles to {}repeat with i from 1 to count of fileNamesset thisImageFile to (sourceFolder as string) & (item i of fileNames)set thisImageFile to thisImageFile as aliasset the end of theseImageFiles to thisImageFileend repeattell application "Keynote"activateif playing is true then tell the front document to stopif not (exists document 1) thenset thisDocument to make new documentset thisSlide to the first slide of thisDocumentend ifrepeat with i from 1 to the count of theseImageFilesset thisImageFile to (item i of theseImageFiles)tell front documentset thisSlide to make new slide with properties {base layout:slide layout "Blank"}tell thisSlideset thisImage to make new image with properties {file:thisImageFile}end tellend tellend repeatend tellreturn inputend run
OmniGraffle • Place Named Image
This is a shortcut for placing named images in the current canvas of the frontmost OmniGraffle document. (DOWNLOAD)
The shortcut processes places named images in two ways:
- If a single solid shape is selected on the current canvas, the chosen image will be placed within the selected shape, and the text of the shape will become the title of the image.
- If no solid shapes are selected, a new shape sized to fit the dimensions of the chosen image will be added to the current canvas, and the text of the shape will become the title of the image.
The shortcut will present a image picker for the system Photos library. Metadata for the image, such as its name or title, can be entered in the pickers search field.
Once the image is chosen, a choose dialog displaying the image’s dimensions as well as the percentages to be used for for scaling the selected image.
| Place Named Images |
| A shortcut that places named images in the frontmost OmniGraffle document. |
|
|
1 Shortcut Input • This shortcut accepts input from selected images processed using the Share Sheet (iOS/iPadOS), or from those selected from the system image picker that displays the contents of default Photos library.
2 “Open App” action • Make OmniGraffle the frontmost application.
3 Create Variable • Store a reference to the chosen image.
4-5 Image Properties • Store the width and height of the chosen image.
6-7 Scaling Percentages • Display a list of scaling percentages (in 10% increments). The prompt includes the chosen image width and height.
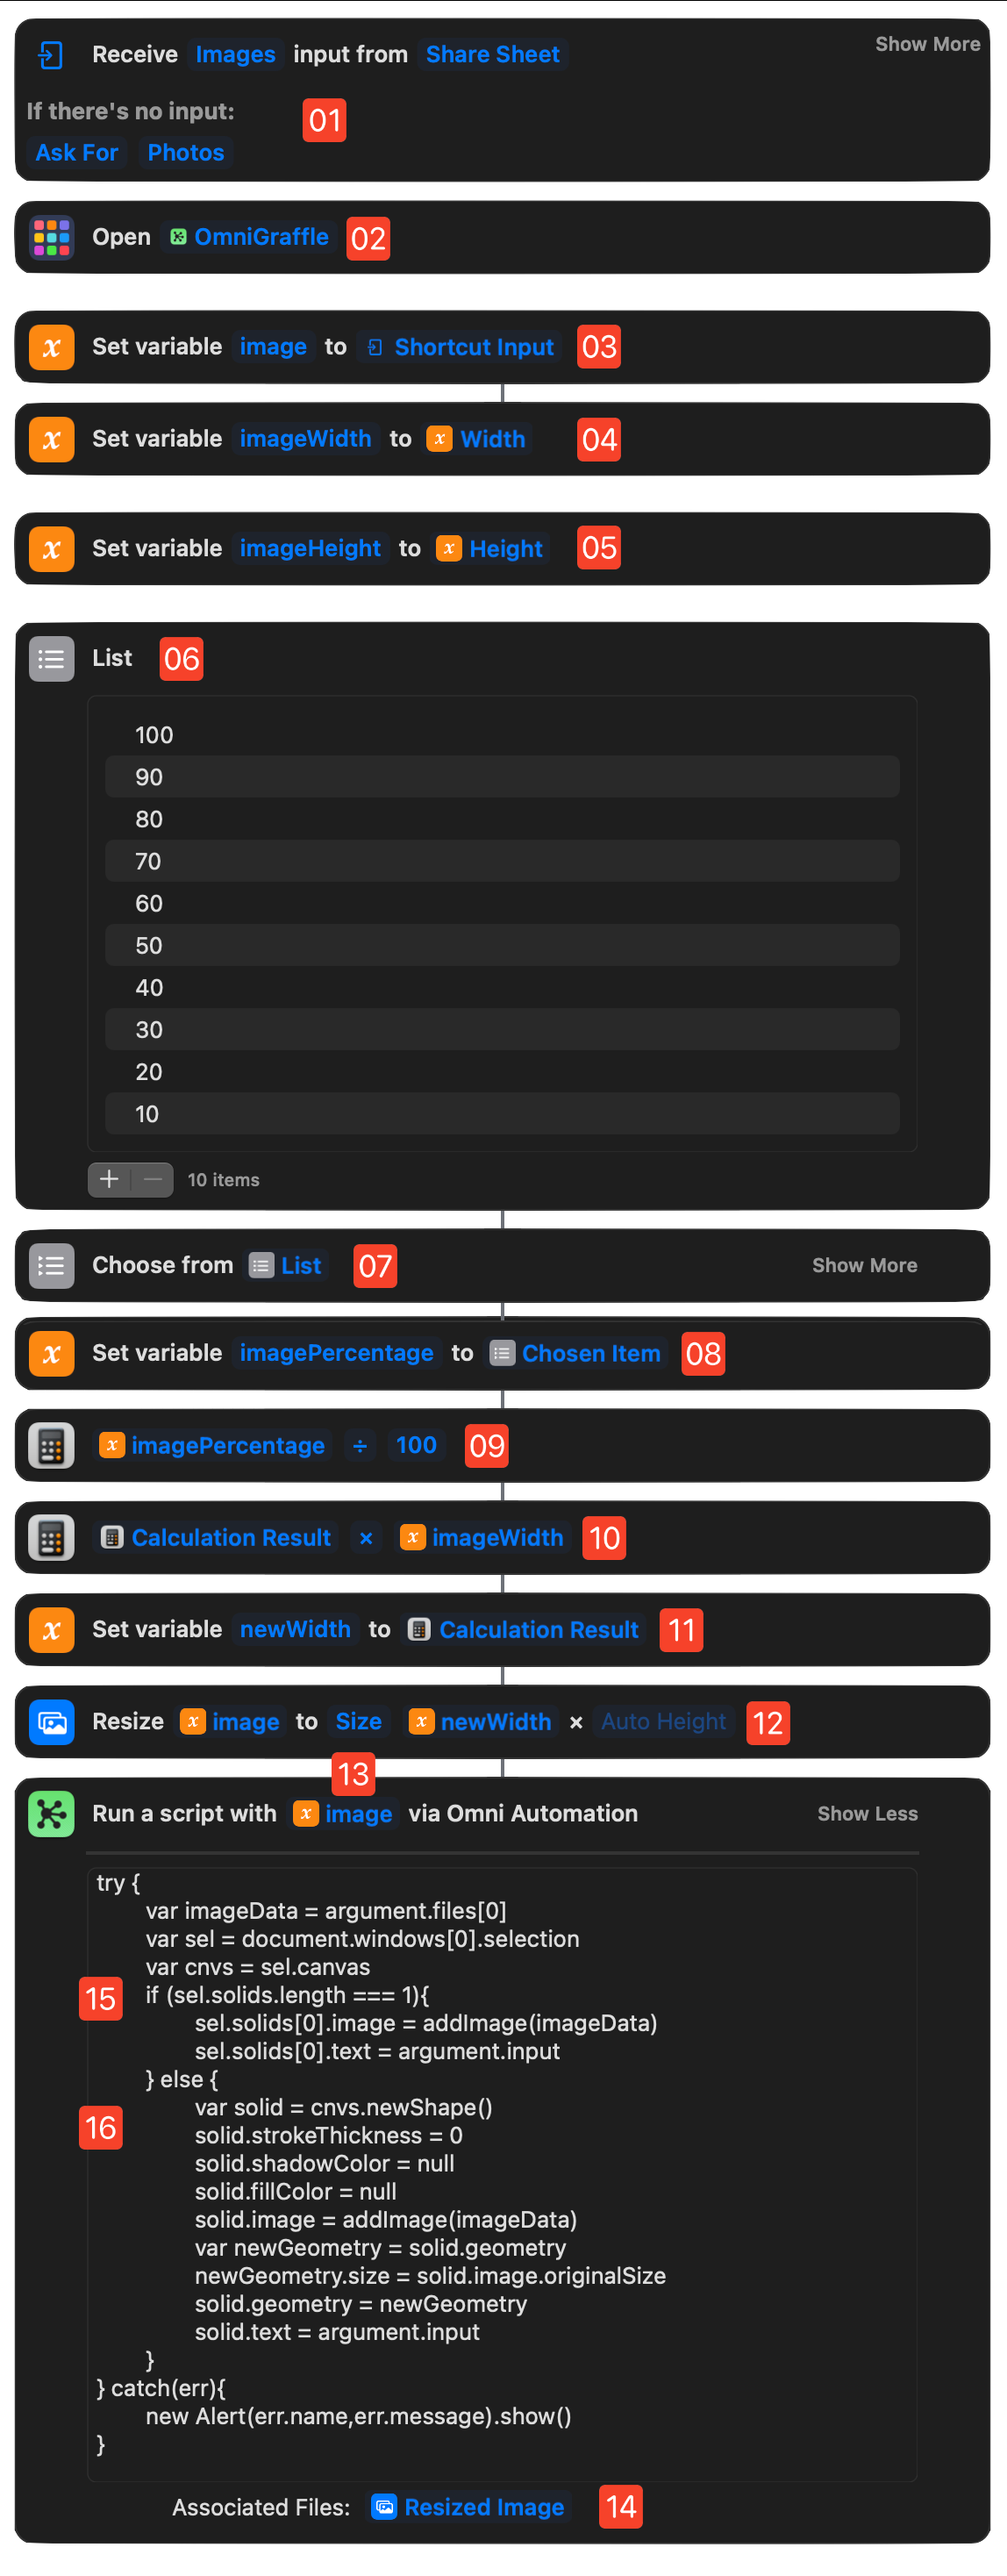
8-11 Calculate New Dimensions • Calculate the new dimensions for the scaled image.
12 Scale Chosen Image • Resize the image data to the new dimensions.
13 “Omni Automaton Script” action • The stored image title is placed in the Data Input Socket of this action.
14 “Omni Automaton Script” action • The resized image data is placed in the “Associated Files” control of this action.
15 “Omni Automaton Script” action • The first section of the script deals with placing the image in a selected shape, using the argument.files[0] parameter to retrieve the passed-in image data, and the argument.input parameter to retrieve the stored image title, which is then used as the text for the selected shape.
16 “Omni Automaton Script” action • The second section of the script deals with placing the image in a new shape (sized to the image), using the argument.files[0] parameter to retrieve the passed-in image data, and the argument.input parameter to retrieve the stored image title, which is then used as the text for the selected shape.
Here is the Omni Automation script used to place the chosen image in the current canvas of the frontmost OmniGraffle document:
Place Named Image
try {var imageData = argument.files[0]var sel = document.windows[0].selectionvar cnvs = sel.canvasif (sel.solids.length === 1){sel.solids[0].image = addImage(imageData)sel.solids[0].text = argument.input} else {var solid = cnvs.newShape()solid.strokeThickness = 0solid.shadowColor = nullsolid.fillColor = nullsolid.image = addImage(imageData)var newGeometry = solid.geometrynewGeometry.size = solid.image.originalSizesolid.geometry = newGeometrysolid.text = argument.input}} catch(err){new Alert(err.name,err.message).show()}