Add Action (Plug-In)
The “Add Action” toolbar button is designed to make the multi-step process of creating and installing an Omni Automation plug-in a much simpler guided process.
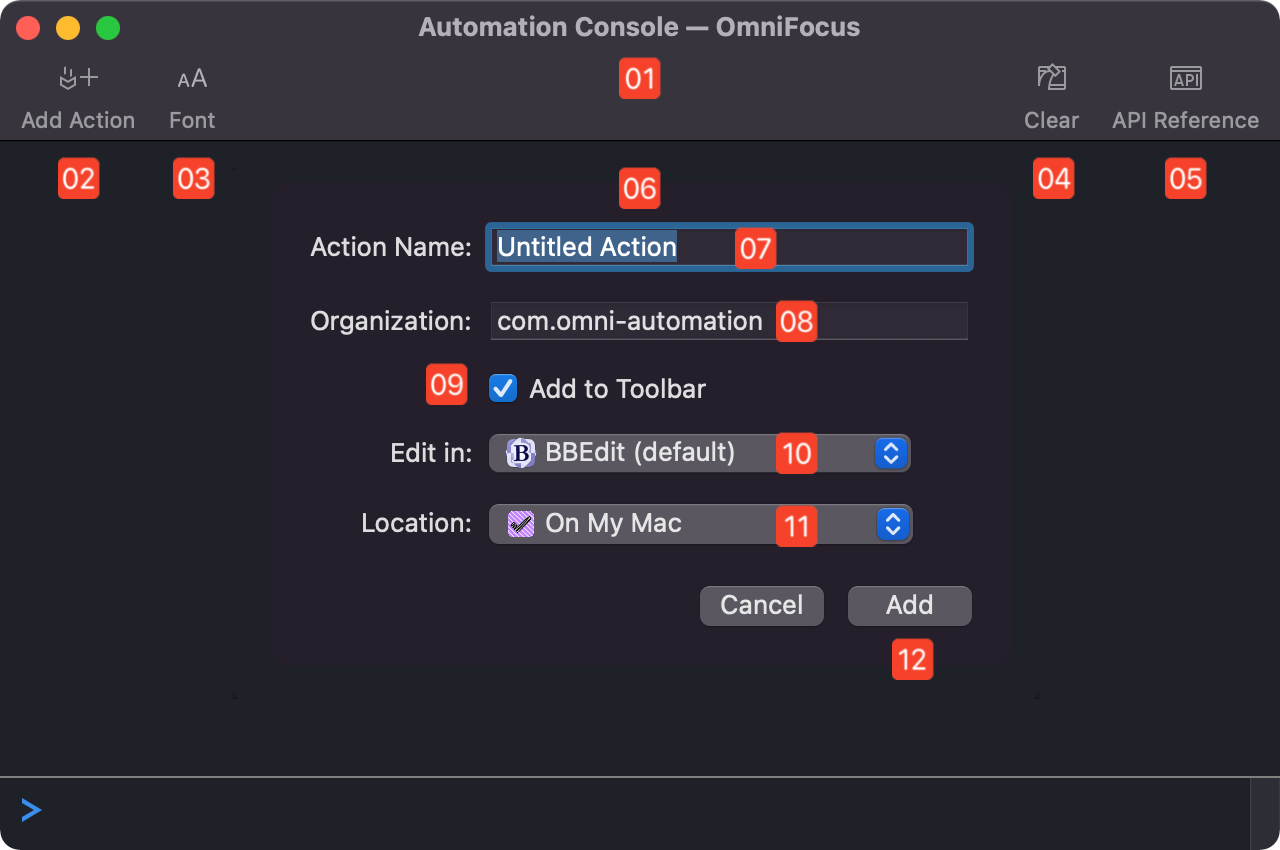
1 Console Window • The Console window.
2 “Add Action” Button • Activate this button to display the parameters overlay 6 for naming and installing a new plug-in.
3 Font Parameters Menu • Select the size for the Console font: regular, medium, or large. Select the “Custom...” option to choose a fixed width font to use for the Console, such as: Menlo or SF Mono
4 Clear Console • Click this button to clear the Console window of content.
5 API Reference • Click this button to open the Omni Automation API for the host Omni application.
6 New Action Overlay • This window overlay displays the controls for setting the parameters of the new plug-in.
7 Action Name • The entered value will be used for both the plug-in’s menu item title and its file name.
8 Developer ID • The identifier for the developer of the action. Usually structured: com.NameOfDeveloper This value is remembered by the dialog and will continue to appear with each summoning until it is changed. The example shown: com.omni-automation follows the recommended practice of avoiding the use of spaces in the plug-in identifier.
9 Add to Toolbar • Select this option to automatically add the new plug-in to the Console toolbar. IMPORTANT: If you’ve chosen this option, do not edit the plug-in identifier once the plug-in has been created. Doing so will disable the plug-in access from the toolbar.
10 Editing Application • This menu displays a list of text editor applications on your Mac. Select the application to be used to open and edit the new plug-in.
11 Location • This menu will display a list of standard (local/iCloud) and user-linked folders in which to save the new plug-in file. Installed plug-ins can be managed using the built-in “Automation Configuration” dialog summoned from the Automation Menu.
12 “Add” Button • Select this button to create and install the new plug-in.
Upon the selection of the “Add” button, the plug-in file is created, installed, and opened in the users chosen or default text editor application.
(⬇ see below ) The new plug-in opened in an editor application (BBEdit):
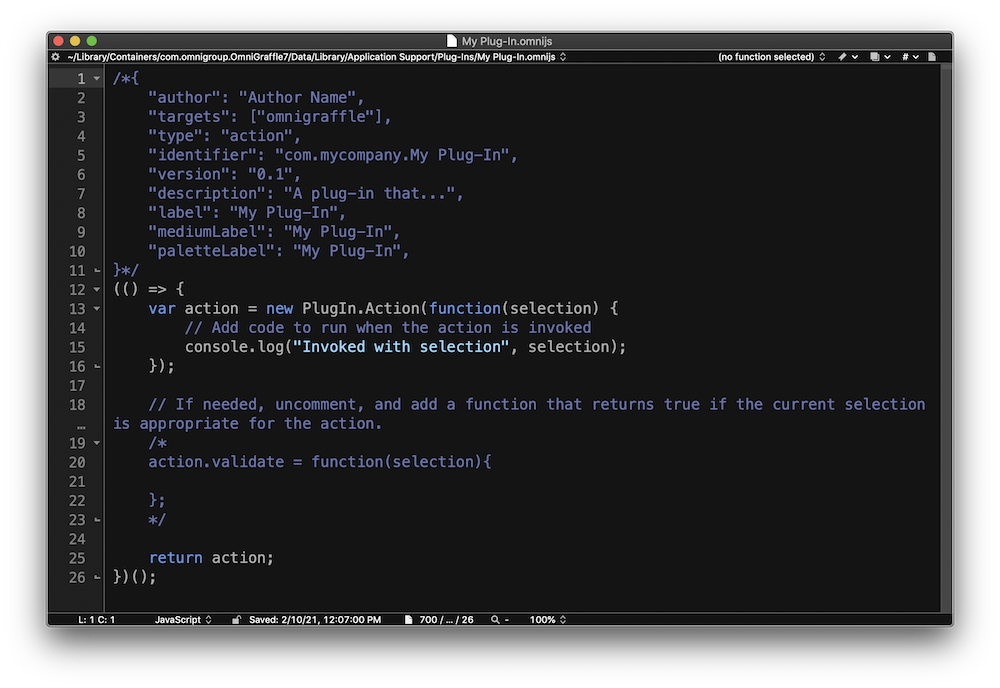
The opened plug-in code can be edited and adapted to perform whatever procedures you require. See the Plug-In Section for detailed explanations and examples of plug-in constructs and concepts.
Editing the Default Plug-In Template
By default, Omni applications open a copy of the same template when the “Add Action” button is selected. This template is stored within each application’s bundle:
OmniApp.app/Contents/Frameworks/OmniJS.framework/Resources/AddActionTemplate.omnijs
Here is the plug-in code used by the default template. When a copy of the template is opened in your chosen text editor, the placeholder TARGET_NAME is automatically replaced with the host Omni application name (omnigraffle, omniplan, omnioutliner, or omnifocus) and the ACTION_NAME placeholder is replaced with the plug-in name entered by the user in the Action Parameters Overlay 6 . The placeholder ORGANIZATION_NAME is replace with the value entered in the Organization field of the overlay.
Default “Add Action” Template
/*{"author": "Author Name","targets": ["TARGET_NAME"],"type": "action","identifier": "ORGANIZATION_NAME.ACTION_NAME","version": "0.1","description": "A plug-in that...","label": "ACTION_NAME","mediumLabel": "ACTION_NAME","paletteLabel": "ACTION_NAME",}*/(() => {var action = new PlugIn.Action(function(selection) {// Add code to run when the action is invokedconsole.log("Invoked with selection", selection);});// If needed, uncomment, and add a function that returns true if the current selection is appropriate for the action./*action.validate = function(selection){};*/return action;})();
Although there is no direct interface provided in the Omni applications for editing the default template, it is possible to customize each Omni application’s template by following these steps:
Steps to Edit Default “Add Action” Template
- Click the “Open AppleScript Script” button displayed in the following Omni application examples. The provided AppleScript script will open in the default AppleScript editor on your Mac.
- Open the default plug-in template file by running the provided AppleScript script.
- In the editor application, replace the contents of the open default plug-in template file with the template provided for the corresponding Omni application.
- In the new template text, replace the AUTHOR-NAME with your name or company name
DO NOT ALTER the ORGANIZATION_NAME TARGET_NAME or ACTION_NAME tags (shown in red) as those are used by the app and are filled in automatically when a new plug-in is generated. - Save and close the edited default plug-in template file, and the open AppleScript script.
NOTE: Updating the Omni application may reset the default plug-in to the standard template.
OmniFocus
The following is a basic single-action template for an OmniFocus plug-in you can use as a replacement for the default template.
Replacement Template for OmniFocus
/*{"type": "action","targets": ["TARGET_NAME"],"author": "AUTHOR-NAME","identifier": "ORGANIZATION_NAME.of.ACTION_NAME","version": "1.0","description": "The plug-in description goes here.","label": "ACTION_NAME","shortLabel": "ACTION_NAME","paletteLabel": "ACTION_NAME","image": "gearshape.fill"}*/(() => {const action = new PlugIn.Action(async function(selection, sender){// action code// selection options: tasks, projects, folders, tags, databaseObjects, allObjectstry {// PROCESSING STATEMENTSnew Alert("GREETINGS", "Hello World!").show()}catch(err){new Alert(error.name, err.message).show()console.error(err)}});action.validate = function(selection, sender){// validation code// selection options: tasks, projects, folders, tags, databaseObjects, allObjectsreturn true};return action;})();
OmniGraffle
The following is a basic single-action template for an OmniGraffle plug-in you can use as a replacement for the default template.
Replacement Template for OmniGraffle
/*{"type": "action","targets": ["TARGET_NAME"],"author": "AUTHOR-NAME","identifier": "ORGANIZATION_NAME.og.ACTION_NAME","version": "1.0","description": "The plug-in description goes here.","label": "ACTION_NAME","shortLabel": "ACTION_NAME","paletteLabel": "ACTION_NAME","image": "gearshape.fill"}*/(() => {const action = new PlugIn.Action(async function(selection, sender){// action code// selection options: canvas, document, graphics, lines, solids, viewtry {// PROCESSING STATEMENTSnew Alert("GREETINGS", "Hello World!").show()}catch(err){new Alert(error.name, err.message).show()console.error(err)}});action.validate = function(selection, sender){// validation code// selection options: canvas, document, graphics, lines, solids, viewreturn true};return action;})();
OmniOutliner
The following is a basic single-action template for an OmniOutliner plug-in you can use as a replacement for the default template.
Replacement Template for OmniOutliner
/*{"type": "action","targets": ["TARGET_NAME"],"author": "AUTHOR-NAME","identifier": "ORGANIZATION_NAME.oo.ACTION_NAME","version": "1.0","description": "The plug-in description goes here.","label": "ACTION_NAME","shortLabel": "ACTION_NAME","paletteLabel": "ACTION_NAME","image": "gearshape.fill"}*/(() => {const action = new PlugIn.Action(async function(selection, sender){// action code// selection options: columns, document, editor, items, nodes, outline, stylestry {// PROCESSING STATEMENTSnew Alert("GREETINGS", "Hello World!").show()}catch(err){new Alert(error.name, err.message).show()console.error(err)}});action.validate = function(selection, sender){// validation code// selection options: columns, document, editor, items, nodes, outline, stylesreturn true};return action;})();
OmniPlan
The following is a basic single-action template for an OmniPlan plug-in you can use as a replacement for the default template.
Replacement Template for OmniPlan
/*{"type": "action","targets": ["TARGET_NAME"],"author": "AUTHOR-NAME","identifier": "ORGANIZATION_NAME.op.ACTION_NAME","version": "1.0","description": "The plug-in description goes here.","label": "ACTION_NAME","shortLabel": "ACTION_NAME","paletteLabel": "ACTION_NAME","image": "gearshape.fill"}*/(() => {const action = new PlugIn.Action(async function(selection, sender){// action code// selection options: project, tasks, resourcestry {// PROCESSING STATEMENTSnew Alert("GREETINGS", "Hello World!").show()}catch(err){new Alert(error.name, err.message).show()console.error(err)}});action.validate = function(selection, sender){// validation code// selection options: project, tasks, resourcesreturn true};return action;})();