OmniOutliner & ChatGPT: Step List Generator
It is common practice to create outlines that list the steps necessary to perform a task or accomplish a goal. This Omni Automation plug-in for OmniOutliner enables the use of the ChatGPT option in the Writing Tools of Apple Intelligence, to automatically generate a “Step-List” outline for you.
| 012: (Quick Tip) The AI “Step-List” Generator |
| A short video demonstrating the creation of a “Step-List” outline from an Apple “Writing Tools” ChatGPT query. (Video from the Omni Automation Vids Podcast) |
|
|
Responses from AI services like ChatGPT are triggered by questions or queries called “prompts.” The better the prompt, the better the quality of the response. This plug-in uses a prompt that is designed to return a “Step-List” outline written in XML (Extensible Markup Language) and then to convert that XML into an OmniOutliner outline.
To return an AI-generated “Step-List,” use the prompt with your task or goal appended to the end of the provided prompt:
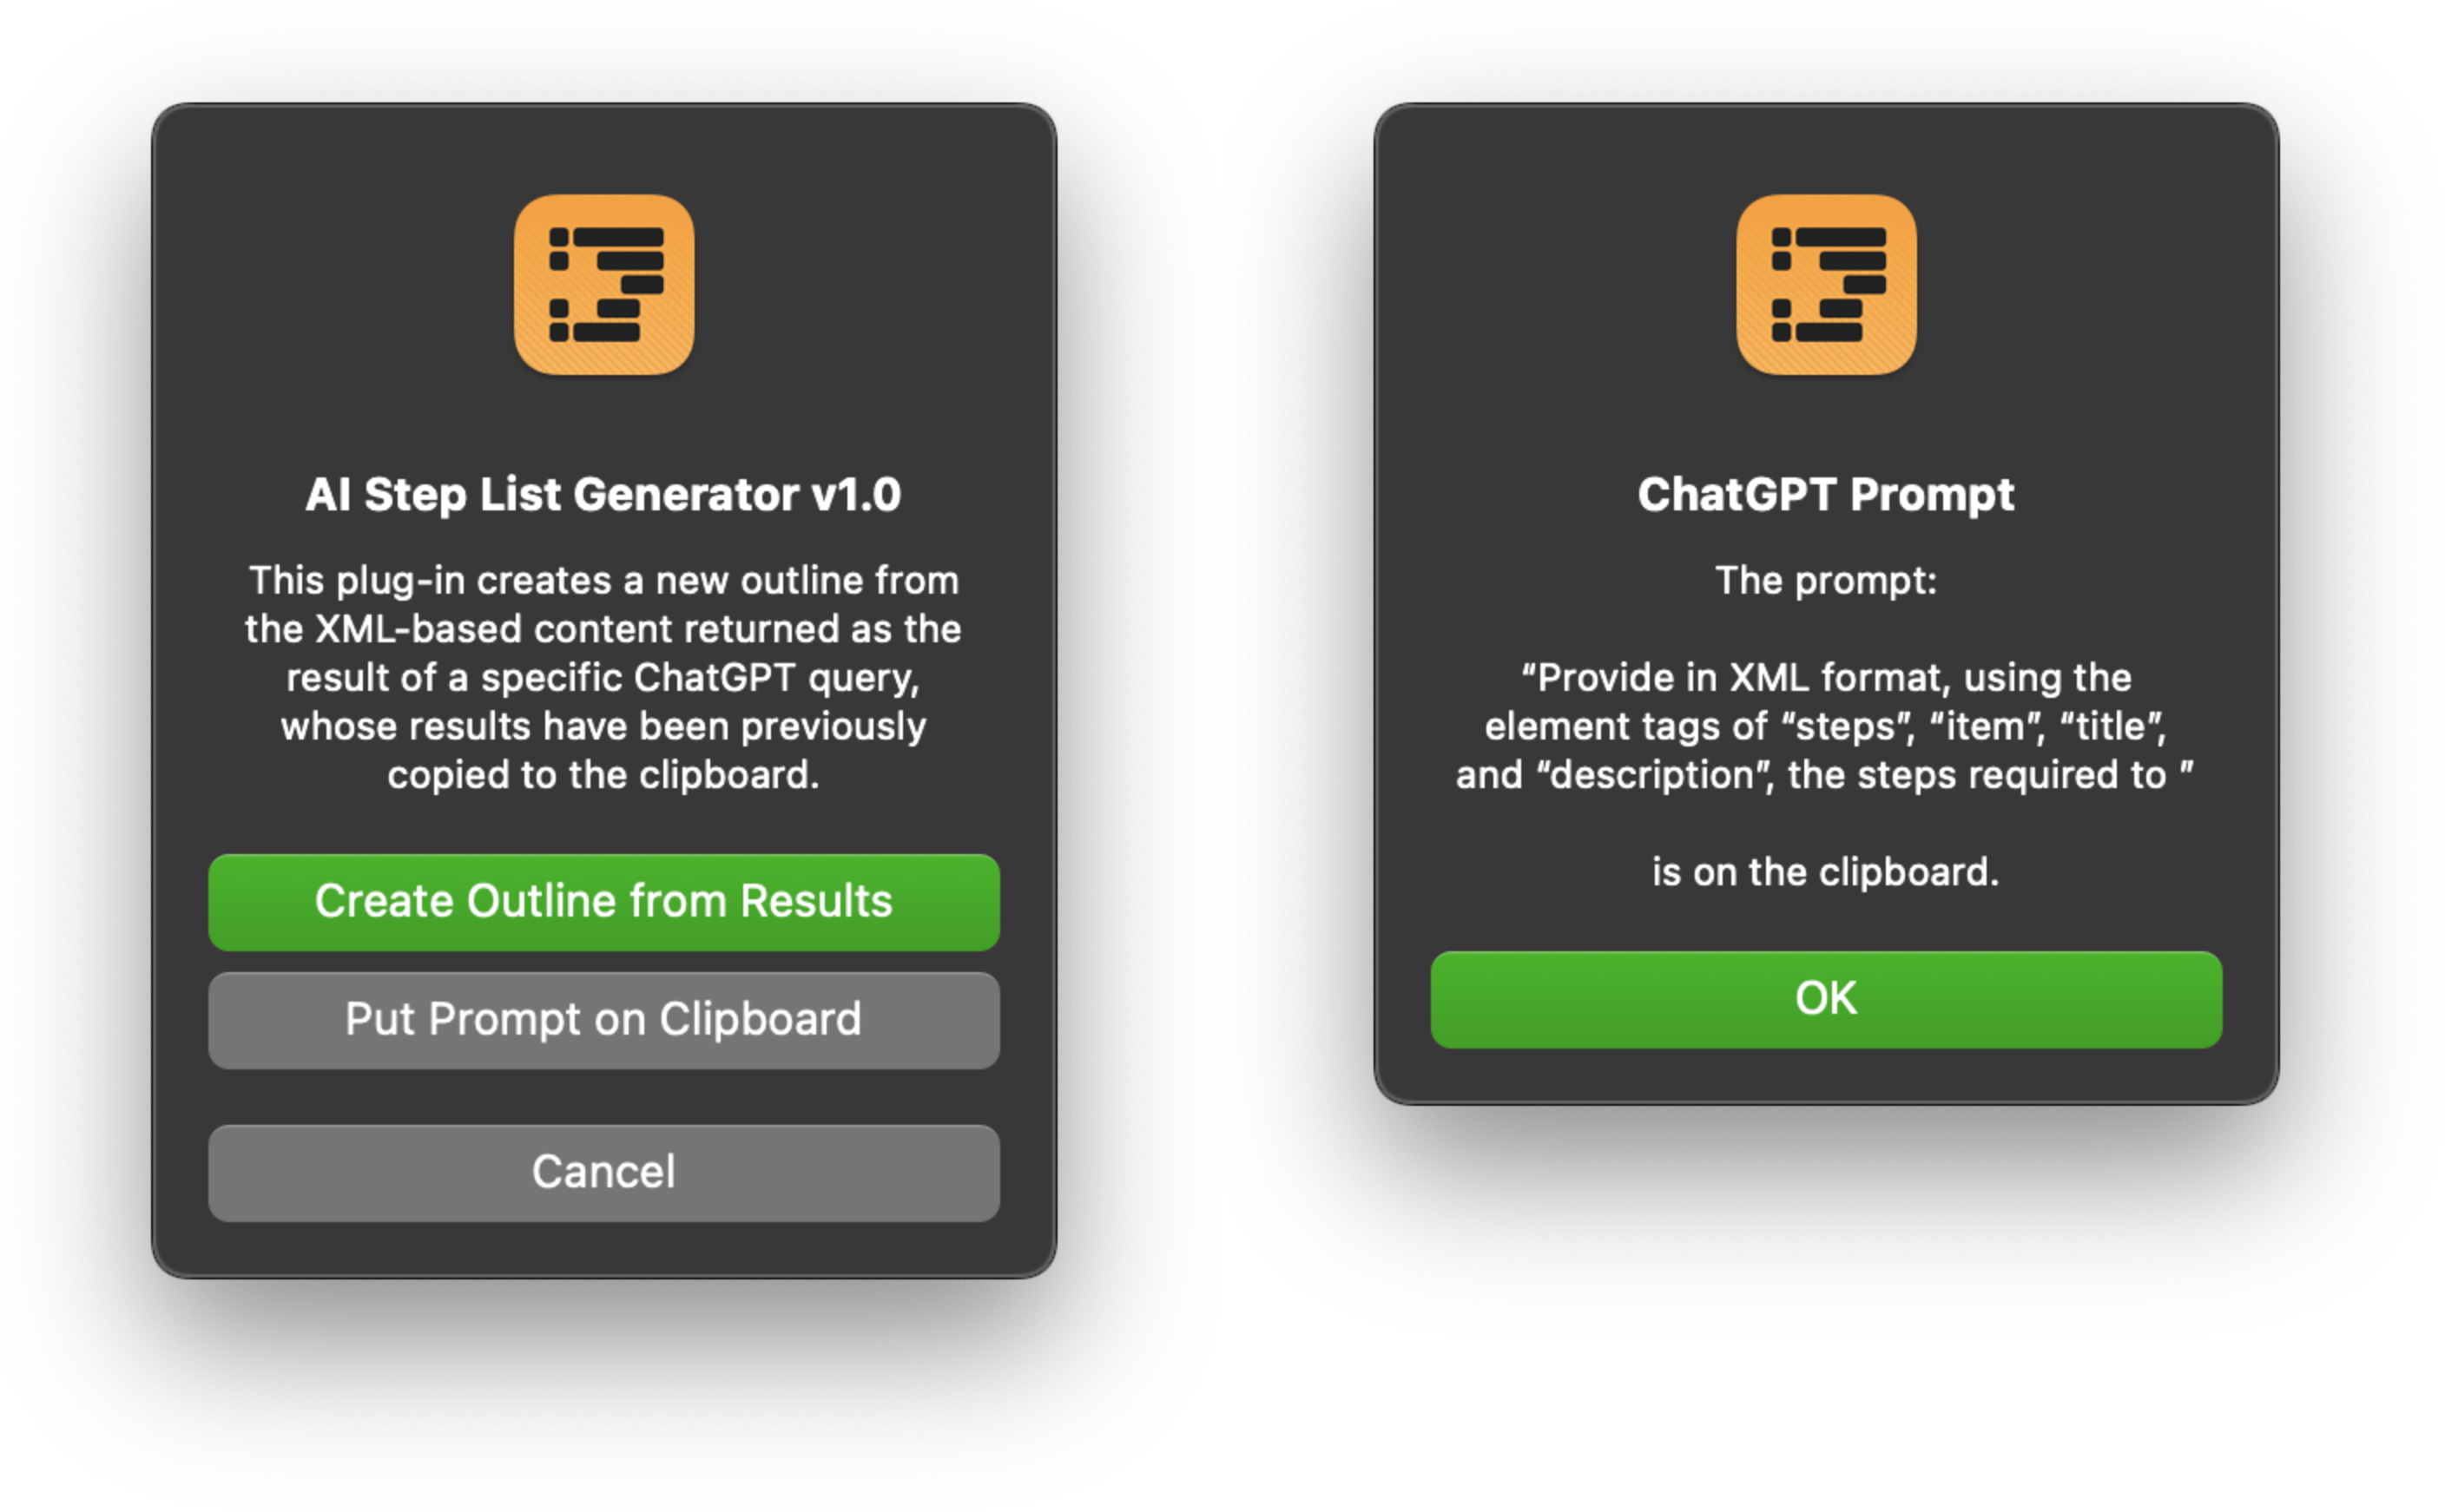
ChatGPT Prompt
Provide in XML format, using the element tags of “steps”, “item”, “title”, and “description”, the steps required to [describe your task here]
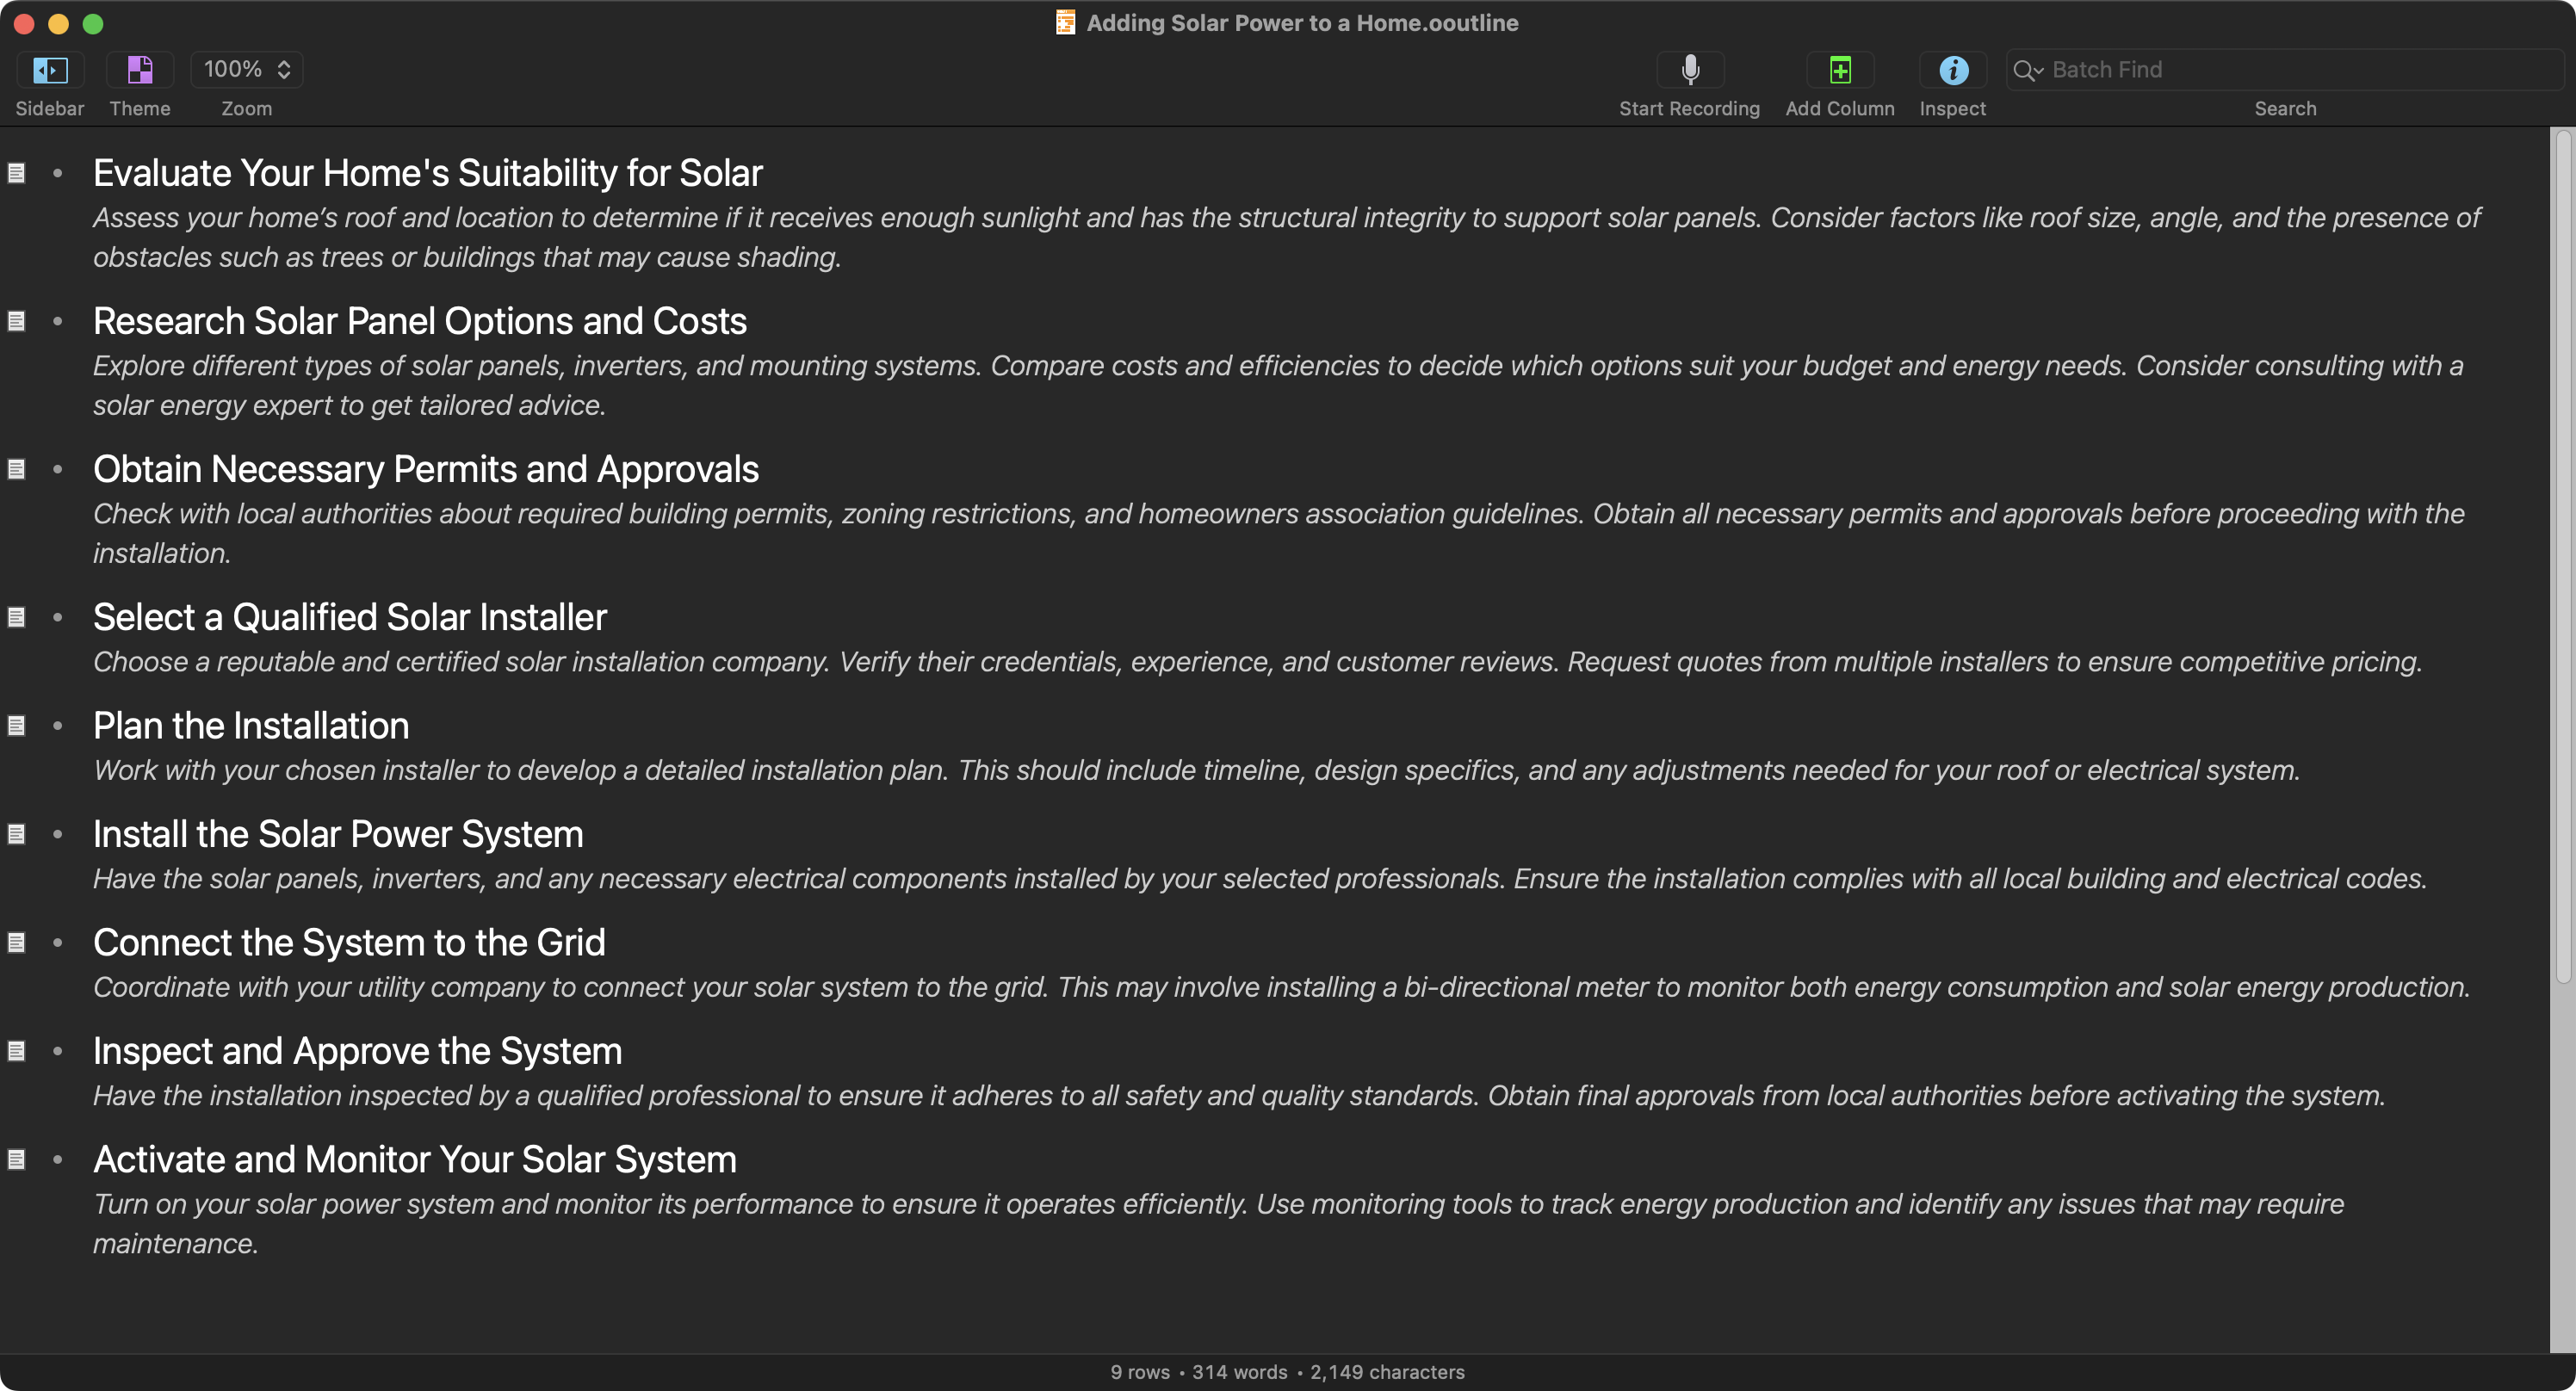
The results of the query are displayed in an overlay containing the XML formatted text. Select the Copy button at the bottom of the dialog to place them on the clipboard for the plug-in to process.
XML ChatGPT Query Results
<steps><item><title>Evaluate Your Home's Suitability for Solar</title><description>Assess your home’s roof and location to determine if it receives enough sunlight and has the structural integrity to support solar panels. Consider factors like roof size, angle, and the presence of obstacles such as trees or buildings that may cause shading.</description></item><item><title>Research Solar Panel Options and Costs</title><description>Explore different types of solar panels, inverters, and mounting systems. Compare costs and efficiencies to decide which options suit your budget and energy needs. Consider consulting with a solar energy expert to get tailored advice.</description></item><item><title>Obtain Necessary Permits and Approvals</title><description>Check with local authorities about required building permits, zoning restrictions, and homeowners association guidelines. Obtain all necessary permits and approvals before proceeding with the installation.</description></item><item><title>Select a Qualified Solar Installer</title><description>Choose a reputable and certified solar installation company. Verify their credentials, experience, and customer reviews. Request quotes from multiple installers to ensure competitive pricing.</description></item><item><title>Plan the Installation</title><description>Work with your chosen installer to develop a detailed installation plan. This should include timeline, design specifics, and any adjustments needed for your roof or electrical system.</description></item><item><title>Install the Solar Power System</title><description>Have the solar panels, inverters, and any necessary electrical components installed by your selected professionals. Ensure the installation complies with all local building and electrical codes.</description></item><item><title>Connect the System to the Grid</title><description>Coordinate with your utility company to connect your solar system to the grid. This may involve installing a bi-directional meter to monitor both energy consumption and solar energy production.</description></item><item><title>Inspect and Approve the System</title><description>Have the installation inspected by a qualified professional to ensure it adheres to all safety and quality standards. Obtain final approvals from local authorities before activating the system.</description></item><item><title>Activate and Monitor Your Solar System</title><description>Turn on your solar power system and monitor its performance to ensure it operates efficiently. Use monitoring tools to track energy production and identify any issues that may require maintenance.</description></item></steps>
AI Step List Generator Plug-In
The alert posted when launching the AI Step List plug-in offers provides these options:
- Cancel • Stop the execution of the plug-in.
- Put Prompt on Clipboard • The power of ChatGPT is unlocked through the instructions (called “prompts”) that you provide it. The prompt used by this plug-in delivers predictable, editable results that the plug-in can parse and convert into an OmniOutliner outline. Use this option to place the first part of the prompt on the clipboard so you can paste it into the ChatGPT query input summoned through the Apple Intelligence Writing Tools interface.
- Create Outline from Results • When this option is chosen, the plug-in will retrieve and process the XML results of the ChatGPT query, that you previous copied to the clipboard.
So, to generate a new step-list using the plug-in, do the following:
- Run the plug-in and copy the prompt to the clipboard.
- Place the cursor into an empty row in the OmniOutliner document, hold down the Control key and click to summon the contextual menu. Choose “Writing Tools > Compose” from the contextual menu.
- Paste the copied prompt into the ChatGPT Compose window.
- Insert a description of the task you want the steps outlined for, after the pasted prompt. For example: “Provide in XML format, using the element tags of “steps”, “item”, “title”, and “description”, the steps required to add solar power to a home.” Type Return key to trigger processing of your prompt.
- In the dialog showing the resulting XML content, click the Copy button to place the resulting text on the clipboard.
- Launch the plug-in again and choose the option to create an outline from the copied results. New rows will be added to the outline. NOTE: If a row is selected when the plug-in is triggered, the new rows will be added as siblings to the selected row. If no rows are selected, they will added to the end of the document.
AI Step List Generator
/*{"type": "action","targets": ["omnioutliner"],"author": "Otto Automator","identifier": "com.omni-automation.oo.ai-xml-to-outline","version": "1.0","description": "This plug-in creates a new outline from the XML-based content returned as the result of a specific ChatGPT query, whose results have been previously copied to the clipboard.","label": "AI Step List Generator","shortLabel": "AI Step List Generator","paletteLabel": "AI Step List Generator","image": "list.bullet.rectangle.fill"}*/(() => {const ChatGPTPrompt = "Provide in XML format, using the element tags of “steps”, “item”, “title”, and “description”, the steps required to "const instructionsURL = "https://omni-automation.com/apple-intelligence/omnioutliner-list-generator.html"const action = new PlugIn.Action(async function(selection, sender){try {versStr = action.plugIn.version.versionStringif(!versStr.includes(".")){versStr = versStr + ".0"}console.log("version string:", versStr)alertTitle = `AI Step List Generator v${versStr}`alertMessage = "This plug-in creates a new outline from the XML-based content returned as the result of a specific ChatGPT query, whose results have been previously copied to the clipboard."alert = new Alert(alertTitle, alertMessage)alert.addOption("Create Outline from Results")alert.addOption("Put Prompt on Clipboard")alert.addOption("Cancel")buttonIndex = await alert.show()if(buttonIndex === 2){throw {name: "-128", message: "User cancelled."}} else if (buttonIndex === 1){console.log("copying to clipboard…")Pasteboard.general.string = ChatGPTPromptconsole.log("done.")await new Alert("ChatGPT Prompt", `The prompt:\n\n“${ChatGPTPrompt}”\n\nis on the clipboard.`).show()throw {name: "-128", message: "User cancelled."}}if(Pasteboard.general.hasStrings === false || Pasteboard.general.string.length === 0){throw {name: "Missing Results",message: "The clipboard does not contain the ChatGPT query results."}}xmlText = Pasteboard.general.stringbehavior = new XML.WhitespaceBehavior(XML.WhitespaceBehavior.Type.Ignore)data = Data.fromString(xmlText)xmlDoc = XML.Document.fromData(data, behavior)rootElementName = xmlDoc.rootElement.nameconsole.log("rootElement name:", rootElementName)if (rootElementName !== "steps"){throw {name: "XML Issue",message: `The root element is not titled: “steps.” The correct ChatGPT prompt begins with: “${ChatGPTPrompt}”`}}editor = document.editors[0]selectedItems = editor.selection.itemsif (selectedItems.length === 0){var baseItem = rootItemvar insertionLocation = null} else {var baseItem = selectedItems[0].parentvar insertionLocation = null}for (element of xmlDoc.rootElement.children){rowTitle = element.firstChildNamed("title").stringContentsconsole.log("row title:", rowTitle)rowNote = element.firstChildNamed("description").stringContentsconsole.log("row note:", rowNote)item = baseItem.addChild(insertionLocation, function(item){item.topic = rowTitleitem.note = rowNote})console.log("item", item)editor.nodeForObject(item).expandNote()}}catch(err){if(err.name !== "-128" && !err.causedByUserCancelling){console.error(err.name, err.message)new Alert(err.name, err.message).show()}}});action.validate = function(selection, sender){return true};return action;})();