IMPORTANT: To jump to a specific section or example, TAP|CLICK the “Jump To:” button above or type Control-Option-J (⌃⌥J) and enter the number for the destination. For example: “019” (no quotes) for example 019, or “3” for section three.
Intro and Setup
|
|
OmniFocus Backup
In order to ensure the complete safety of your data, let’s use Omni Automation to save a backup copy of your current OmniFocus database. Select this button:
As an element of the built-in Omni Automation script security tools, a dialog displaying the script to be run will be displayed:
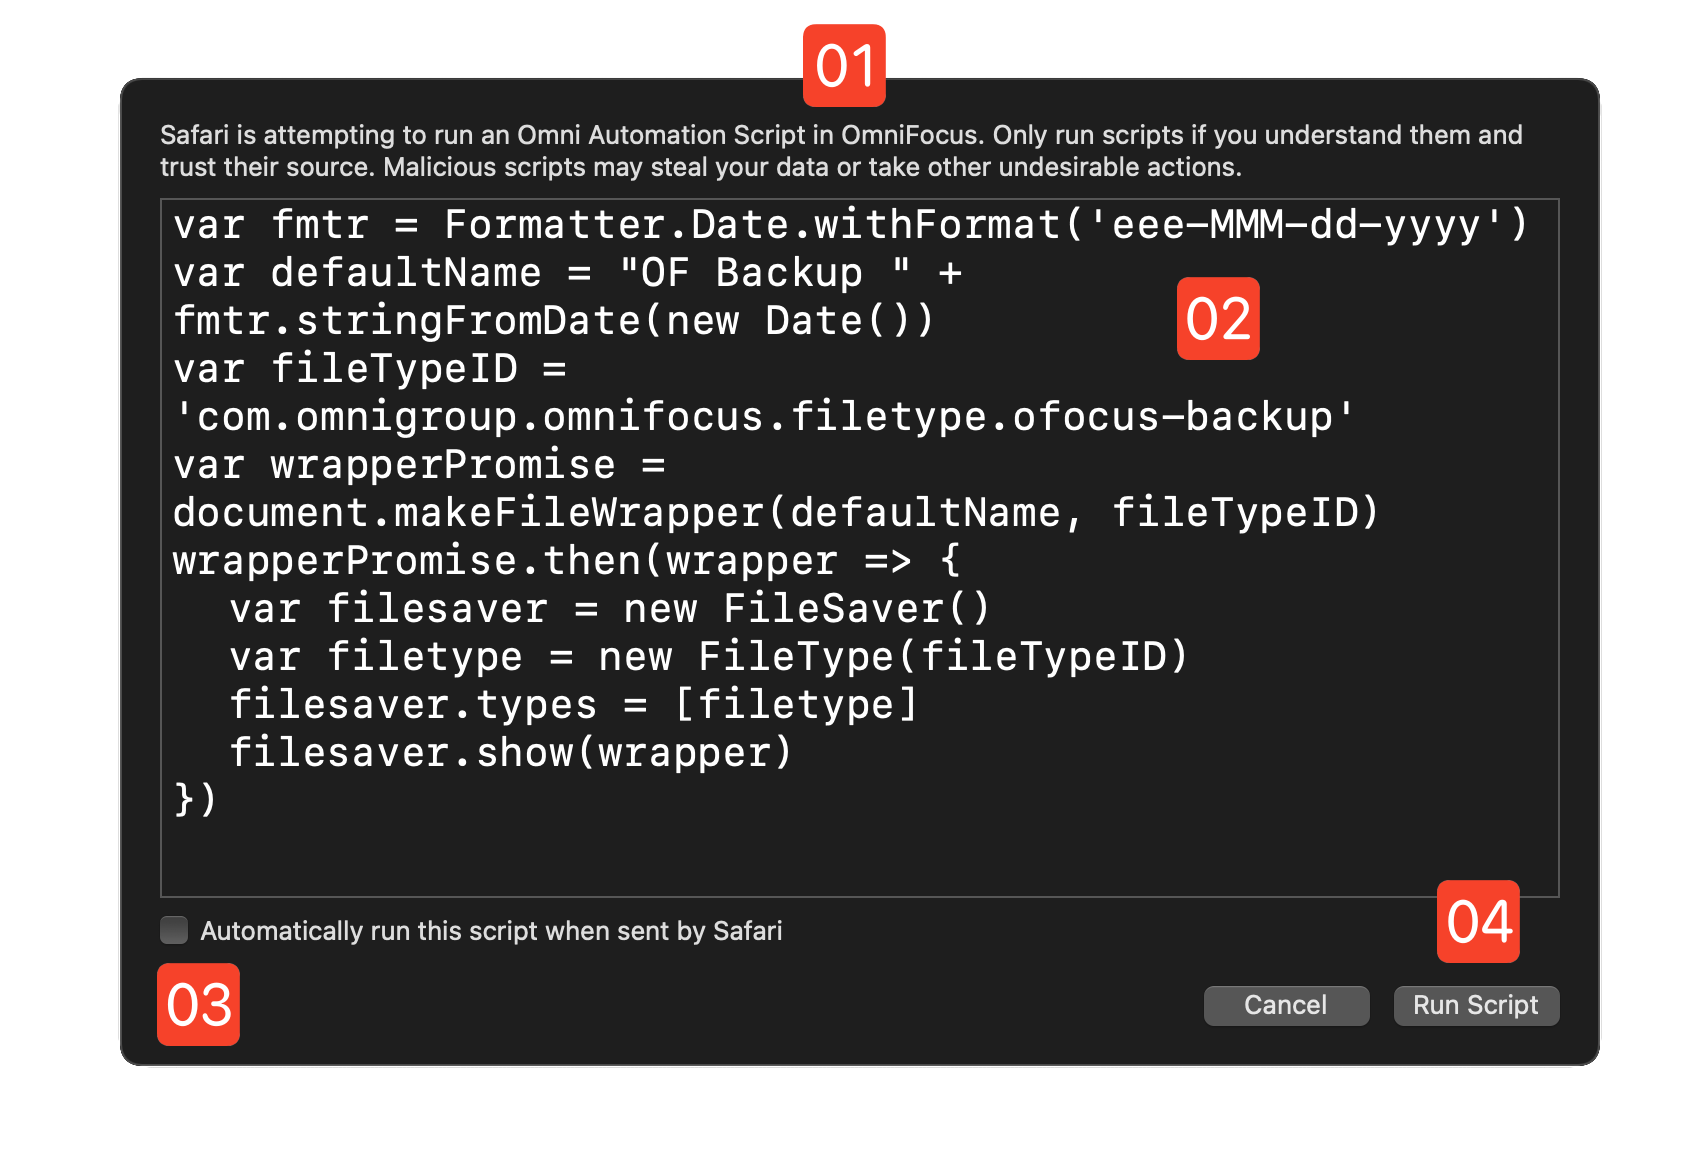
1 Omni Automation Security Dialog • This window provides user control of an Omni Automation script URL.
2 The Script Code • This is the text of the JavaScript script that is requesting permission to run on your device. To become available to run, the entire script must be scrolled in the window.
3 Script Enable • If you wish to designate this script to run again without prior approval, select this checkbox.
4 Run Script • Activate this button to run the script.
| DO THIS ► | Activate the Run Script button in the security window. In the forthcoming save dialog, choose a name and destination for the OmniFocus backup file. |
Terms and Definitions
- JavaScript
- Is a general purpose scripting language often used to interact with and manipulate webpages. Its common elements include: objects, arrays, classes, properties, and commands. Omni Automation is based upon standard JavaScript, but is used to query and control applications instead of webpages.
- API
- Application Programing Interface or Scripting Dictionary contains all of the scriptable objects, properties, commands, and functions used by OmniFocus.
- Script
- A collection of JavaScript statements and functions
- Execute
- A “programers” term for running a script or plug-in
- Console
- Each Omni application has a special window in which you can write and execute your Omni Automation scripts, and view the results or “log” of script statements
- Array
- A list of items, such as a list of names or objects
- Class
- A specific type of object, such as an image, project, or task
- Task
- An equivalent scripting term for an OmniFocus “action”
- Function
- A collection of JavaScript statements that perform a specific set of actions. Functions can be triggered or “called” one or more times from within a script
- Object
- A scriptable element of the application, such as a task or project.
- Property
- Objects have qualities that define what they are and how they function. For example, projects and tasks have names. The value of the name property is data in text format, which is alway encased in quote marks, like: "Landscaping and Maintenance"
- Variable
- A named container for holding data and references to objects. Variables are often two or more words “CamelCased” together, like this: sessionPlanningTask
Variables are used as substitutes and placeholders for the orignial objects: sessionPlanningTask.name = "Discuss Upcoming Class" - Constructor
- A JavaScript command for creating new “instances” of a Class
- Iterate
- To process the items in an array (list) one-at-a-time
- Code Comment
- Text placed in a script that is not meant to be executed, but rather provide an explanation of the code. Comments are proceded by two slash characters: // here is my comment
#1 • Console and API View
Learning the basics of the built-in OmniFocus Console and the API Viewer.
- The Console is a window in which you can write and execute your Omni Automation scripts, and view the results or “log” of script statements.
- API is an acronym for Application Programing Interface or Scripting Dictionary. This document contains definitions for all of the scriptable objects, properties, commands, and functions used by OmniFocus.
001 • Show the Console
| DO THIS ► |
(iPadOS) To summon the Automation Console sheet, type Command-Shift-C (⇧⌘-C), OR… TAP|CLICK the Automation Menu icon at the bottom-left of the OmniFocus window, and in the forthcoming popup menu, select the Automation Console menu item. |
- By default, the OmniFocus Console window in iPadOS a sheet that must be dismissed to view the results of the statements is has executed.
| DO THIS ► | (macOS) To summon the Console window, use the keyboard shortcut you previously created during the setup for this tutorial. Type: Control-Option-Command-K (⌃⌥⌘-K) OR… |
- By default, the OmniFocus Console window on macOS has an editable toolbar containing buttons for clearing the console results and summoning the API Viewer.
- NOTE: On macOS, both the Console and Application toolbars can be customized with buttons for installed plug-ins.
002 • Adjust Text Size
| DO THIS ► | (iPadOS) To adjust the size of the text display in the console window, tap the Automation Console Preferences gear icon to reveal the menu and then tap the menu item for setting text display size to Large |
| DO THIS ► | (macOS) To adjust the size of the text display in the console window, select Automation > Console Text Size > Large from the Automation Menu. |
003 • API Documentation Viewer
| DO THIS ► | (iPadOS) To display the OmniFocus scripting documentation, TAP|CLICK the “API Reference” tab in the Console window’s Content View Tabs control and the API Reference documentation will be displayed in the sheet window. |
| DO THIS ► | (macOS) To display the OmniFocus scripting documentation, select the “API Reference” option from the Automation Menu. |
- The dictionary content can be organized in a variety of ways: Inheritance, Nesting, or as a Flat alphabetical list of entries.
- The API content can be displayed in either of three sizes: Regular, Medium, and Large
- The API documentation is searchable using the provided search field.
004 • Application Class
| DO THIS ► | In the API section of the TOC Sidebar, TAP|CLICK the Application class entry to reveal its definition and related properties. |
The properties of the Application class are either:
- keyboard sensors (commandKeyDown, controlKeyDown, optionKeyDown, shiftKeyDown) or…
- informational (buildVersion, name, platformName, userVersion, version)
- The Application class has one function (command): openDocument()
005 • Ready for Input
| DO THIS ► |
(iPadOS) TAP|CLICK the “Console” Content View Tab to switch the window to console mode. Next, TAP|CLICK in the code input field to make the console ready for entering scripting code. |
| DO THIS ► | (macOS) Summon the Console window and click in the code input field at the bottom of the window. |
006 • Code Completion
| DO THIS ► | In the code input field enter the first two characters of the term “application” — “a” and “p” |
007 • Code Completion
| DO THIS ► |
TAP|CLICK the first code completion instance “app” which is used in Omni Automation to represent the Application object in scripts. Once the code completion button (iPadOS) or menu item (macOS) is selected, the corresponding code will entered in the console. |
008 • “name” Property
| DO THIS ► | To specify a property of the Application object, such as “name,” follow the “app” entry with a period and then type the first two characters of the property: “n” and “a” |
009 • Property Value
| DO THIS ► |
TAP|CLICK the code completion button and the complete property title will be entered in the code input field. To submit (run) the script, simply TAP|CLICK the Return key. |
- The result shown in the Console is: "OmniFocus" = $1
010 • History Variables
| DO THIS ► | To prove that history variables represent and retain the resulting values of their corresponding script statements, enter the variable $1 in the console and TAP|CLICK the Return key. |
- The result shown in the Console is: "OmniFocus" = $1
011 • Application Properties: platformName
| DO THIS ► | Enter and execute the statement for retrieving the value of this property:
|
- The result shown in the Console is: "macOS" = $2
012 • Application Properties: buildVersion
| DO THIS ► | Enter and execute the statement for retrieving the value of this property:
|
- The result shown in the Console is:
[object Version: 149.14] {versionString: "149.14"} = $3
The result is an instance of the Version class or a Version Object. Note that following the bracketed object […] is a braced entity {…} showing a property and its corresponding value delimited by a colon character. This braced entity is called a Property Record.
Let’s retrieve the value of versionString property of the returned Version object:
| DO THIS ► | To re-enter the previous statement in the Console, type the UP ARROW key once, and append a period and the versionString property to the statement, and then and TAP|CLICK the Return key.
|
- The result shown in the Console is: "149.14" = $4
013 • Application Properties: userVersion
| DO THIS ► | Enter and execute the statement for retrieving the value of this property:
|
- The result shown in the Console is:
[object Version: 3.11.7] {versionString: "3.11.7"} = $5
| DO THIS ► | Retrieve the previous statement by typing the UP ARROW key once, and append a period and the versionString property to the statement, and then and TAP|CLICK the Return key.
|
- The result shown in the Console is: "3.11.7" = $6
014 • Properties String
| DO THIS ► | Enter the following statement that places the history variables in an array, and then applies the join(…) function to the array to add a space between the value of each variable:
|
- The result shown in the Console is:
"OmniFocus
macOS
149.14
3.11.7" = $7
015 • Clearing the Console
| DO THIS ► | And to close out this initial look at the console, we’ll clear the contents of the console window by entering and executing the clear() function with the Console class:
|
- Another useful Console command is console.log("Howdy!")
This command is frequently placed in scripts to provide feedback during the script execution.
Console • Summary
In this section you learned:
How to activate “Developer Mode” in order to gain access to the Automation Console, Automation API Reference, the Automation Menu, and the dialog for Configuring Plug-In Management Controls
How to access the API and use the provided information to access the values of the properties of the Application class.
How to use code completion instances in the console window.
#2 • Tasks in the Inbox
The topic of this section is about creating and manipulating tasks in the OmniFocus Inbox.
016 • Backup/Restore Content
In preparation, select the Inbox perspective and clear it of any tasks with a TAP|CLICK on the Inbox Backup button below. The corresponding Omni Automation script will be executed and will move the contents of the Inbox into a new project titled “Inbox-Backup.”
To return the archived tasks to the Inbox, TAP|CLICK the Inbox Restore button, whose script will move the contents of the “Inbox-Backup” project back into the Inbox and then delete the empty backup project.
•
017 • “inbox” Property
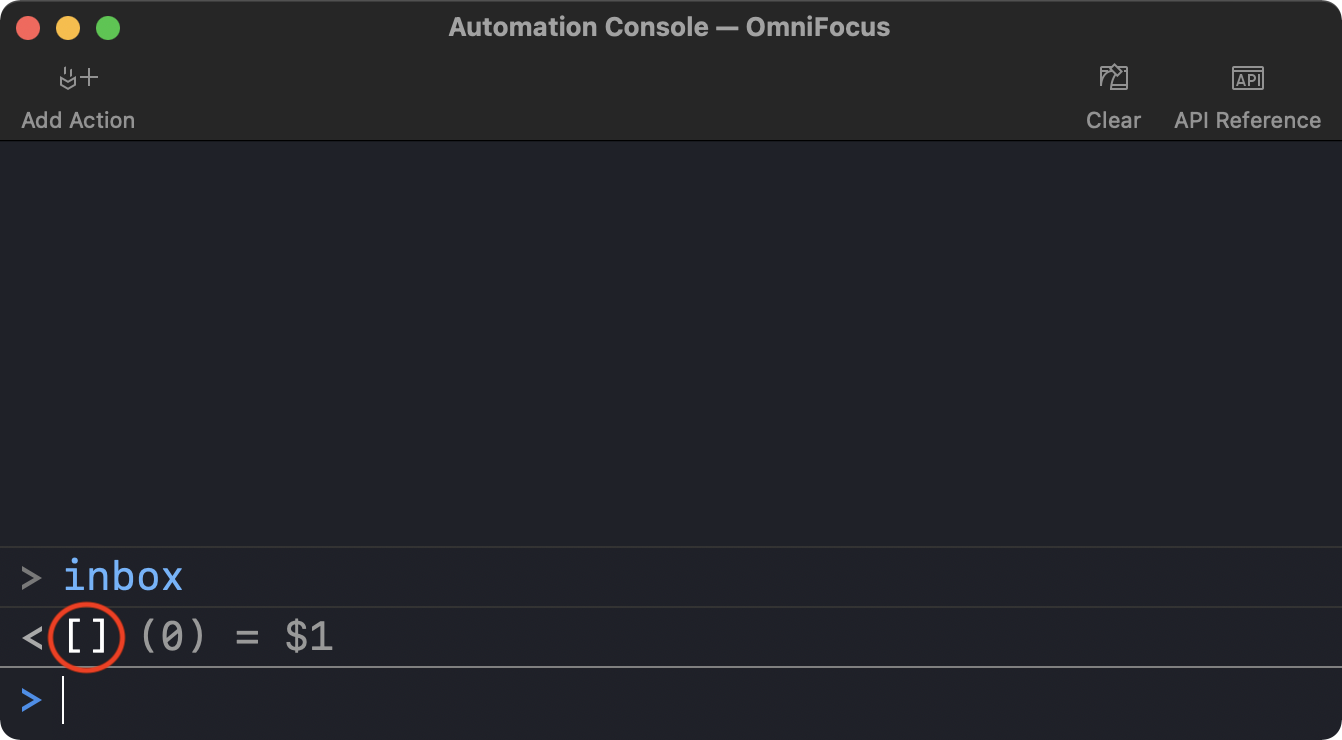
| DO THIS ► | In the OmniFocus console window, enter the term: inbox and TAP|CLICK the Return key to execute the script:
|
- NOTE: (above) The text //--> [] represents the result of the execution of the previous script statement as it appears in the Console window. In this example, the result is an empty array: [] indicating there are no items in the Inbox. (see below)
018 • Count Inbox Items
| DO THIS ► | To confirm the results of the previous script, enter and run the following statement that checks the “length” or number of items in the result array:
|
019 • Create Task
| DO THIS ► |
New Tasks are created using the new item constructor. Enter and execute the following statement for creating a new instance of the Task class titled “Task Two” by placing the new constructor term prior to the class name Task and include the name for the new task as a text string placed within the opening and closing constructor parenthesis:
|
Object References and Properties Records
An [object reference] is a representative for a scripting object and may be stored in a variable for use later in a script in order to address the previously created/referenced item.
A resulting console {properties record} is a JavaScript object containing a comma-delimited list of each of the source object’s property names and their corresponding values:
{property:value, property:value, property:value, etc.}
A property is a quality, feature, or element of the object (in this example, the object is a Task). Properties have values that may be expressed in the form of text strings (such as the name property), an array of object references (like the attachments property), booleans (true/false) (such as the flagged property), or even dates (such as the dueDate and deferDate properties)
Here is a property record for a newly created task:
Task Object Reference and Properties Record
[object Task: Task Two] {active: true, added: null, after: [object Task.ChildInsertionLocation], assignedContainer: null, attachments: [], before: [object Task.ChildInsertionLocation], beginning: [object Task.ChildInsertionLocation], children: [], completed: false, completedByChildren: false, completionDate: null, containingProject: null, deferDate: null, dropDate: null, dueDate: null, effectiveActive: true, effectiveCompletedDate: null, effectiveDeferDate: null, effectiveDropDate: null, effectiveDueDate: null, effectiveFlagged: false, ending: [object Task.ChildInsertionLocation], estimatedMinutes: null, flagged: false, flattenedChildren: [], flattenedTasks: [], hasChildren: false, id: [object ObjectIdentifier: Task ay_6C0aFLsr], inInbox: true, linkedFileURLs: [], modified: null, name: "Task Two", note: "", notifications: [], project: null, repetitionRule: null, sequential: false, shouldUseFloatingTimeZone: true, tags: [], taskStatus: [object Task.Status: Available], tasks: []}
020 • Inbox Content Object References
| DO THIS ► | Enter and run the following script statement:
|
021 • Count of Inbox Items
| DO THIS ► | Enter and execute the same script statement as we did previously:
|
022 • Identify by Position (index)
| DO THIS ► | Enter and run the following script statement in the colsole:
|
023 • Identify by Name
| DO THIS ► | Enter and run the following script statement:
|
024 • Set Property Value
| DO THIS ► | Enter and run the following script statement that will cause the task to become flagged:
|
025 • Store Object Reference
| DO THIS ► | Enter and run the following script statement that will instantiate the variable “task” with an object reference to the targeted task:
|
- To confirm that the variable task is holding a reference to the previously created task, enter the variable task in the console and TAP|CLICK the Return key. The result will be the object reference and properties record for the task.
026 • Target Stored Reference
| DO THIS ► | Enter and run the following script statement that will set the value of the referenced task’s note property:
|
027 • Task Insertion Locations
The instance of the Inbox class returned as the value the inbox property of the Database class has two properties that can be used when adding, duplicating, or moving tasks: beginning and ending
Here's the definition for the Task constructor from the OmniFocus API documentation:
new Task(name: String, position: Project, Task, or Task.ChildInsertionLocation or null) → (Task) • Returns a new Task at the given location. If a project or task is given as a location, the new task is placed at the end of the children of that parent. If no location is specified, then the task is created at the end of the inbox.
028 • Insertion Locations
| DO THIS ► | Enter and run the following script statements:
|
- The position indicators work with all container classes: Folder, Project, Task, and the Database properties inbox, library, projects, and folders to enable control of the placement of new items.
029 • Iterating the Inbox Items
| DO THIS ► |
Enter and run the following multiple-line script. TAP|CLICK the “Copy Script” button and then paste the copied script into OmniFocus console and press the “Return” or “Go” key. |
Iterate Inbox
inbox.forEach(task => {task.note = "This is the note for task: " + task.nametask.flagged = false})
- The JavaScript forEach() command is used to iterate the items in an array.
- array.forEach(arrayItem => {console.log(arrayItem)})
Inbox • Summary
In this section you learned:
The value of the inbox property of the Database class represents the contents of the OmniFocus Inbox, and returns an array of object references to the tasks that are currently in the Inbox.
How to create new tasks using the new task constructor: new Task("Task Name") that takes a positional placement indicator as its optional second parameter: new Task("Task Name", container or position for the created task)
object references and property records are used to represent objects and to display a list of their properties and corresponding values.
Tasks can be identified by their position in their parent container or by the value of their name property, and an object reference to specified Inbox task can be generated using the taskNamed("Title of Task to Find") function called on the inbox property. NOTE: Also see byName() function of the Array class.
The tasks in the Inbox can be processed using the forEach(…) function called on the resulting array of task object references returned as the value of the inbox property.
#3 • Due and Repeat
OmniFocus is the premier tool for personal time management. In JavaScript and Omni Automation, date and time intervals are represented through the use of JavaScript date objects. This section of the OmniFocus tutorial will be focused on the use of date objects with tasks.
Specifically, in this section of the OmniFocus tutorial you’ll learn how to:
Create tasks with specific due dates
Create tasks that repeat at specified intervals
Tasks with Due Dates
OmniFocus is designed to provide an organized structure to your schedule. To do so, tasks are often associated with both specific and relative moments in time. This section will examine how to create and apply date/time references to tasks.
030 • Create Meeting Task
| DO THIS ► | Enter and run the following script to create a new task in the Inbox:
|
Here is the entry for the dueDate task property from Omni Automation scripting API:
dueDate (Date or null) • If set, the Task should be completed by this date.
There are five ways to use the JavaScript date constructor to instantiate a date object:
Create New Date Object (current date/time)
new Date()
Milliseconds Since Start of 1970
new Date(1623806853256)
Standard Date String
new Date("July 4, 2021")
ISO Date String
new Date("2021-07-04T00:00:00")
Specifying Date Elements (yr, mth, day, hour, min, secs)
new Date(2021, 11, 1, 13, 30, 0, 0)
FYI: Detailed information regarding JavaScript Date objects and related functions is available at developer.mozilla.org
031 • Create Date Object
| DO THIS ► | Copy, paste, and run the following two-line script: |
Next Month on the 20th at 1:30PM
// 20th of next month at 1:30PMvar d = new Date()var dateObj = new Date(d.getFullYear(), d.getMonth() + 1, 20, 13, 30)
032 • Assign as Due Date
| DO THIS ► | Enter and run this script:
|
Repeating Tasks
So you’ve created a new task that is due on the 20th of next month at 1:30PM. But circumstances change and the “Staff Meeting” task needs to be re-scheduled to occur every Tuesday at 10:30AM. Let’s examine how to alter the existing task to become one that repeats.
According to the OmniFocus Omni Automation scripting API, the Formatter.Date class has the following function for generating a formatted date:
withStyle(dateStyle: Formatter.Date.Style, timeStyle: Formatter.Date.Style or null) → (Formatter.Date) • A formatter that will display dates according to the specified date and time formats selected in system settings.
The following script will use the withStyle(…) function of the Formatter.Date class to create a new date formatter instance and then have it translate the provided text string into a date object:
033 • Generate Date with Formatter
Generate Date from Shorthand String
var formatter = Formatter.Date.withStyle(Formatter.Date.Style.Short) var dateObj = formatter.dateFromString('tuesday @ 10:30AM')
| DO THIS ► | Copy and paste the previous short script into the console and run it. |
034 • Assign Date as Due Date
| DO THIS ► |
With the date object created, it can be assigned as the value for the task’s dueDate property. Enter and run the following script that set the dueDate property of the fourth task in the Inbox (Reminder: the first item in a JavaScript array has an index of 0):
|
035 • Repetition Rule
Tasks are set to be repeating by setting the value of the task’s repetitionRule property to a created instance of the Task.RepetitionRule class. Here is the scripting API entery for the repetitionRule property:
repetitionRule (Task.RepetitionRule or null) • If repetition is enabled for the task, the value of this task property is an instance of the Task.RepetitionRule class.
And here is the API entry for constructing an instance of the Task.RepetitionRule class:
new Task.RepetitionRule(ruleString: String, method: Task.RepetitionMethod) → (Task.RepetitionRule) • Returns a new Task.RepetitionRule with the specified ICS rule string and repetition method. The the rule string is not valid, or combination with the method is not supported, an error will be thrown.
As the API entry details, a “rule string” will be needed to indicate the schedule of repetition. A rule string (ICS formatted recurrence string) is a text string written in a specific format detailed on the iCalendar.org website. Fortunately, the RRULE Tool at iCalendar.org, is the simplest and easiest way to derive a correct ICS rule string.
Using the RRULE Tool, the ICS formatted rule string for a weekly repeating occurence is:
FREQ=WEEKLY;INTERVAL=1
Or to include specific a weekday for the weekly repetition:
FREQ=WEEKLY;BYDAY=TU
(TIP: Be sure to remove any superfluous punctuation from the end of the rule string, such as a trailing semi-colon.)
Generating & Assigning a Repetition Rule
var ruleString = "FREQ=WEEKLY;BYDAY=TU"var repMethod = Task.RepetitionMethod.DueDatevar repRule = new Task.RepetitionRule(ruleString, repMethod)inbox[3].repetitionRule = repRule
| DO THIS ► | Copy, paste, and run the previous script in the console window. |
036 • TIP: to make a task non-repeating, set the value of the repetitionRule property to null
Stop Task Repetition
inbox[3].repetitionRule = null
037 • Notifications
With busy schedules, receiving a notification prior to a meeting can be useful. Let’s examine how to assign a notification to the “Staff Meeting” task.
Notification-related properties and functions of the Task class:
notifications (Array of Task.Notification r/o) • An array of the notifications that are active for this task.
addNotification(info: Number or Date) → (Task.Notification) • Add a notification from the specification in info. Supplying a Date creates an absolute notification that will fire at that date. Supplying a Double (number) will create a due-relative notification. Specifying a due relative notification when this task’s effectiveDueDate is not set will result in an error.
removeNotification(notification:Task.Notification) → ( ) • Remove an active notification for this task. Supplying a notification that is not in this task’s notifications array, or a notification that has task to something other than this task results in an error.
These properties and functions are used in conjunction with properties of the Notification class to assign and remove notifications to and from tasks.
The value for a task notification can be either of two types:
- A Date object indicating the exact time and date the notification should occur, or…
- A negative Number indicating the time period (in seconds) prior to the event the notification should occur.
Add Notification to Task
taskNamed("Staff Meeting").addNotification(-3600)
| DO THIS ► | Set a notification to the “Staff Meeting” task for an hour before the meeting occurs. Copy, paste, and run the script in the console window. |
A notification will be added to the task.
Due & Repeat Summary
In this section you learned:
How to generate JavaScript date objects using the new Date( ) constructor and the Omni Automation date formatters.
How to assign a due date to a task by assigning a date object as the value for the task’s dueDate property.
How to make a task a repeating task by creating a repetition rule object and assign it as the value for the task’s repetitionRule property.
How to add a notification to the repeating task.
#4 • Tags
This section of the tutorial will examine how to create, find, assign, and delete tags — one of the most powerful features of OmniFocus.
038 • Tags Perspective
| DO THIS ► |
The Tags Perspective displays a list of your tags in the sidebar, and a list of all your actions grouped by the tags they belong to in the outline. Enter and run the following script that sets the value of the perspective property of the Window class so that the Tags Perspective is displayed: |
Show the Tags Perspective
document.windows[0].perspective = Perspective.BuiltIn.Tags
Creating Tags
Instances of the Tag class are created using the standard JavaScript new item constructor.
new Tag(name:String, position:Tag or Tag.ChildInsertionLocation or null) → (Tag r/o) • The new Tag object titled with the provided string. Unless otherwise specified, tags are added to the end of the array of the tags within their parent container.
039 • Create Tag
| DO THIS ► | Enter and run this script for creating a new tag at the start of the list of tags displayed in the Tags Perspective:
|
040 • Duplicate Tag
IMPORTANT:
in OmniFocus, tag titles are not required to be unique, and so multiple tags may be created using the same name.
Let’s see if that is true.
TIP: To re-enter the previous console statement, type the UP ARROW key.
| DO THIS ► | Enter and run the previous script again:
|
Although both tags share the same name, they possess different identifiers in the OmniFocus database. Their use can create confusion and conflicts.
041 • Delete Tag
| DO THIS ► | Enter and run this script that will locate and delete one of the duplicate tag objects:
|
- Javascript Conditional Statements are written using this format:
if (condition returning true|false){action to take}
Assigning Tags
With the duplicate tag removed, we can now examine the process for assigning a tag to a task. To assign one or more tags to a task, use either the addTag(…) or addTags(…) instance functions of the Task class.
addTag(tag:Tag) → ( ) • Adds a Tag to this task, appending it to the end of the list of associated tags. If the tag is already present, no change is made. The moveTags(…) function of the Database class can be used to control the ordering of tags within the task.
addTags(tags:TagArray) → ( ) • Adds multiple Tags to this task, appending them to the end of the list of associated tags. For any tags already associated with the Task, no change is made. The moveTags(…) function of the Database class can be used to control the ordering of tags within the task.
The following script statement will return an object reference to an existing tag specified by name, but if there is not one, will create a new tag using the specified name:
Object Reference for Tag Specified by Name
var tagObj = flattenedTags.byName("Zebra-Shoe") || new Tag("Zebra-Shoe")
- JavaScript logical operators are written using this format:
if true value return result || otherwise return this value - The “flattened” properties of the Database class (flattenedTags, flattenedTasks, flattenedProjects, flattenedFolders, and flattenedSections) represent arrays of all of the database occurrences of the specified class.
- The byName("name") and byID("xxxxxxxx") functions can be called on these properties to locate specific items.
042 • Assign Tag to Task
Using this conditional script statement, let’s generate an object reference to a tag with a specified name, and then assign the tag to the previously created task: “Staff Meeting”
| DO THIS ► | Enter and run the following script. (Reminder: type Option-Return to add a new line to a script in the Console without evoking the script.) |
Assign Tag to Task
var tagName = "Attendance Required"var tagObj = flattenedTags.byName(tagName) || new Tag(tagName)var taskObj = inbox.byName("Staff Meeting") || new Task("Staff Meeting")taskObj.addTag(tagObj)document.windows[0].perspective = Perspective.BuiltIn.Inboxdocument.windows[0].selectObjects([taskObj])
TIP: Use the same technique in your scripts whenever you need to generate an object reference to a unique tag.
Object Reference for Tag Specified by Name
var tagName = "name of tag"var tagObj = flattenedTags.byName(tagName) || new Tag(tagName)
Tags Summary
In this section you learned:
Using the perspective property of the Window class, you can change the perspective currently displayed in OmniFocus.
You learned how to create, reference, and assign tags to tasks.
#5 • Projects
A Project is a container for organizing and managing the tasks related to a specific topic or event. Projects are usually comprised of tasks that are designed to be processed in sequence, together, or in an order chosen by the user. Projects share many of the same properties and functions with tasks.
In this section of the tutorial, you’ll learn how to create projects, set the value of their properties, and populate them with tasks.
043 • Projects Perspective
| DO THIS ► | The Projects Perspective displays a list of your projects in the sidebar. Enter and run the following script that sets the value of the perspective property of the Window class so that the Projects Perspective is displayed: |
Show the Projects Perspective
document.windows[0].perspective = Perspective.BuiltIn.Projects
New Project
Instances of the Project class are created using the standard JavaScript new item constructor, with the name of the new project as the parameter passed into the function:
new Project(name:String, position:Folder or Folder.ChildInsertionLocation or null) → (Project) • Create an instance of the Project class.
As with tags and tasks, there is no limitation as to the naming of projects. You can have multiple projects titled using the same name. If maintaining an OmniFocus database of unique project names is important to you, the same functions we used in the previous section to ensure unique tags can be adapted for use with the creation and referencing of projects:
Unique Top-Level Project
var projName = "4-Step Success"var projObj = flattenedProjects.byName(projName) || new Project(projName)
044 • Create Project at Location
| DO THIS ► | Enter and run the following script: |
New Project
var projName = "4-Step Success"var projObj = new Project(projName, library.beginning)
NOTE: The property library of the Database class (line 2 in the previous script) represents the top-level folders and projects in the database, which are displayed in the Projects Perspective. This property also supports the use of the apply(…) method to iterate library content.
045 • Task Object References Array
NOTE: the value of the inbox property of the Database class is an array of object references to the tasks in the Inbox. We can create an array of object references to the first three tasks in the Inbox by using the JavaScript splice(…) function.
1st Three Inbox Tasks
var taskObjs = inbox.splice(0,3)//--> [[object Task: TASK ONE], [object Task: TASK TWO], [object Task: TASK THREE]]
046 • Move Tasks into Project
| DO THIS ► | Enter and run the following script for moving the inbox tasks into the newly created project: |
Move Tasks into Project
var taskObjs = inbox.splice(0,3)moveTasks(taskObjs, projectNamed("4-Step Success").beginning)
047 • Add Task to Project
Since the title of the targeted project is “4-Step Success” and it contains three tasks, we need to create one more task. Let’s add another task to the project.
| DO THIS ► | Enter and run the following script: |
Add 4th Task to Project
new Task("Task Four", projectNamed("4-Step Success").ending)
Project Properties
With all four tasks now in place in the project, we can change the value of a couple of project properties to alter the way the project functions.
For this example, we want the project tasks to be completed in order, and when the last task of the project is completed, the project is to be marked as completed. We can change the default values of the following properties of the example project to accomplish our goals:
sequential (Boolean) • If true, then children of this project form a dependency chain. For example, the first task blocks the second one until the first is completed.
completedByChildren (Boolean) • If set, the project will be automatically marked completed when its last child Task is marked completed.
048 • Set Value of Project Properties
| DO THIS ► | Enter and run the following script: |
Set Project Properties
var projObj = projectNamed("4-Step Success")projObj.sequential = trueprojObj.completedByChildren = true
049 • Set Value of Project Task Properties
To edit the properties of an existing project task, append the taskNamed(…) function to an object reference to the parent project:
| DO THIS ► | Enter and run the following script: |
Edit Task in Project
projectNamed("4-Step Success").taskNamed("Task One").flagged = true
Project Summary
In this section you learned:
How to display the Projects Perspective.
How to create a new instance of the Project class.
How to move tasks into a project.
How to add a task to a project.
How to change the values of the properties of a project.
#6 • Plug-Ins
An outstanding feature of Omni Automation is its mechanism for integrating scripts with applications through the use of user-created and deployed plug-ins.
An Omni Automation plug-in is a single-file script or script bundle that exposes script functionality contextually through the host Omni application’s “Automation” and “Share” menus. With a little bit of effort, you can create, deploy, and share your own plug-ins to add-to and automate the abilities of OmniFocus and the other Omni applications.
As an example, in this section you’ll learn how to create and install a plug-in that removes tags from all of the selected tasks selected in OmniFocus.
Editor Application
While the built-in automation console in OmniFocus is useful for writing and testing short script snippets, it is not designed to replace a full-featured editor application. To write Omni Automation plug-ins, you’ll need to use a text editor app or one of the 3rd-party JavaScript editor applications found on the Apple App Stores for macOS and iPadOS.
050 • If needed, install JavaScript Editor app
| DO THIS ► | If you don’t already have a JavaScript editing application installed, the Textastic Code Editor application (iPadOS) from Alexander Blach, and the BBEdit application (macOS) from BareBones Softare are excellent choices. |
The Plug-In Template
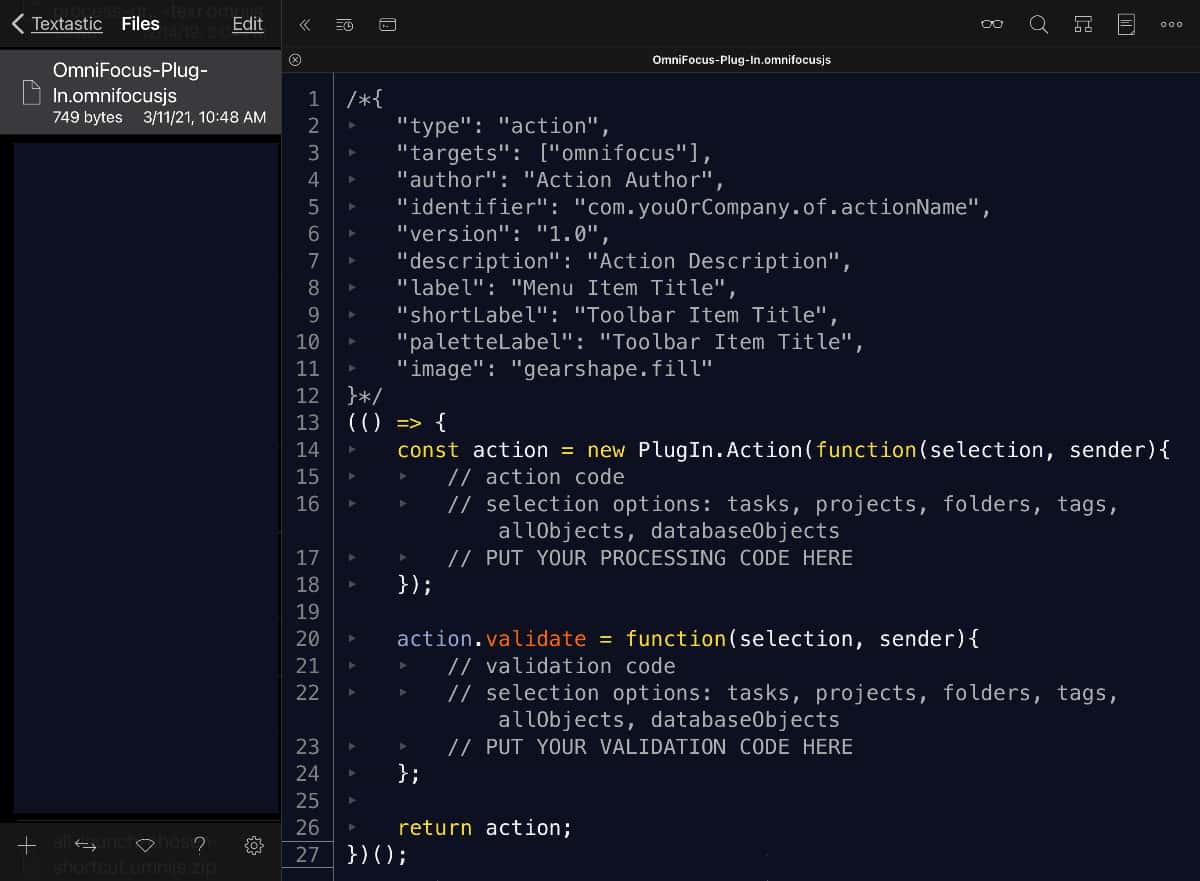
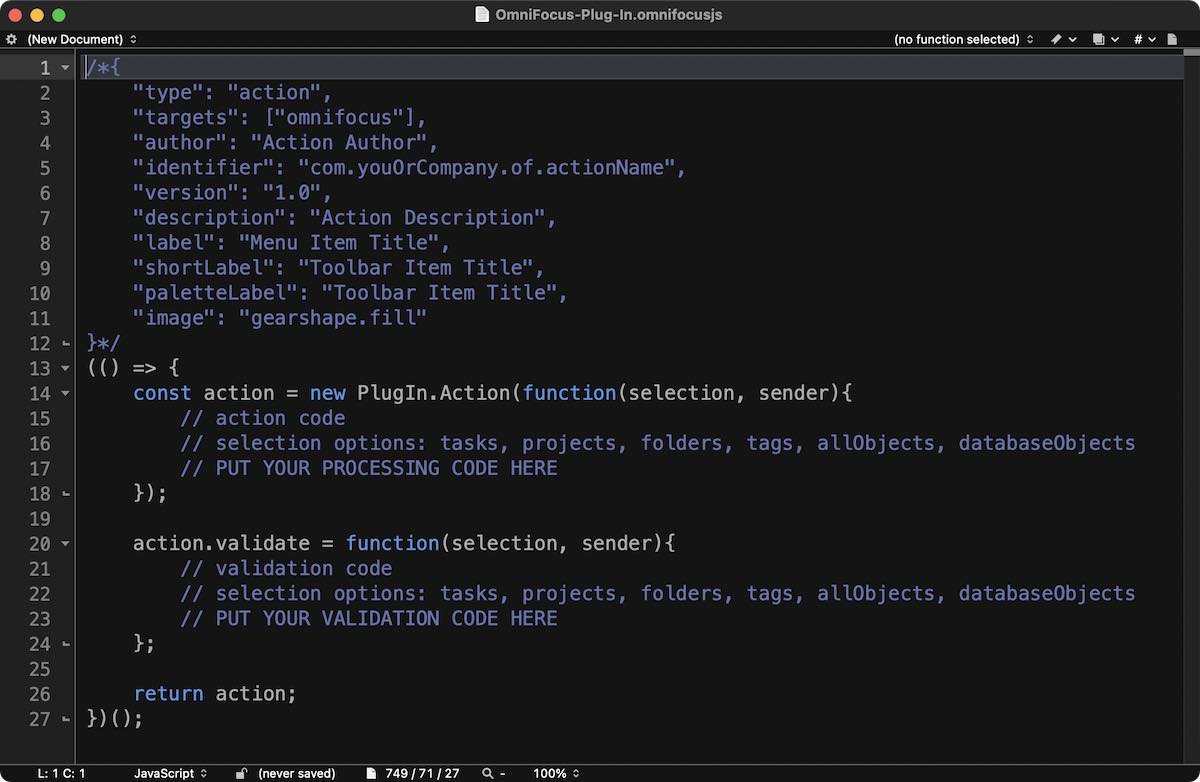
Omni Automation plug-ins are divided into two sections: the plug-in metadata properties record (lines 1-12 below), and the plug-in function code (lines 13-27 beow).
051 • Open Plug-In Template
| DO THIS ► |
|
Basic Plug-In Template
/*{"type": "action","targets": ["omnifocus"],"author": "Action Author","identifier": "com.youOrCompany.of.actionName","version": "1.0","description": "Action Description","label": "Menu Item Title","shortLabel": "Toolbar Item Title","paletteLabel": "Toolbar Item Title","image": "gearshape.fill"}*/(() => {const action = new PlugIn.Action(function(selection, sender){// action code// selection options: tasks, projects, folders, tags, allObjects, databaseObjects// PUT YOUR PROCESSING CODE HERE});action.validate = function(selection, sender){// validation code// selection options: tasks, projects, folders, tags, allObjects, databaseObjects// PUT YOUR VALIDATION CODE HERE};return action;})();
(⬇ see below ) Textastic (iPadOS)
(⬇ see below ) BBEdit (macOS)
052 • Save the Plug-In to File
| DO THIS ► | In the editor application, save the opened template to file, replacing the default name “OmniFocus-Plug-In.omnifocusjs” with “of-clear-task-tags.omnifocusjs” |
053 • Add Plug-In Template to Split-View
Now that template has been opened in your JavaScript editor application, we can alter the current view setup to display the template as we proceed with the tutorial.
| DO THIS ► |
Replace the split-screen OmniFocus view with with the opened template, so that this tutorial is on the left side and the template on the right side. On both macOS and iPadOS this is accomplished by dragging the icon of the editor application from the Dock over the right side of the split screen and releasing the cursor (or finger). |
The Plug-In Metadata Properties
A plug-in’s metadata properties define how a plug-in is integrated by the host Omni application. Here is an explanation of each metadata property:
Plug-In Metadata
/*{"type": "action","targets": ["omnifocus"],"author": "Action Author","identifier": "com.youOrCompany.of.actionName","version": "1.0","description": "Action Description","label": "Menu Item Title","shortLabel": "Toolbar Item Title","paletteLabel": "Toolbar Item Title","image": "gearshape.fill"}*/
1-10 The plug-in metadata record (key/values) determine which Omni application(s) host the plug-in; what should be displayed as the plug-in menu item in the OmniFocus Automation menu or Sharing menu; and the author and identifier of the plug-in.
2 The plug-in type, which in this example is an "action". If the plug-in was to be used as a library, this value would be: "library"
3 The plug-in targets property is an array of the lowercase names of the Omni applications in which this plug-in should be made available.
4 The author property is the name of the user, developer, or company who created the plug-in.
5 The value of the identifier property is a unique text string that is used by OmniFocus to identify and integrate the plug-in. A general format to follow is: com.YourNameOrYourCompanyName.of.nameOfAction (“of” is for OmniFocus) TIP: Avoid using spaces and special characters in the identifier.
6 The version property is expressed as a numeric string and is important to update as you deploy your plug-in. OmniFocus compares versions when you install and updated version, and will automatically prompt for replacement.
7 The value of the description property is a short text string displayed to users in the OmniFocus Plug-In Management window.
8 The value of the label property is the text for the plug-in’s menu item displayed in the Automation and Share menus.
9 The value of the shortLabel property is used to display on toolbar buttons.
10 The value of the paletteLabel property is used to display on toolbar assignment dialog.
11 The value of the image property is the name of the SF Symbol character to be used as the icon for the plug-in.
054 • Edit Plug-In Metadata
| DO THIS ► | Keeping in mind that our plug-in example will clear all tags from the selected tasks, in the editor application, edit the metadata header to include your information and a description of the plug-in: |
Plug-In Metadata Header
/*{"type": "action","targets": ["omnifocus"],"author": "YOUR-NAME","identifier": "com.YOUR-NAME.of.clear-task-tags","version": "1.0","description": "This plug-in will clear all tags from the selected tasks.","label": "Clear Tags from Tasks","shortLabel": "Clear Tags","paletteLabel": "Clear Task Tags","image": "tag.slash"}*/
The Plug-In Validation Function
Optionally, plug-ins can be designed to be only be available when specific conditions exist within the application or the app’s selected objects.
For example, our example plug-in for clearing tags from selected tasks should only be enabled in the Automation or Sharing menus when one or more tasks are selected in the application interface.
Your code for performing the conditional checks is placed within the validation function in the template (lines 20-24 in the template)
Validation Function
action.validate = function(selection, sender){// validation code// selection options: tasks, projects, folders, tags, allObjects, databaseObjects// PUT YOUR VALIDATION CODE HERE};
To assist you in validating the plug-in, two items are automatically passed into the function:
The selection object that has a value that is an array of items currently selected in the application interface: tasks, projects, folders, tags, or a collection of selected database objects (folders, projects, and tasks)
The sender object that has a value indicating the mechanism used to trigger the execution of the plug-in. (Menu Item, Toolbar Button, or null if a remote script)
Since a validation function must return a Boolean value (true or false) we can use the passed-in selection object to determine if one or more tasks are selected in OmniFocus, and return the appropriate boolean value.
If the validation function returns a value of false, the plug-in’s menu item will be disabled in the Automation Menu and will not appear on the Sharing Menu.
To determine whether one or more tasks are currently selected, we return the value of a script statement that counts the number of tasks returned by the tasks property of the selection object and compares it to zero (none):
The Validation Check Statement (true|false)
return (selection.tasks.length > 0)
If one or more tasks are selected in the application interface, this statement will return a value of true, otherwise it will return a value of false.
055 • Edit Plug-In Validation Function
| DO THIS ► | Replace the example plug-in’s validation function with a version containing the previous boolean statement. |
The Validation Function
action.validate = function(selection, sender){return (selection.tasks.length > 0)};
The Plug-In Action Function
The plug-in action function performs the work of the plug-in, which in the case of this example plug-in is clearing all tags from the tasks selected in the application interface.
The Action Function
const action = new PlugIn.Action(function(selection, sender){// action code// selection options: tasks, projects, folders, tags, allObjects, databaseObjects// PUT YOUR PROCESSING CODE HERE});
As with the validation function, the action function also receives the selection and sender objects as input to the function. (line 01 above)
The value of the selection object is an array of object references to the selected tasks. The script for processing each of the selected tasks uses the JavaScript forEach(…) function to iterate the list of tasks, applying the clearTags() function of the Task class to each selected task:
Clear Tags from Selected Tasks
selection.tasks.forEach(task => task.clearTags())
056 • Edit Plug-In Action
| DO THIS ► | Replace the plug-in template’s action declaration (removing the existing comments) so that it contains the previous script processing statement: |
The Action Function
const action = new PlugIn.Action(function(selection,sender){selection.tasks.forEach(task => task.clearTags())});
With your edits saved, the completed plug-in code should look similar to this:
Clear Tags Plug-In
/*{"type": "action","targets": ["omnifocus"],"author": "YOUR-NAME","identifier": "com.YOUR-NAME.of.clear-task-tags","version": "1.0","description": "This plug-in will clear all tags from the selected tasks.","label": "Clear Tags from Tasks","shortLabel": "Clear Tags","paletteLabel": "Clear Task Tags","image": "tag.slash"}*/(() => {const action = new PlugIn.Action(function(selection,sender){selection.tasks.forEach(task => task.clearTags())});action.validate = function(selection, sender){return (selection.tasks.length > 0)};return action;})();
057 • Replace Editor with OmniFocus in Split-View
| DO THIS ► | Using the same “drag-icon-from-Dock” technique you employed previously, replace the editor application with OmniFocus in the right side view. |
Installing the Plug-In
Now that the plug-in has been created and edited, you’re ready to install the plug-in in OmniFocus.
058 • Install the Plug-In
| DO THIS ► |
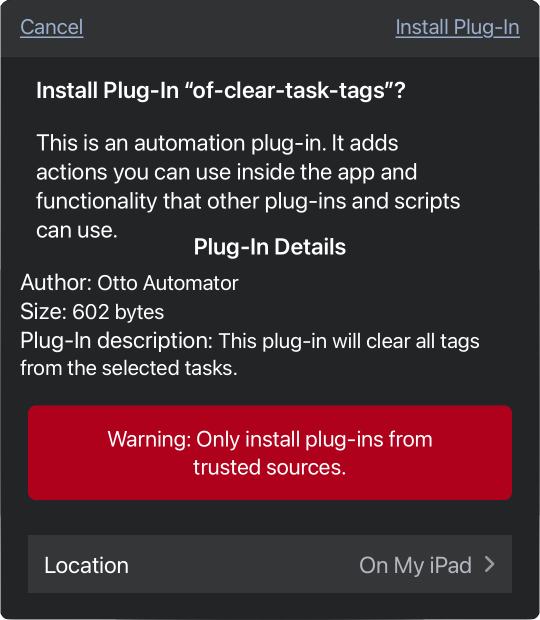
(iPadOS) In your editor application, activate the Share menu for plug-in file, and TAP|CLICK the OmniFocus icon in the list of apps in which to open the plug-in. In the forthcoming OmniFocus plug-in installation dialog TAP|CLICK “Install Plug-In” button at the top right of the dialog. |
| DO THIS ► |
(macOS) To trigger the Omni Plug-In installation process, open the plug-in file from the Finder. If BBEdit is your editor application, Control-Click the plug-in file name in the “Open Documents List” view on the left and select “Open with Finder” from the contextual menu. |
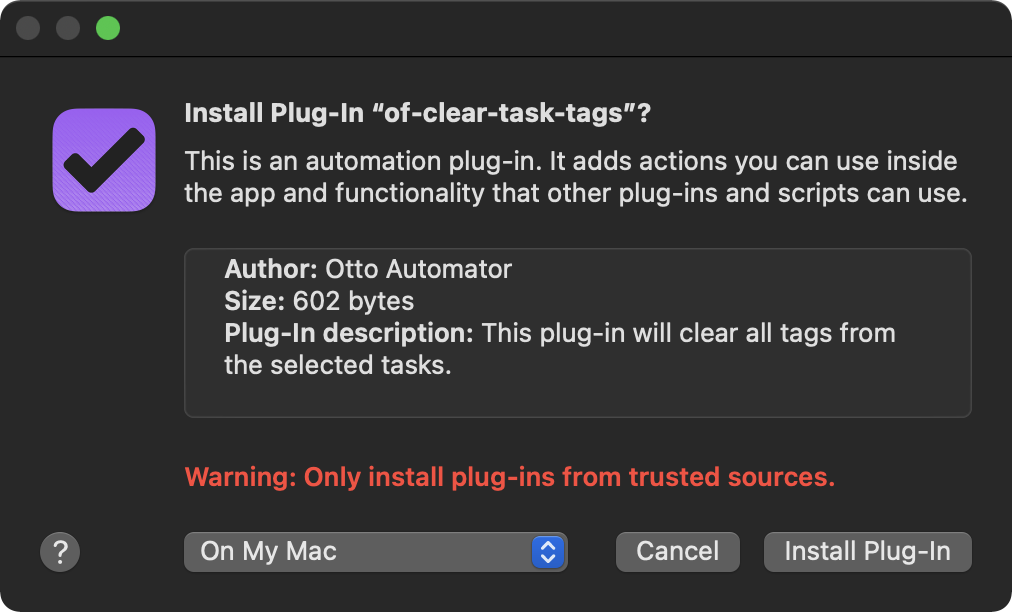
| DO THIS ► | In the installation dialog, select the “Install Plug-In” button at the bottom right of the dialog. |
Using the Plug-In
Now that the plug-in is installed, let’s use it to remove the tags from the previously created task: “Staff Meeting”
059 • Select Task “Staff Meeting”
| DO THIS ► | In OmniFocus, switch to the Inbox Perspective and select the previously created task: “Staff Meeting” |
060 • Execute the Plug-In
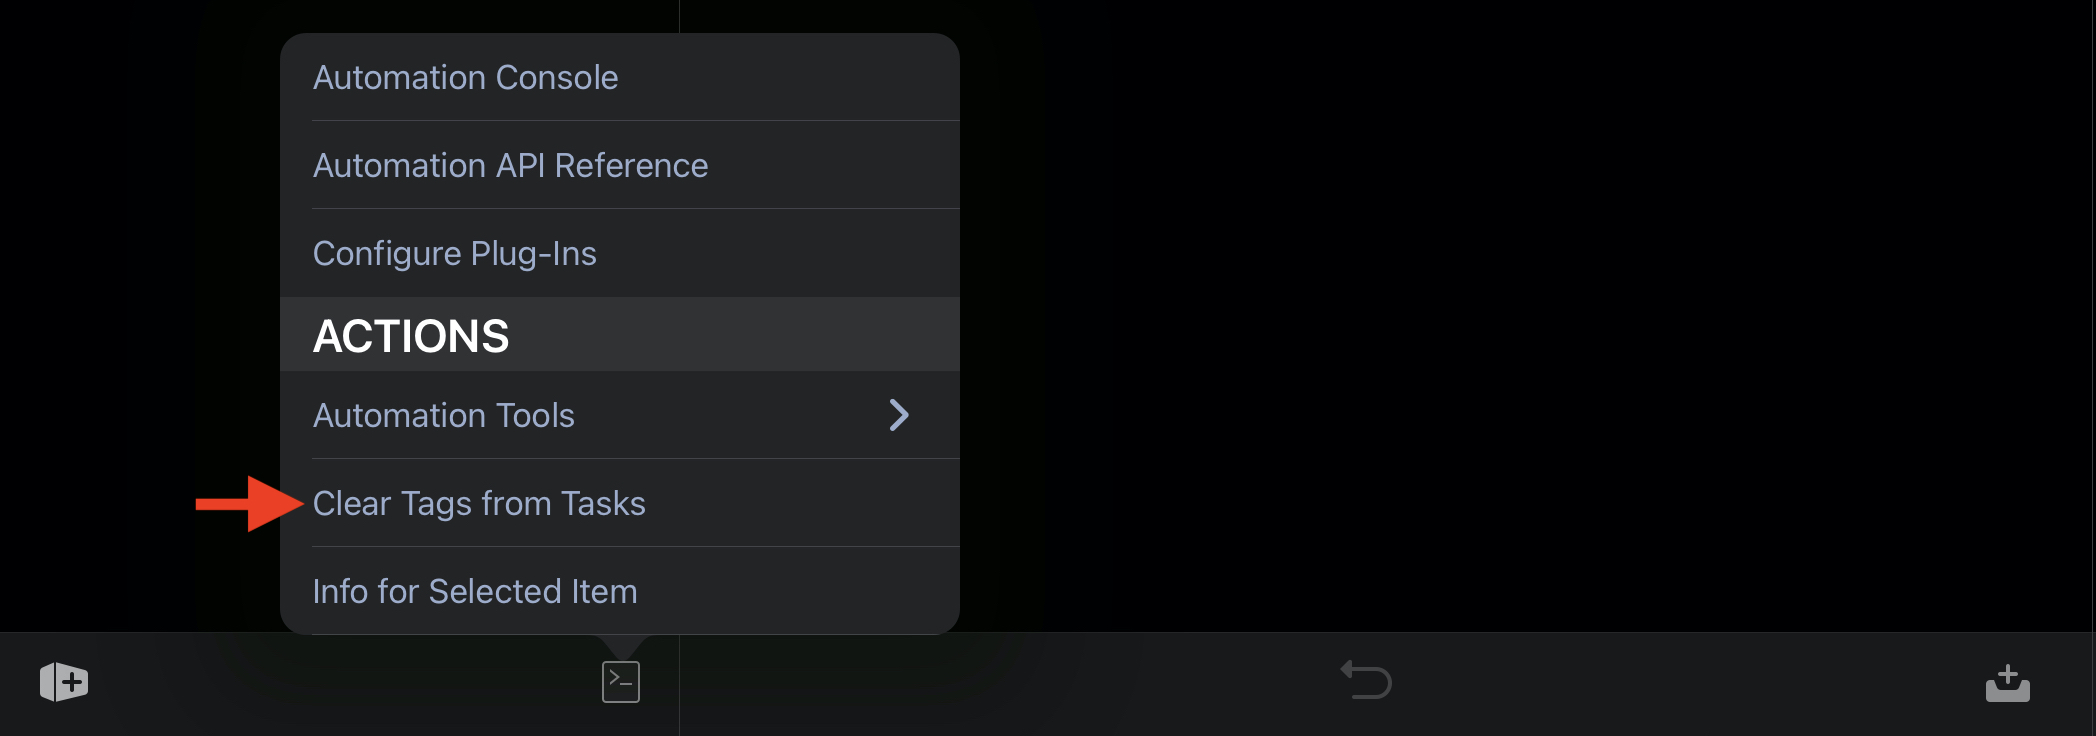
| DO THIS ► | (iPadOS) TAP|CLICK the Automation Menu at the bottom left of the window, and then TAP|CLICK the plug-in title: “Clear Tags from Tasks” |
As an alternative, you can select the plug-in from the contextual Share menu:
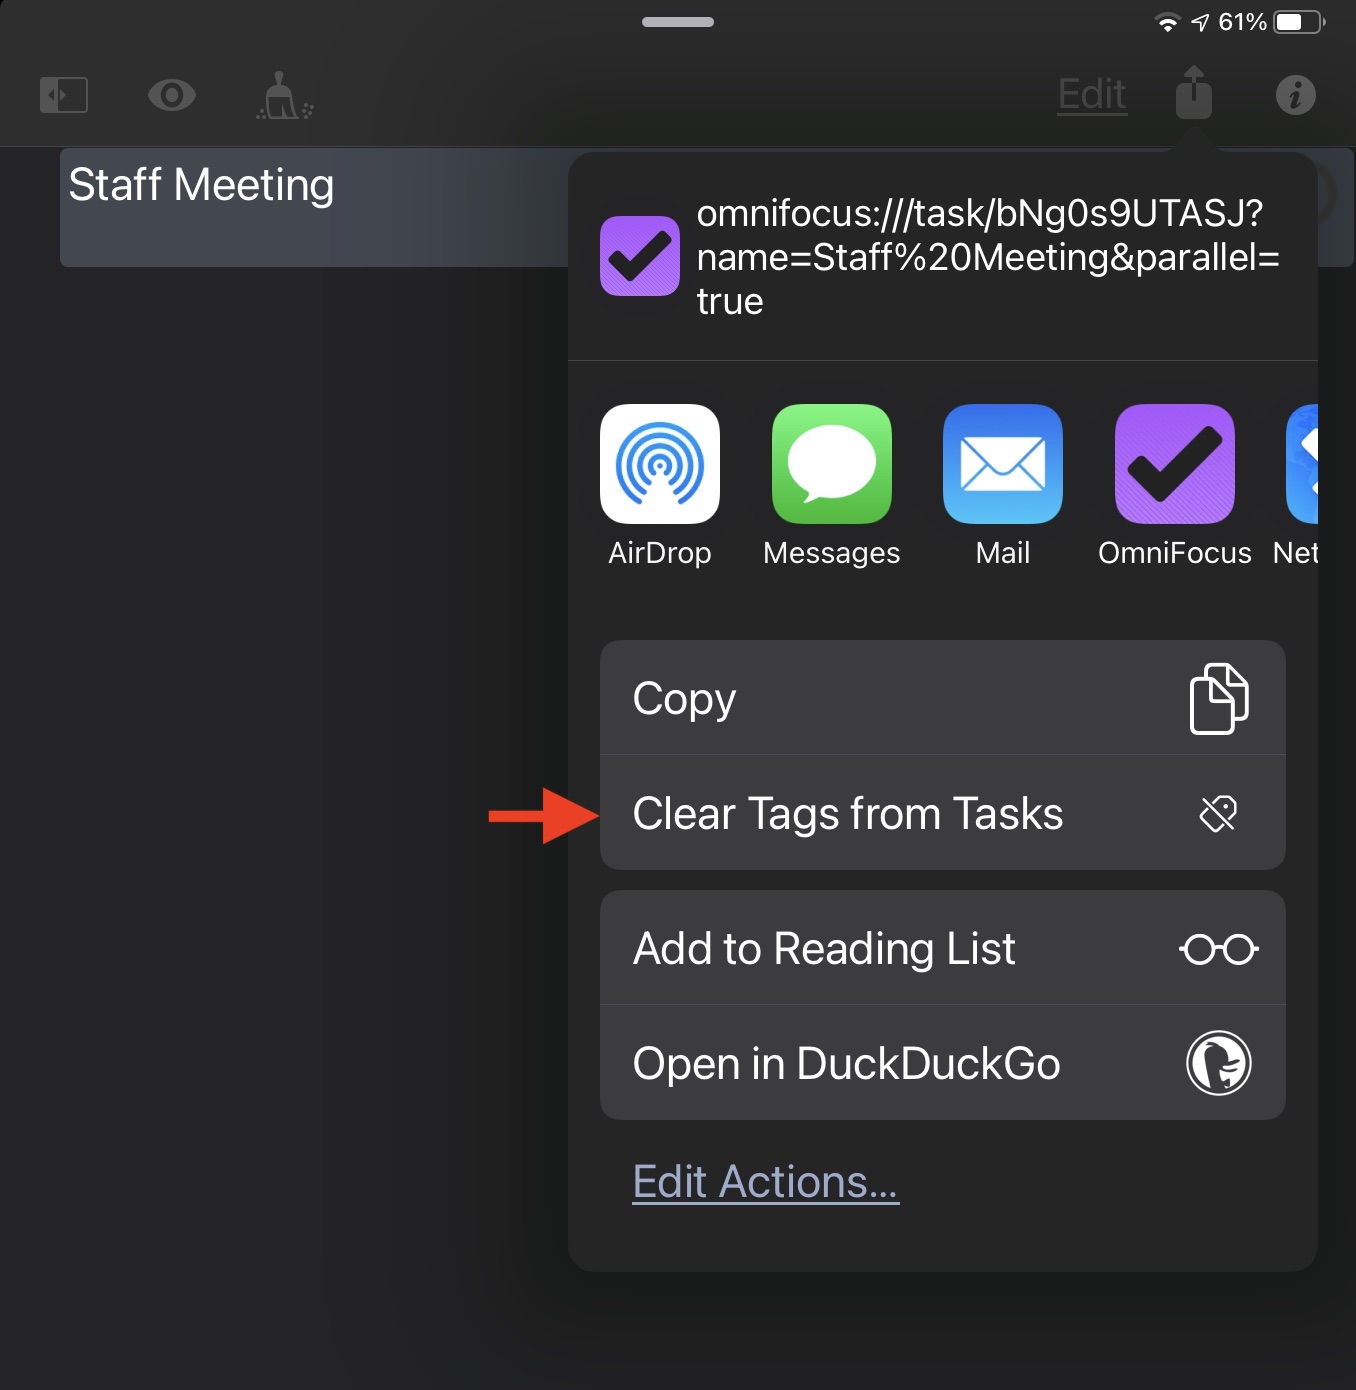
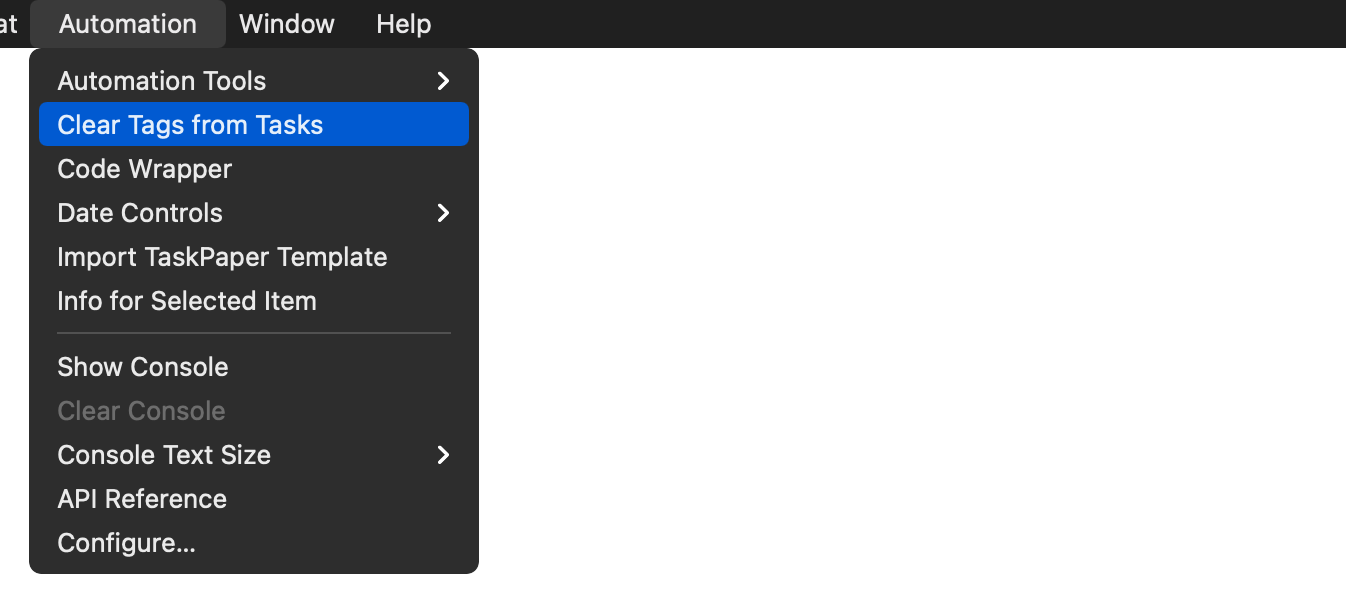
| DO THIS ► | (macOS) Select “Clear Tags from Tasks” from the Automation Menu at the top of the window. |
All assigned tags will be cleared from the selected tasks.
Managing Plug-Ins
All of the Omni applications offer extensive control of installed plug-ins. Let’s use those controls to set a keyboard shortcut to the installed plug-in.
061 • Assign Keyboard Shortcut
| DO THIS ► |
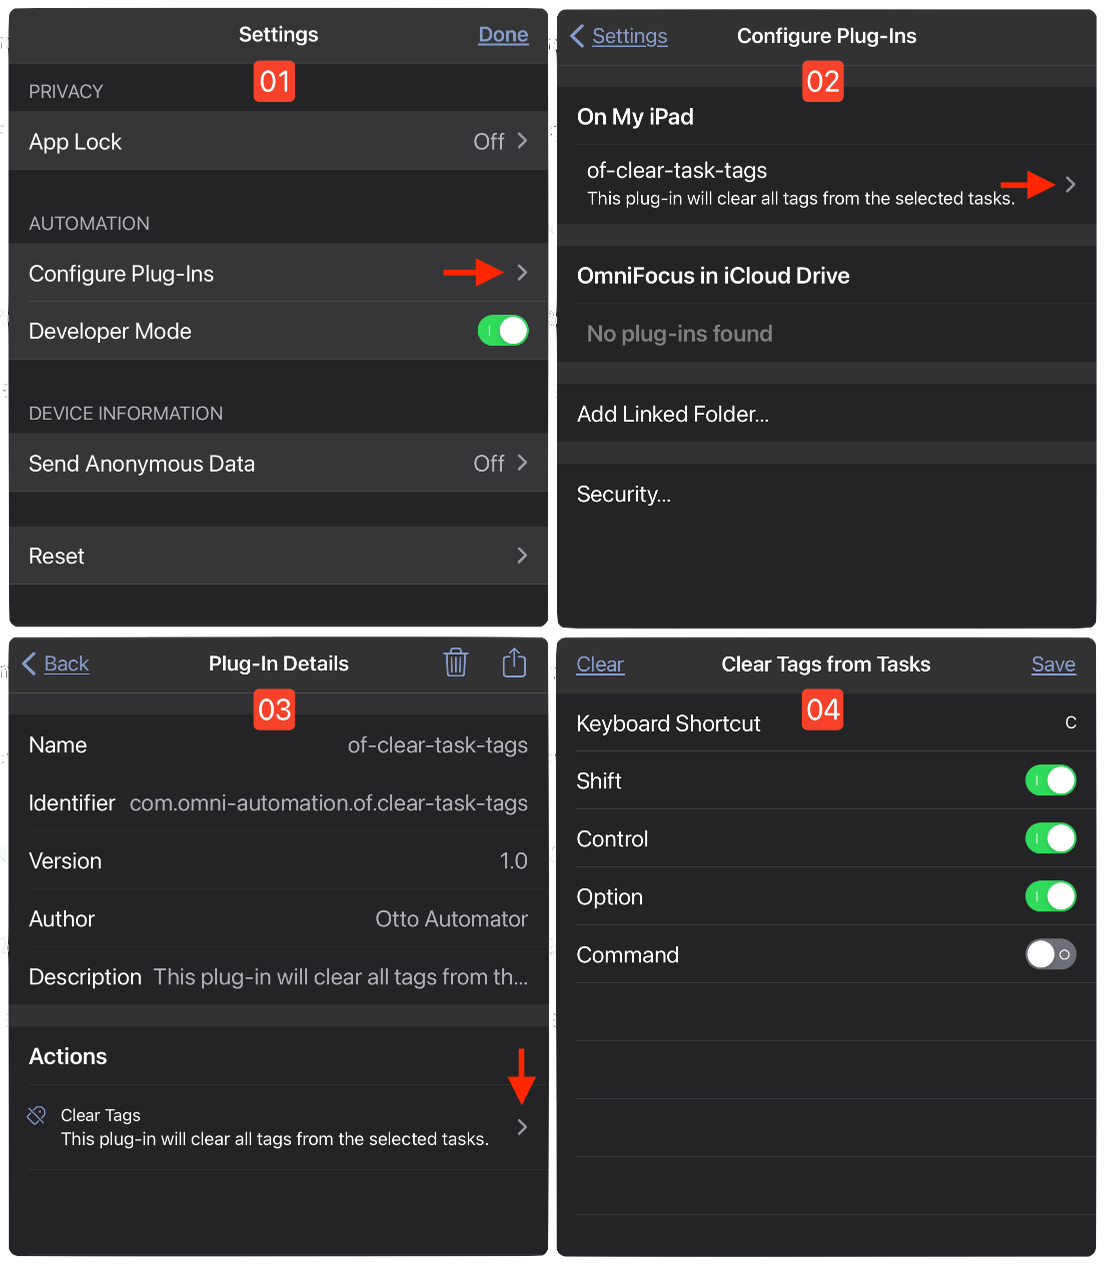
(iPadOS) In the Settings panel 01 select the option for “Configure Plug-Ins.” In the forthcoming “Configure Plug-Ins” pane 02 tap the right arrow button for the installed plug-in. In the forthcoming “Plug-In Details” pane 03 TAP|CLICK the right arrow button for the installed plug-in’s action. In the forthcoming pane 04 enter the keyboard combination for the plug-in keyboard shortcut. TAP|CLICK the “Save” button and back out of the panes. |
| DO THIS ► | (macOS) Summon the plug-in management tools by selecting the “Configure…” menu option from the Automation Menu. |
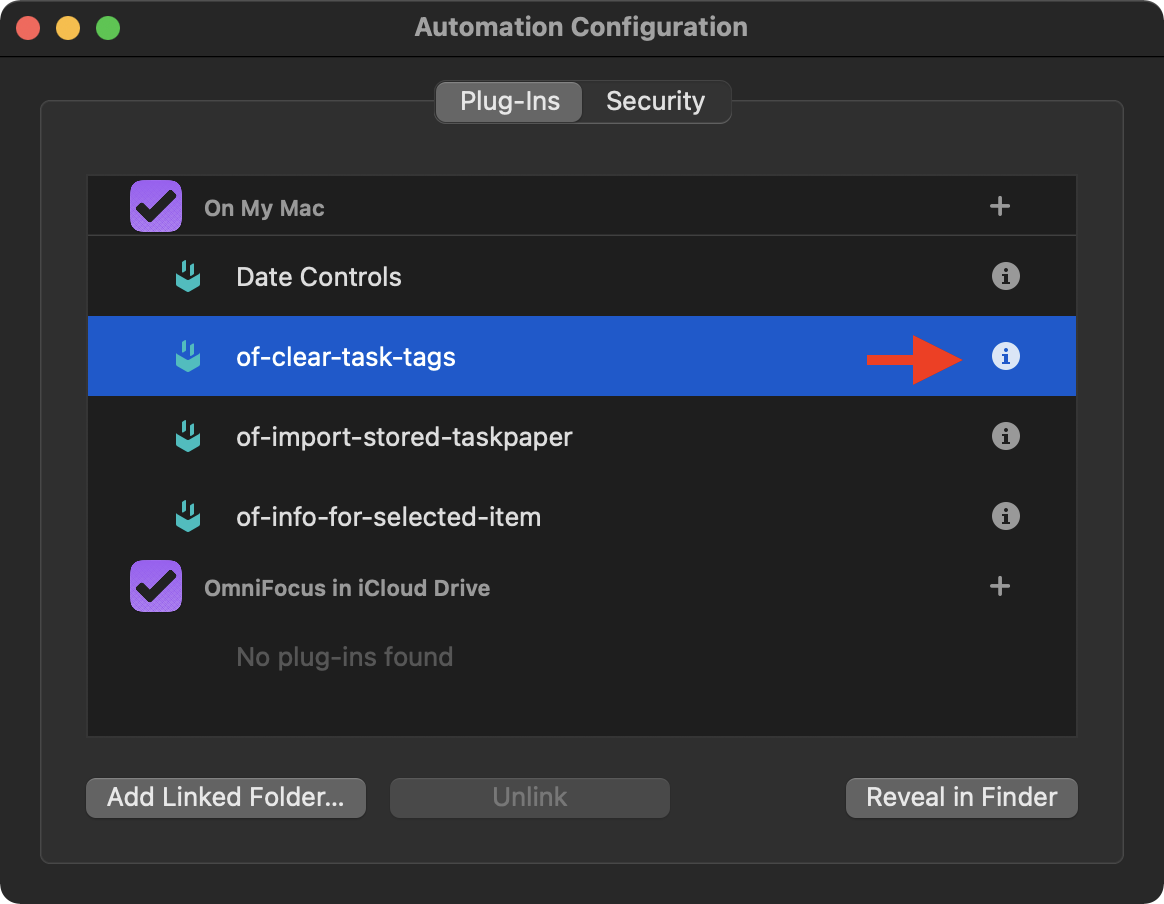
| DO THIS ► | (macOS) (above) In the “Automation Configuration” dialog, select the plug-in from the list of installed plug-ins and click the information control at the right of the plug-in entery. |
| DO THIS ► |
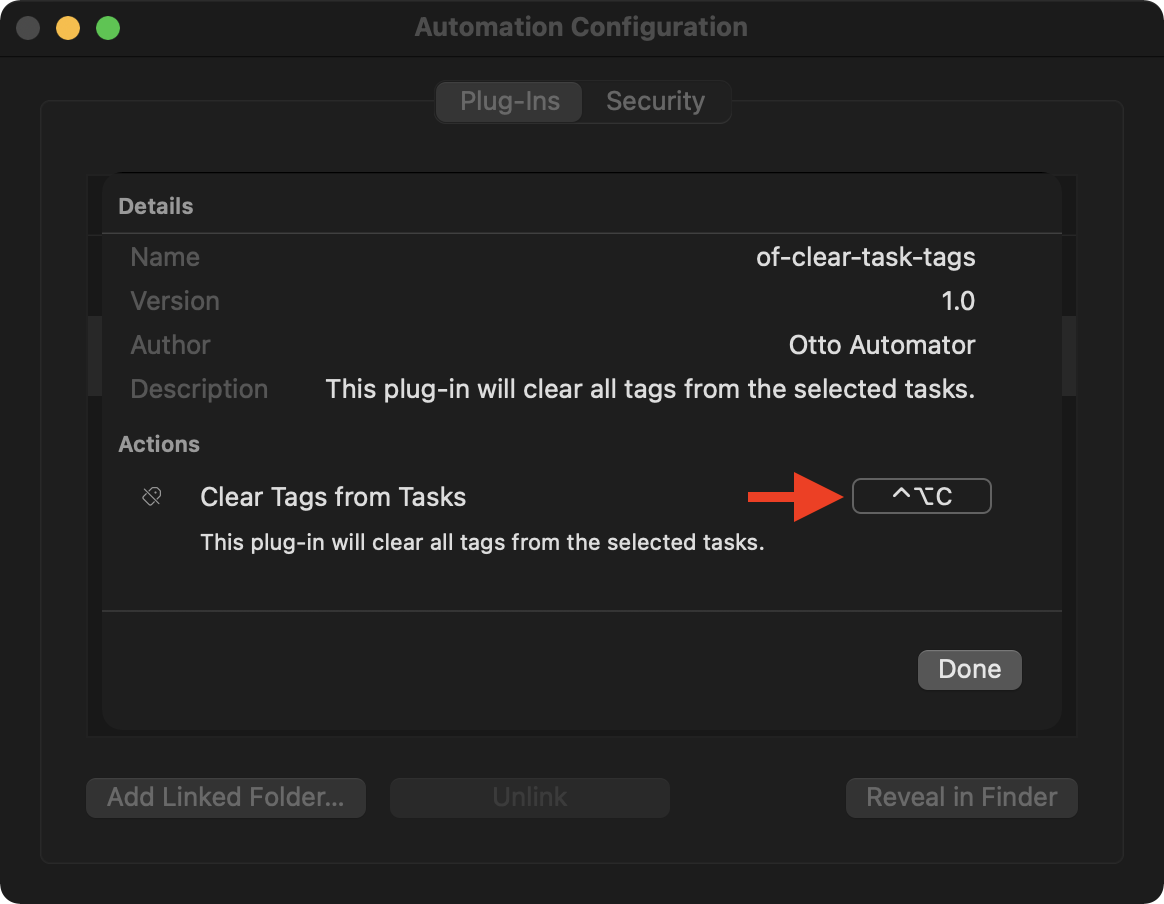
(macOS)(above) Click into the text input field to the right side of the plug-in’s action, and enter the keyboard shortcut to assign to the plug-in. Click the “Done” button and close the “Automation Configuration” window. |
More OmniFocus Plug-In Templates
This website hosts online Template Generator forms for generating Omni Automation plug-ins for each of the Omni apps, including the Template Generator for OmniFocus that contains many preset plug-in templates for you to use.
Plug-In Summary
In this section you learned:
How to create, install, and run an Omni Automation plug-in for OmniFocus.
How to access the built-in plug-in management tools.
#7 • Cleanup & Restore
Now that you’ve completed the tutorial, there’s a few more scripts to run before finishing.
062 • Delete the “Staff Meeting” Task
| DO THIS ► | Enter and run the following script that will remove the “Staff Meeting” task from the Inbox: |
Delete Meeting Task
deleteObject(taskNamed("Staff Meeting"))
063 • Delete the “4-Step Success” Project
| DO THIS ► | Enter and run the following script that will remove the “4-Step Success” project from the library array: |
Delete Demo Project
deleteObject(projectNamed("4-Step Success"))
064 • Restore Inbox
| DO THIS ► | To return the archived tasks to the Inbox, TAP|CLICK the Inbox Restore button, whose script will move the contents of the “Inbox-Backup” project back into the Inbox and then delete the empty backup project. |
What’s Next?
Congratulations on finishing an introductory tutorial for Omni Automation in OmniFocus!
To continue your use and study of Omni Automation in OmniFocus, visit: